CLOUDEX for Admins only
- Admin settings
- Office365: How to get TenantId, ClientId and ClientSecret?
- How to change APPLICATION Callback URL in Azure Portal?
- Shipment integrations
Admin settings
Office365: How to get TenantId, ClientId and ClientSecret?
If you use Microsoft office 365 for email sending. Your company Microsoft admin need to get following settings from Azure AD Application
-
Directory (Tenant) ID
-
Application (Client) ID
-
Client Secret Value
These three values are required for integrating CLOUDEX TMS with Microsoft Graph using OAuth2.
1️⃣ Sign in to Azure Portal
Open: https://portal.azure.comSign in with a Microsoft 365 Global Admin or Application Administrator account.
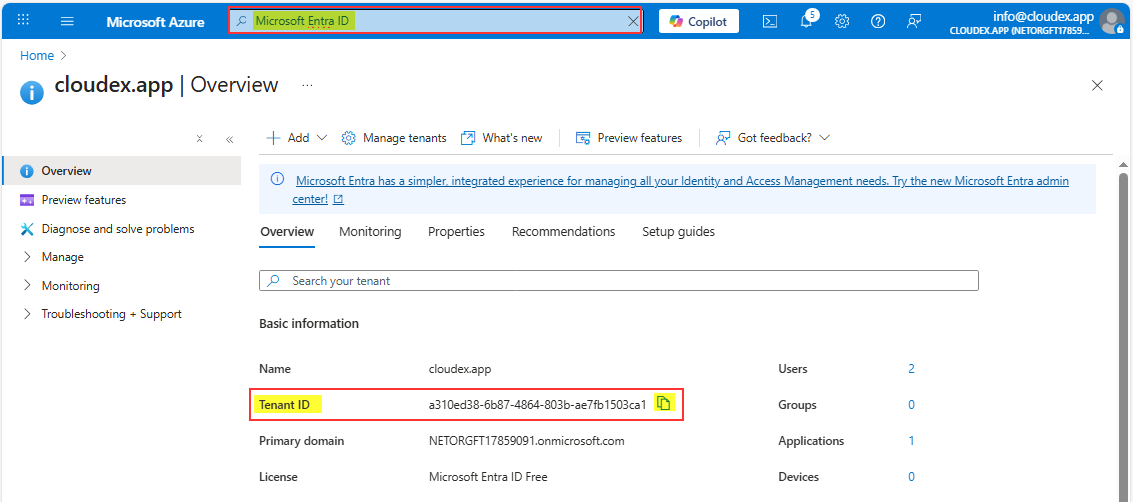
2️⃣ Open “Microsoft Entra ID” (Azure AD)
3️⃣ Create a new App Registration
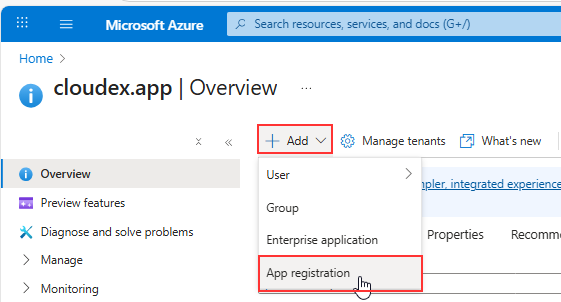
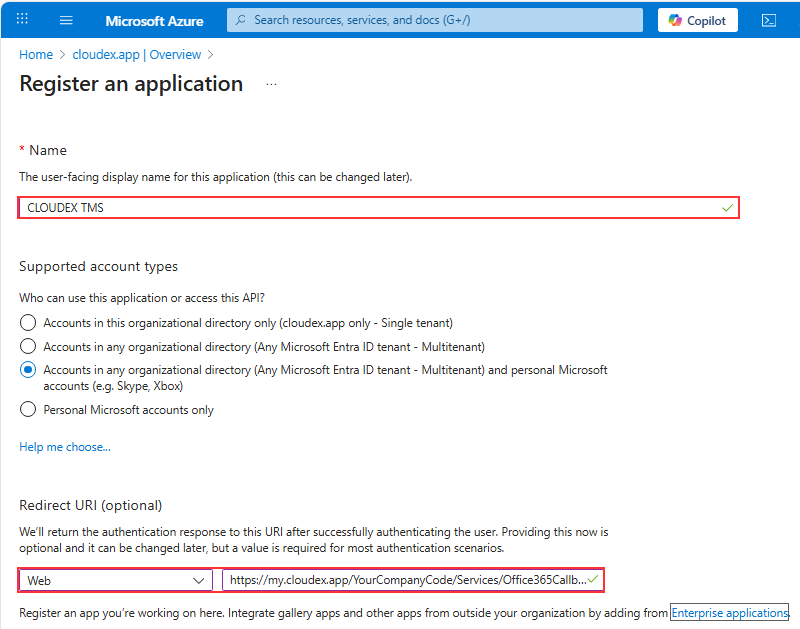
| Field | Value |
|---|---|
| Name | CLOUDEX TMS Email Integration (or any name) |
| Supported account types | ✔️ Accounts in any organizational directory (multitenant) |
| Redirect URI |
Select Web → Enter your redirect:
1) Replace 2) Redirect URL is case-sensitive |
Click Register.
4️⃣ Get the Tenant ID and Client ID
After creation, you will be redirected to the app’s Overview page.
Here you will see:
✔ Directory (Tenant) ID
✔ Application (Client) ID
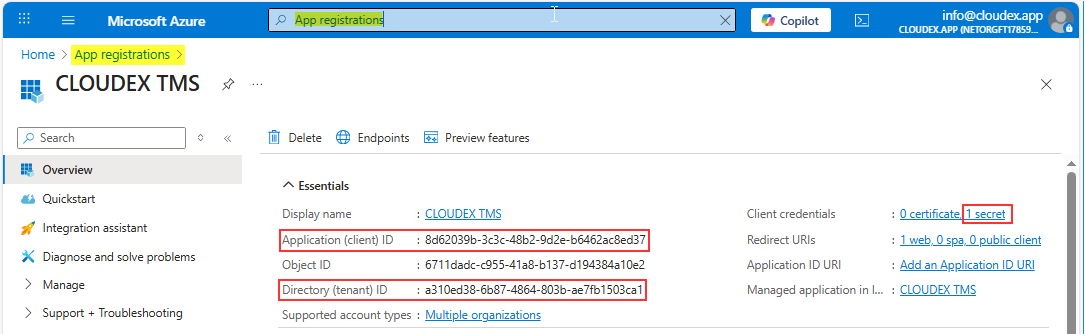
You already have 2/3 values.
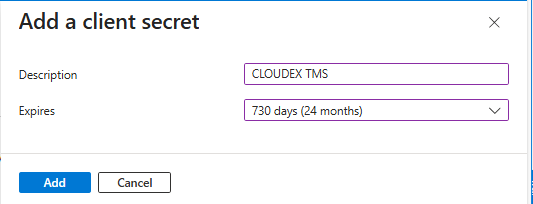
5️⃣ Create Client Secret
-
Click New client secret
-
Enter a name:
CLOUDEX Secret -
Choose expiration:
-
6 months (not recommended)
-
12 months
-
24 months (recommended)
-
Or “Custom”
-
-
Click Add
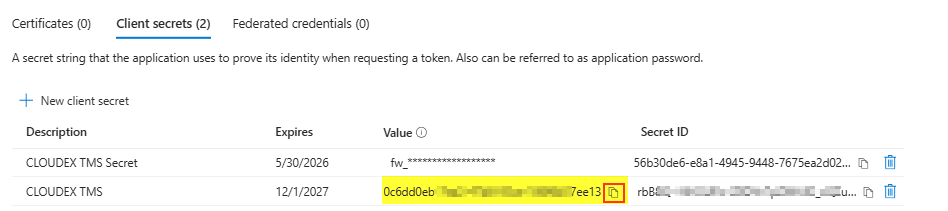
Copy the Client Secret VALUE immediately.
You will never be able to see it again later.
Store it securely (Azure Key Vault, password manager, etc).
Now you have:
-
ClientId
-
TenantId
-
ClientSecret Value
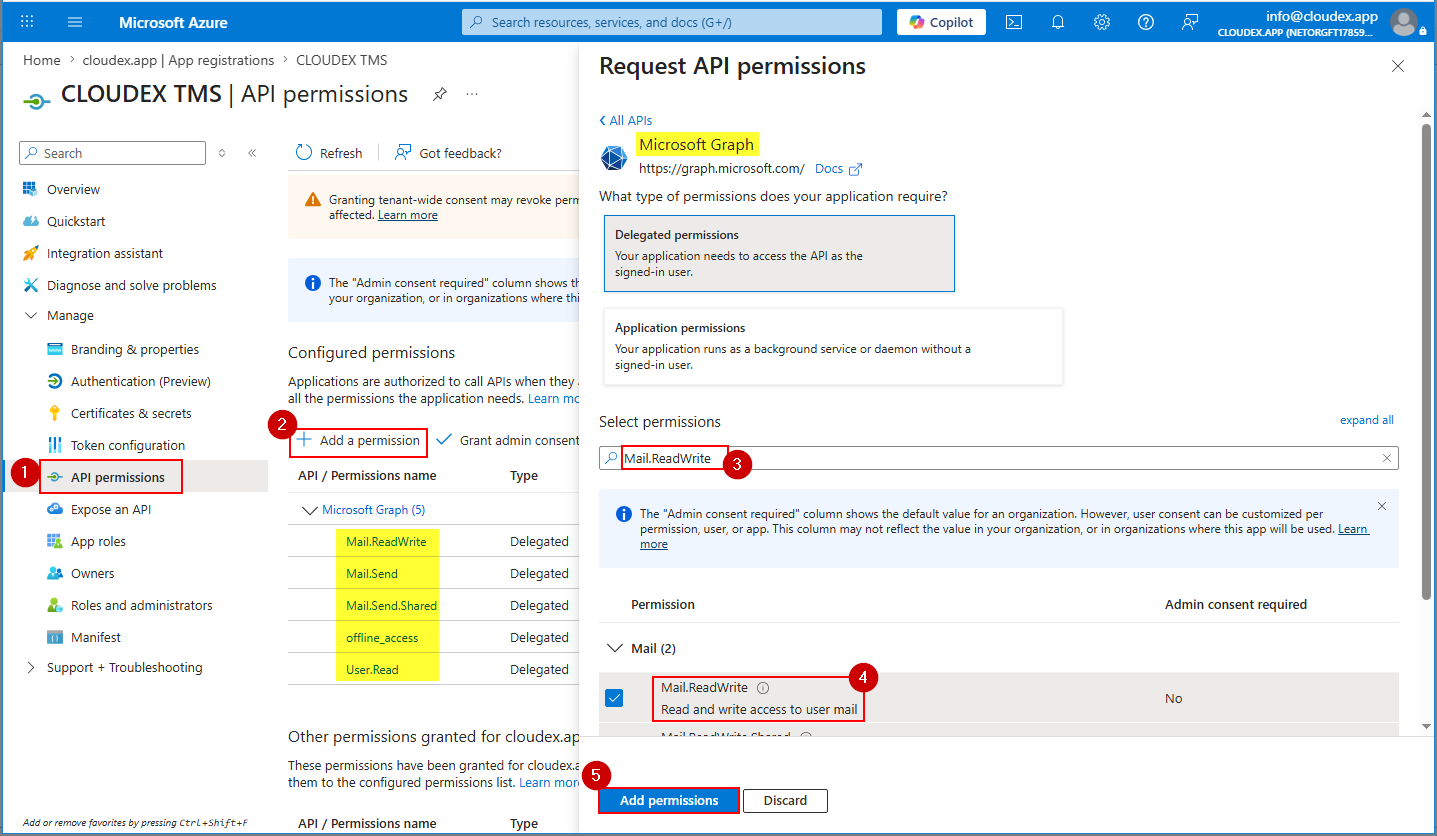
6️⃣ Add Required API Permissions
Click:
-
Add a permission
-
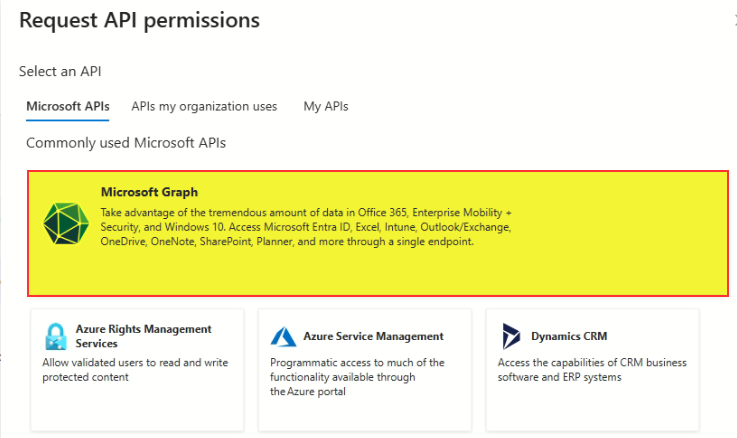
Microsoft Graph
-
Delegated permissions
Search + select:
✔ Mail.ReadWrite
✔ Mail.Send
✔ Mail.SendShared
✔ offline_access
✔ User.Read
!!! If email sending does not work, then add also following permissions
✔ email
✔ openid
✔ profile
Then click Add permissions.
Then click Grant admin consent.
Can be in new interface need to choose Microsoft Graph API
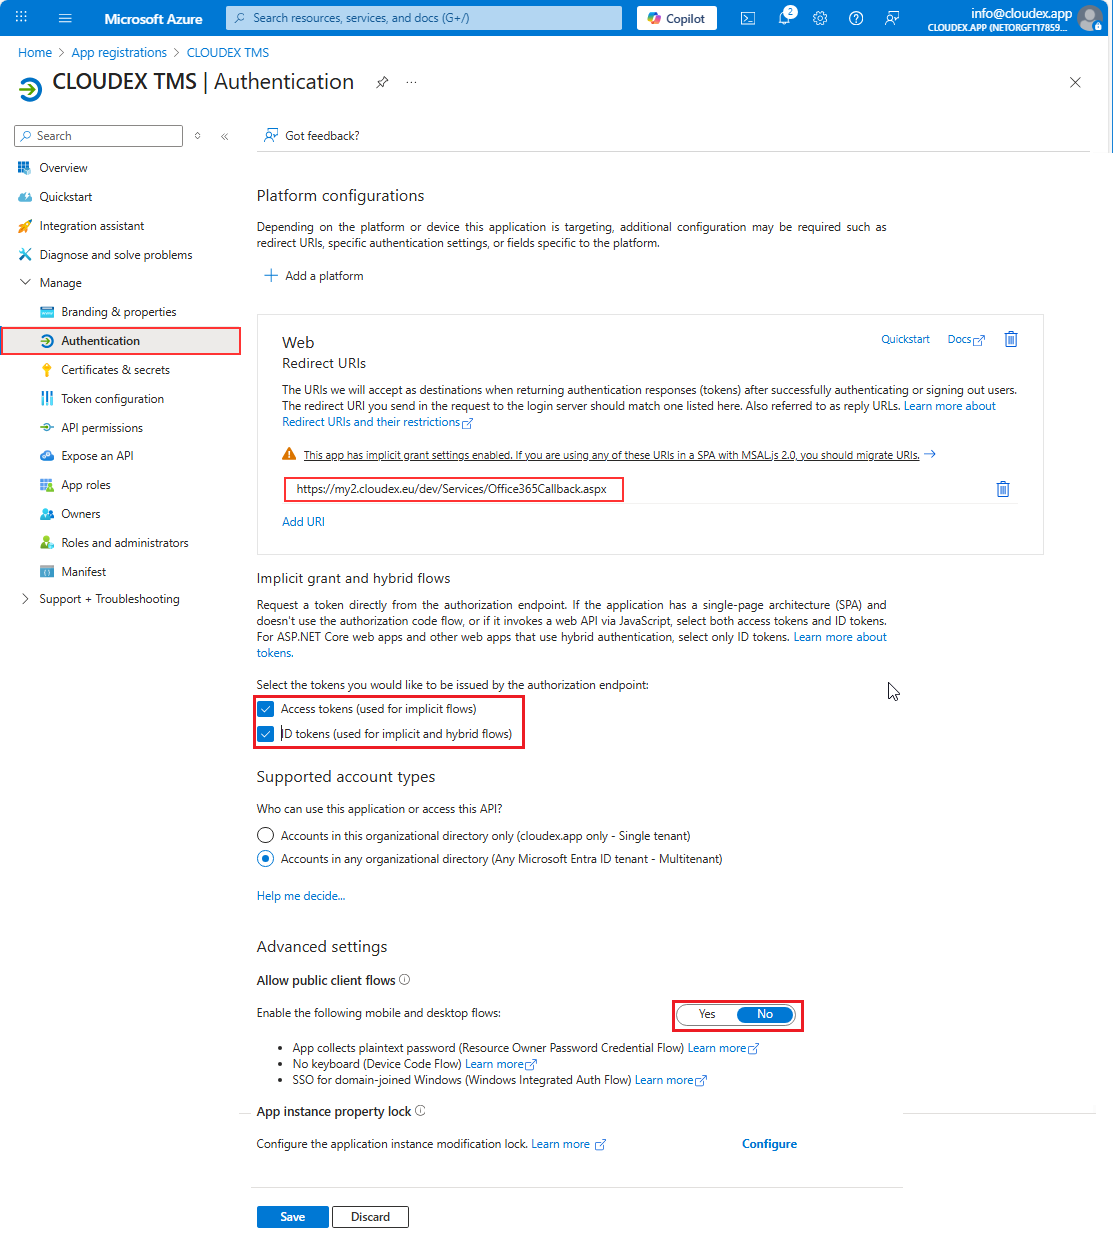
7️⃣ Final Check: Authentication Settings
Ensure:
✔ Your redirect URI is correct
✔ “Allow public client flows” is OFF
✔ “Access tokens” and “ID tokens” are ON
🎉 DONE — Values ready to use
You now have everything:
| Parameter | Where to find it |
|---|---|
| TenantId | App → Overview → Directory (tenant) ID |
| ClientId | App → Overview → Application (client) ID |
| ClientSecret | App → Certificates & Secrets → Value |
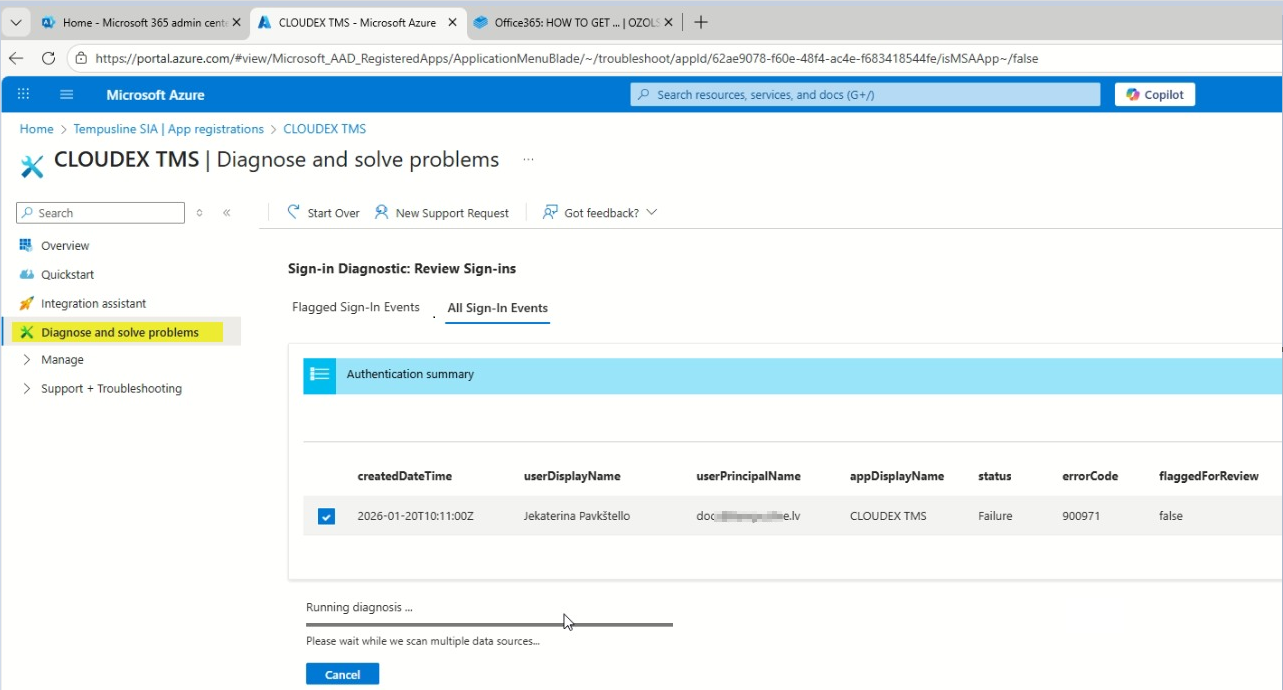
Problem solution
In case you have any problems sending out emails from CLOUDEX TMS or Ozols you can run "Diagnose and solve problems" tool
How to change APPLICATION Callback URL in Azure Portal?
1️⃣ Open Azure Portal
Go to: https://portal.azure.com
Sign in using a Global Administrator or Application Administrator account.
2️⃣ Open Microsoft Entra ID
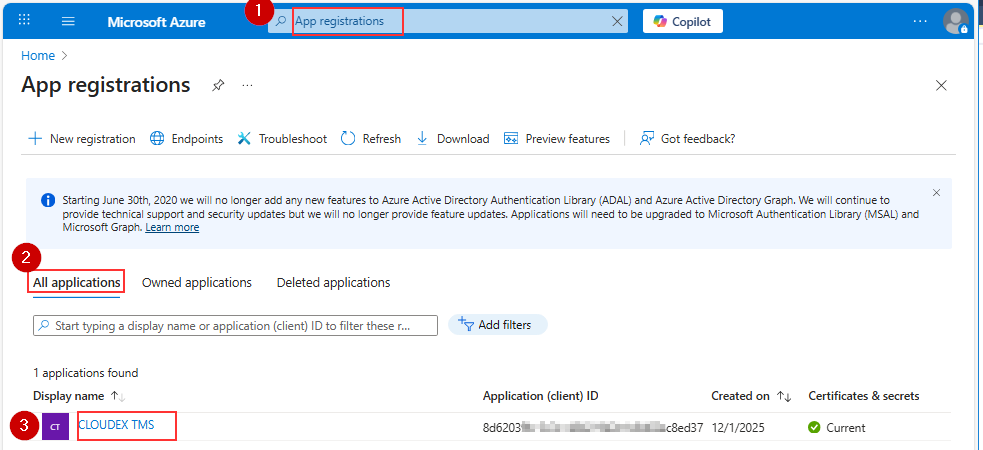
Choose Redirect URLs
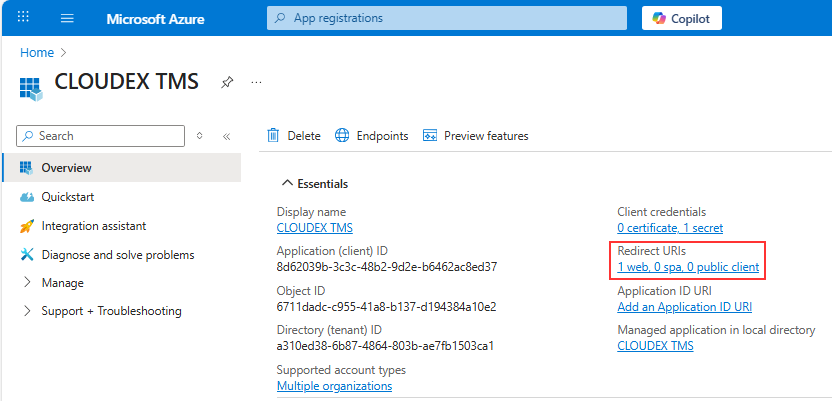
!!!! In YourCompanyCode you should place your company code https://my.cloudex.app/YourCompanyCode/Services/Office365Callback.aspx
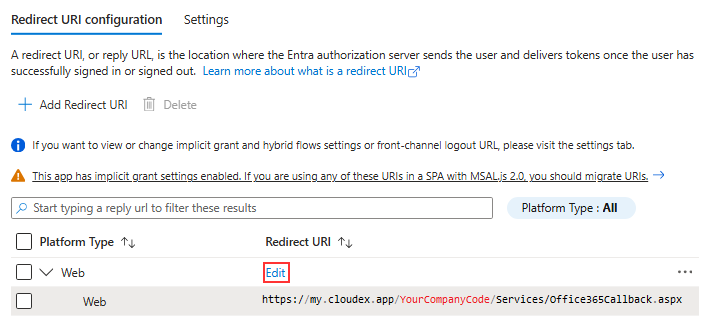
Redirect URL should be under Web NOT under SIngle-application
Shipment integrations
How to send shipment data to Cloudex TMS via API?
Use the Cloudex TMS API when shipments created in another system need to be automatically imported into Cloudex TMS.
This is typically the first step of a shipment integration between an external TMS, ERP, customer system, or another application and Cloudex TMS.
Before you start
You need:
- access to the Cloudex TMS API;
- a valid Cloudex API key;
- access to the Cloudex TMS API documentation.
See: How to create API key
Full Cloudex TMS API documentation: https://my.cloudex.lv/cloudex-api/swagger/index.html
Which endpoint should be used?
To create/import a shipment in Cloudex TMS, use the: shipment-manifest endpoint.
The external system sends the shipment information to Cloudex TMS using this endpoint.
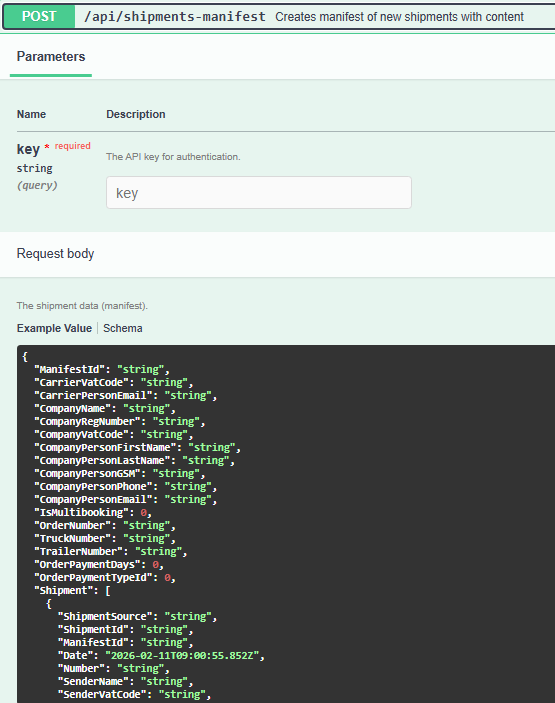
Integration flow
A typical shipment integration works as follows: External system → Shipment manifest → Cloudex TMS
Related articles
How to send shipment milestones to Cloudex TMS via API?
Use the Cloudex TMS API milestones endpoint when an external system needs to update Cloudex TMS about the progress of an existing shipment.
Examples include shipment milestone/status updates such as:
- Shipment loaded;
- Shipment delivered.
Before you start
The shipment must already exist in Cloudex TMS and the external system must be able to identify which Cloudex TMS shipment the milestone belongs to.
You also need:
- access to the Cloudex TMS API;
- a valid Cloudex API key.
Full Cloudex TMS API documentation: https://my.cloudex.lv/cloudex-api/swagger/index.html
Which endpoint should be used?
To send shipment milestone/status updates to Cloudex TMS, use the: milestones endpoint.
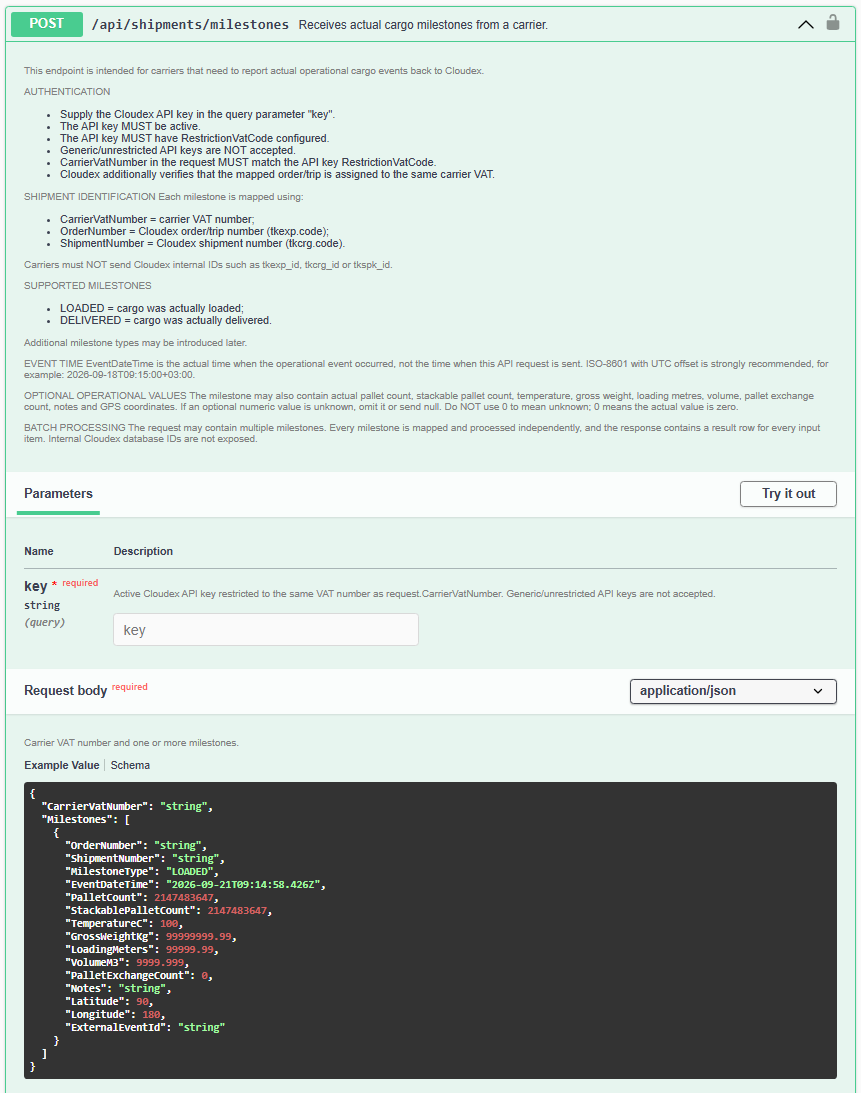
Integration flow
A typical integration works as follows: External system → Shipment milestone/status → Cloudex TMS
For example, when the shipment is marked as delivered in the connected external system, the corresponding milestone can be sent to Cloudex TMS.
This allows Cloudex TMS to keep the shipment status synchronized with the connected system without requiring users to update the shipment manually.
Related articles
How to send shipment documents to Cloudex TMS via API?
Use the Cloudex TMS API documents endpoint when documents from an external system need to be attached to a shipment in Cloudex TMS.
Typical examples are:
- POD (Proof of Delivery);
- CMR;
- other shipment-related documents.
Before you start
The shipment must already exist in Cloudex TMS and the external system must be able to identify which shipment the document belongs to.
You also need:
- access to the Cloudex TMS API;
- a valid Cloudex API key.
Full Cloudex TMS API documentation: https://my.cloudex.lv/cloudex-api/swagger/index.html
Which endpoint should be used?
To send shipment documents to Cloudex TMS, use the: documents endpoint.
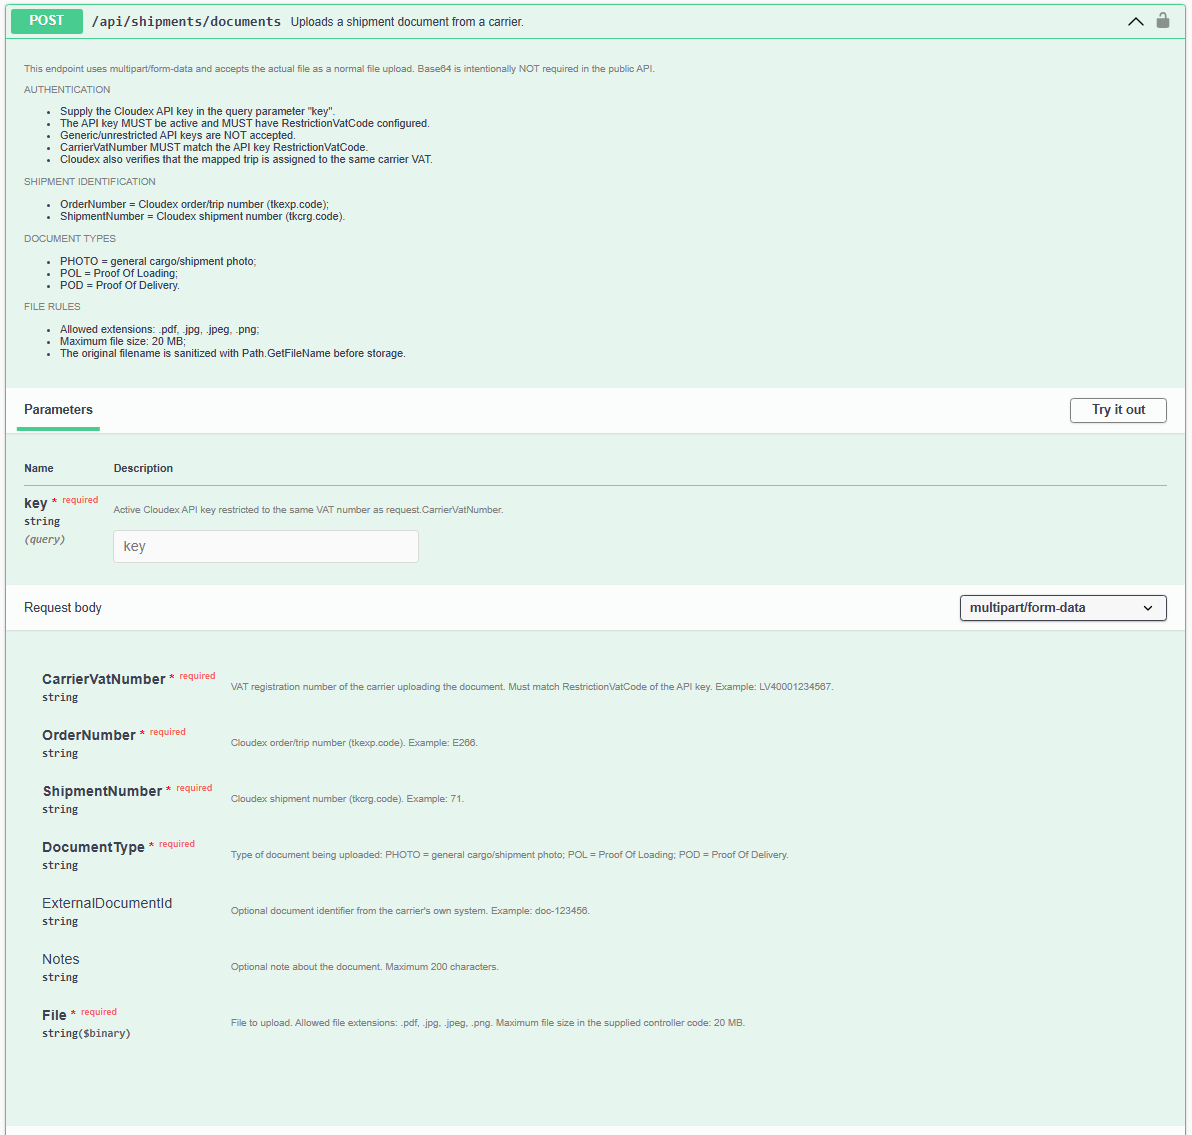
Integration flow
A typical document integration works as follows: External system → Shipment document → Cloudex TMS shipment
For example, once a signed POD or CMR becomes available in the connected system, it can be sent automatically to Cloudex TMS and linked to the corresponding shipment.
This reduces the need to manually download documents from one system and upload them again into Cloudex TMS.