# Client orders

# How to create a new client order?

- [How to create a new Client order?](https://help.cloudex.app/link/14#bkmrk-1.-registering-a-new)
- [How to add a new client?](https://help.cloudex.app/link/14#bkmrk-3.-adding-a-new-cust)
- [How to Add a Partner from the EU VAT register?](https://help.cloudex.app/link/14#bkmrk-4.-how-to-add-a-part)

### How to create a new Client order?

Navigation path: **New → Client Order**

[![2026_07_17_11_47_53_Document2_Word.png](https://help.cloudex.app/uploads/images/gallery/2026-07/2026-07-17-11-47-53-document2-word.png)](https://help.cloudex.app/uploads/images/gallery/2026-06/fwQimage.png)

### How to add a New client?

1. Click on the three dots to open additional options.
2. Click **New** to open the **new partner** form.

[![image.png](https://help.cloudex.app/uploads/images/gallery/2026-06/scaled-1680-/ekoimage.png)](https://help.cloudex.app/uploads/images/gallery/2026-06/ekoimage.png)

### How to Add a Partner from the EU VAT Register?


1. Paste the **VAT number**.
2. Click the button **[![image-1720764926448.png](https://doc.ozols.lv/uploads/images/gallery/2024-07/scaled-1680-/image-1720764926448.png)](https://doc.ozols.lv/uploads/images/gallery/2024-07/image-1720764926448.png)** to automatically fill in the fields.

[![VAT.gif](https://help.cloudex.app/uploads/images/gallery/2026-07/vat.gif)](https://help.cloudex.app/uploads/images/gallery/2026-06/5l0image.png)

# How to Add Multiple Loading or Delivery Addresses – Multibooking?

**Multibooking** is used when a single customer order includes multiple pickup or delivery addresses.

Form path: **Client order → Multibooking → Loading/Delivery address sections → Order sub-number**

1. Select **the **Multibooking**** **checkbox.[![image-1720785262062.png](https://doc.ozols.lv/uploads/images/gallery/2024-07/scaled-1680-/image-1720785262062.png)](https://doc.ozols.lv/uploads/images/gallery/2024-07/image-1720785262062.png)**
2. Click the *[![image-1720785164462.png](https://doc.ozols.lv/uploads/images/gallery/2024-07/scaled-1680-/image-1720785164462.png) ](https://doc.ozols.lv/uploads/images/gallery/2024-07/image-1720785164462.png)*<span style="color: rgb(0, 0, 0);">[i](https://doc.ozols.lv/uploads/images/gallery/2024-07/image-1720785164462.png)con in th</span>e **Loading** section to add another loading address.
3. Click the *[![image-1720785164462.png](https://doc.ozols.lv/uploads/images/gallery/2024-07/scaled-1680-/image-1720785164462.png)](https://doc.ozols.lv/uploads/images/gallery/2024-07/image-1720785164462.png)* icon in the **Delivery** section to add another delivery addresses.
4. The order number will be assigned a **sub-number**. [![image.png](https://help.cloudex.app/uploads/images/gallery/2026-06/scaled-1680-/BdEimage.png)](https://help.cloudex.app/uploads/images/gallery/2026-06/BdEimage.png)allows you to switch between multibooking order parts.

[![image.png](https://help.cloudex.app/uploads/images/gallery/2026-06/scaled-1680-/iPqimage.png)](https://help.cloudex.app/uploads/images/gallery/2026-06/iPqimage.png)

# How to Add order to the trip?

- [How to add cargo from cargo form?](https://help.cloudex.app/link/16#bkmrk-1.-adding-cargo-from)
- [How to add cargo from planning desk?](https://help.cloudex.app/link/16#bkmrk-2.-adding-cargo-or-m)

###  How to add cargo from cargo form?  


<div id="bkmrk-open-the-client-orde"><div data-test-render-count="1"><div data-is-streaming="false">1. Open the client order
2. Scroll down to the "**Services**" section at the bottom of the screen.
3. In this table you'll see a service row with the route (e.g., *LV-3018, Ozolnieki → LV-1057, Riga*), loading and unloading dates, income, and costs.
4. In the "**Order for carrier**" column there are two buttons: 
    - "**New**"[![image-1782373852123.png](https://doc.ozols.lv/uploads/images/gallery/2026-06/scaled-1680-/image-1782373852123.png)](https://doc.ozols.lv/uploads/images/gallery/2026-06/image-1782373852123.png)— create a **new trip/order for the carrier** and assign this cargo to it.
    - "**Existing**"[![image-1782373869696.png](https://doc.ozols.lv/uploads/images/gallery/2026-06/scaled-1680-/image-1782373869696.png)](https://doc.ozols.lv/uploads/images/gallery/2026-06/image-1782373869696.png)— assign this cargo (order) **to an already existing trip.**
5. To add the order to an existing trip: 
    - Click the "**Existing**" button.
    - A window/list will open showing available trips (filterable by route, date, vehicle, etc.).
    - Select the matching trip from the list and confirm.
6. To create a **new trip** for this order: 
    - Click the "**New**" button.
    - The system will create a new carrier order/trip using this client order's data (route, cargo details, dates).
7. Click "**Save**" at the bottom of the screen to confirm the changes.

</div></div></div>### [![image-1782369030685.png](https://doc.ozols.lv/uploads/images/gallery/2026-06/scaled-1680-/image-1782369030685.png)](https://doc.ozols.lv/uploads/images/gallery/2026-06/image-1782369030685.png)  
  
How to add cargo from planning desk? 

#####   


<div class="" data-is-intersecting="true" data-turn-id-container="request-WEB:87917413-c528-4b31-a533-b075848b27cb-0" id="bkmrk-select-the-appropria"><section class="text-token-text-primary w-full focus:outline-none has-data-writing-block:pointer-events-none [&:has([data-writing-block])>*]:pointer-events-auto R6Vx5W_threadScrollVars scroll-mb-[calc(var(--scroll-root-safe-area-inset-bottom,0px)+var(--thread-response-height))] scroll-mt-[calc(var(--header-height)+min(200px,max(70px,20svh)))]" data-testid="conversation-turn-2" data-turn="assistant" data-turn-id="request-WEB:87917413-c528-4b31-a533-b075848b27cb-0" data-turn-id-container="request-WEB:87917413-c528-4b31-a533-b075848b27cb-0" dir="auto"><p class="callout success">Select the appropriate shipment from the “Not planned cargos” window, mark it, and press [![image.png](https://help.cloudex.app/uploads/images/gallery/2026-06/scaled-1680-/bN9image.png)](https://help.cloudex.app/uploads/images/gallery/2026-06/bN9image.png)button; the shipment will then be assigned to the selected trip or dispatch.</p>

</section></div>[![image.png](https://help.cloudex.app/uploads/images/gallery/2026-06/scaled-1680-/yQoimage.png)](https://help.cloudex.app/uploads/images/gallery/2026-06/yQoimage.png)

# How to search, filter, and adjust the Client Orders list?

- [How to find client orders using Search?](https://help.cloudex.app/link/17#bkmrk-1%29-search)
- [How can I see more orders?](https://help.cloudex.app/link/17#bkmrk-how-can-i-see-more-o)
- [How to use the Client column filter?](https://help.cloudex.app/link/17#bkmrk-how-to-use-the-clien)
- [What is the difference between Search and Filters?](https://help.cloudex.app/link/17#bkmrk-what-is-the-differen-1)

### How to find client orders using Search?

Use the **Search** field to find client orders related to a specific company.

**1.** Enter the **Company name** in the **Search** field.

CLOUDEX TMS will show all orders where this company is used, for example as a supplier, recipient, sender, consignee, or another partner.

Check the number of found records next to the search result. The number **21** indicates that **21** records have been found.

[![image-1780646601662.png](https://doc.ozols.lv/uploads/images/gallery/2026-06/scaled-1680-/image-1780646601662.png)](https://doc.ozols.lv/uploads/images/gallery/2026-06/image-1780646601662.png)

### How can I see more orders?

**2.** Change the number of rows displayed per page if you want to see more client orders on one screen. For example, if you choose **300 rows**, a larger amount of data will immediately be visible on the screen, making it easier to analyze information without switching pages.

[![image-1780646654223.png](https://doc.ozols.lv/uploads/images/gallery/2026-06/scaled-1680-/image-1780646654223.png)](https://doc.ozols.lv/uploads/images/gallery/2026-06/image-1780646654223.png)

### How to use the Client column filter?

**3.** Use the **Client** column filter to show only orders related to one selected customer. This narrows the list to only the records related to that specific Client, excluding all others.

[![image-1780646739176.png](https://doc.ozols.lv/uploads/images/gallery/2026-06/scaled-1680-/image-1780646739176.png)](https://doc.ozols.lv/uploads/images/gallery/2026-06/image-1780646739176.png)

[![image-1780646908064.png](https://doc.ozols.lv/uploads/images/gallery/2026-06/scaled-1680-/image-1780646908064.png)](https://doc.ozols.lv/uploads/images/gallery/2026-06/image-1780646908064.png)

### What is the difference between Search and Filters?  


**Search** looks for matching records across the client order list. It is useful when you want to quickly find all orders related to a company or keyword.

**Filters** narrow the list by a specific column, for example **Client**, **Status**, **POD**, **Delivery date**, or **Manager**.

# How to send an order acceptance confirmation to Client?

To send an order acceptance confirmation, open the specific **Client order.**  
  
1\. In the toolbar, click the button [![image-1724937762525.png](https://doc.ozols.lv/uploads/images/gallery/2024-08/scaled-1680-/image-1724937762525.png)](https://doc.ozols.lv/uploads/images/gallery/2024-08/image-1724937762525.png) and select the appropriate option.

[![Client order steps.png](https://help.cloudex.app/uploads/images/gallery/2026-07/client-order-steps.png)](https://doc.ozols.lv/uploads/images/gallery/2026-06/image-1780992395893.png)

2\. By selecting **Inform client for cargo accepting**, you can send an automatically generated order acceptance confirmation email.

[![image-1780995258569.png](https://doc.ozols.lv/uploads/images/gallery/2026-06/scaled-1680-/image-1780995258569.png)](https://doc.ozols.lv/uploads/images/gallery/2026-06/image-1780995258569.png)

3\. By selecting **Order for Client**, an email containing the order agreement will be generated automatically.

[![image-1780995368027.png](https://doc.ozols.lv/uploads/images/gallery/2026-06/scaled-1680-/image-1780995368027.png)](https://doc.ozols.lv/uploads/images/gallery/2026-06/image-1780995368027.png)

# How to add Delivery via Terminal to a Client order?

- [Where can I find the Delivery via Terminal service?](https://help.cloudex.app/link/48#bkmrk-where-can-i-find-the)
- [How to select Delivery via Terminal in the Services section?](https://help.cloudex.app/link/48#bkmrk-how-to-select-delive)
- [How does the Services view change after adding Delivery via Terminal?](https://help.cloudex.app/link/48#bkmrk-how-does-the-service)

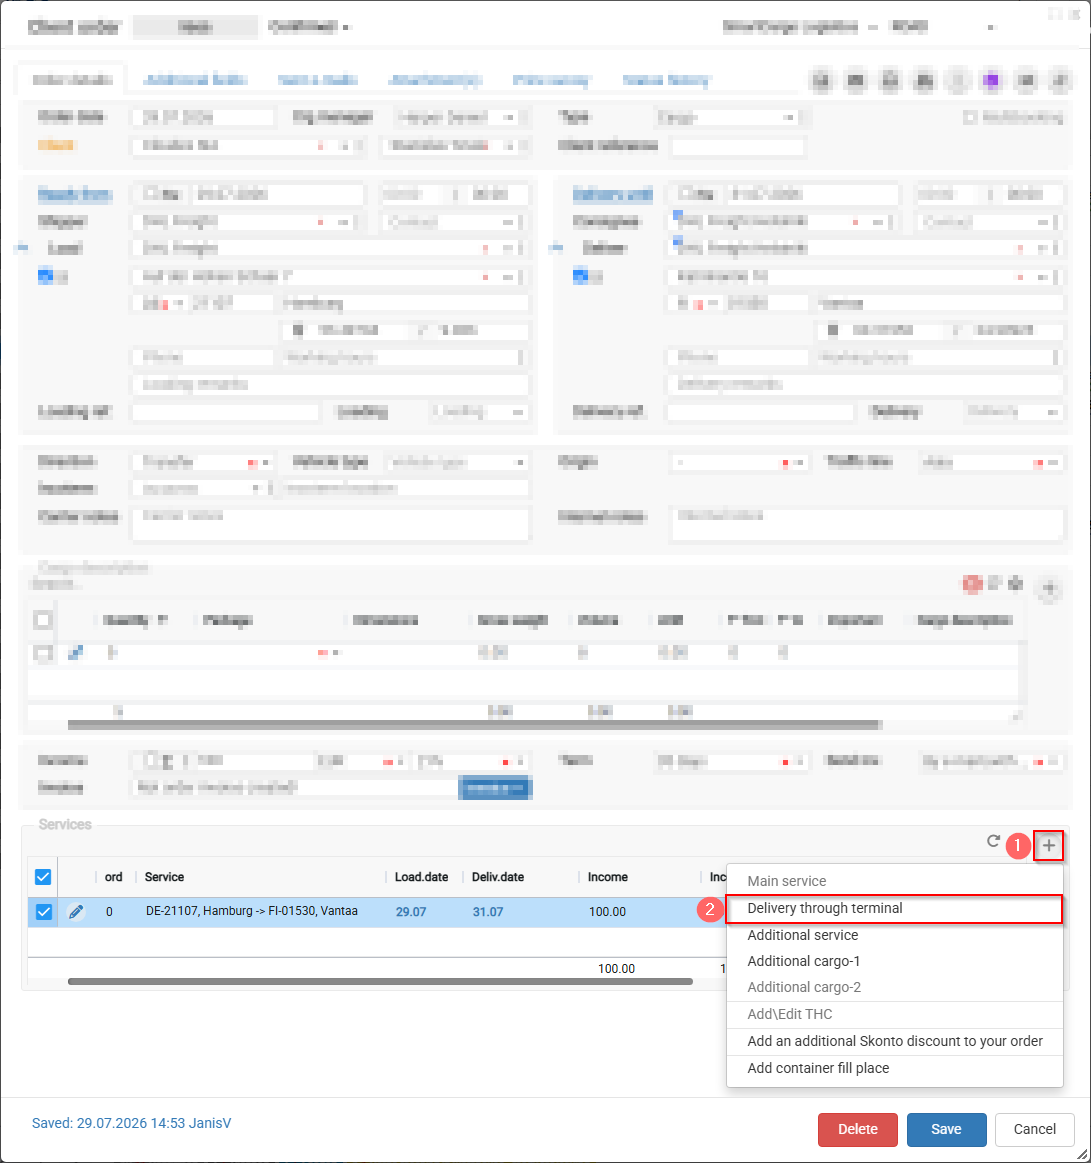
### Where can I find the Delivery via Terminal service?

<p class="callout success">**Client Order → Services → + →Delivery via Terminal**</p>

[![Terminal_en.png](https://help.cloudex.app/uploads/images/gallery/2026-07/scaled-1680-/D0vterminal-en.png)](https://help.cloudex.app/uploads/images/gallery/2026-07/D0vterminal-en.png)

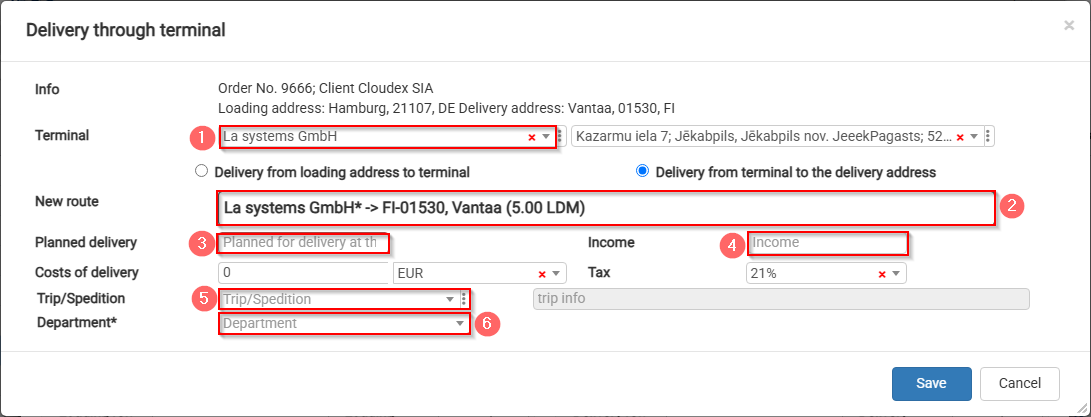
### How to select Delivery via Terminal in the Services section?

1. Select the required terminal; the address will be filled in automatically.
2. Split the route **La systems GmbH → FI-01530** into two parts.
3. Planned delivery deadline to the terminal.
4. Specify the amount allocated for the stage from the terminal to the delivery address.
5. If you know which truck will transport the cargo, you can create a new trip or add it to an existing trip.
6. Assign it to the department responsible for delivery from the terminal to the delivery address.

[![Terminal_en_2.png](https://help.cloudex.app/uploads/images/gallery/2026-07/scaled-1680-/terminal-en-2.png)](https://help.cloudex.app/uploads/images/gallery/2026-07/terminal-en-2.png)
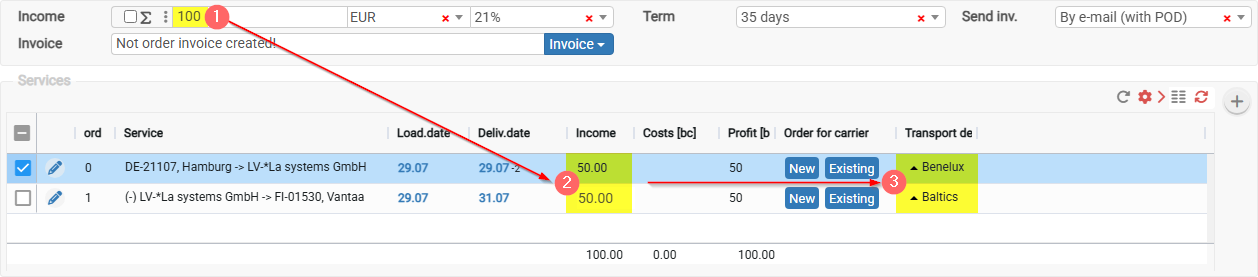
### How does the Services view change after adding Delivery via Terminal?

<p class="callout success">The overall delivery process is divided into two stages, and each stage is assigned a specific amount:</p>

1. Total amount to be received from the customer.
2. Revenue distributed among departments.
3. Departments responsible for specific delivery stages.

[![Terminal_en_3.png](https://help.cloudex.app/uploads/images/gallery/2026-07/scaled-1680-/PrDterminal-en-3.png)](https://help.cloudex.app/uploads/images/gallery/2026-07/PrDterminal-en-3.png)
# How to obtaining GPS data for a customer order

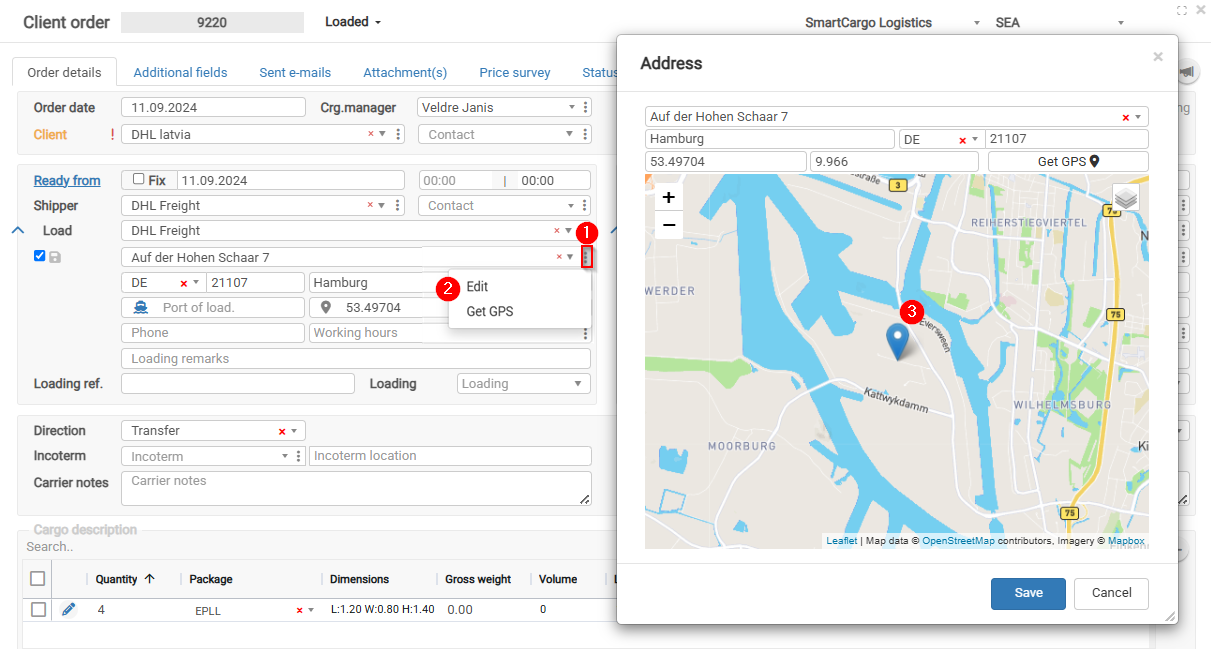
##### 1. How to obtaining GPS data for a customer order

<p class="callout success">Press ![image.png](https://help.cloudex.app/uploads/images/gallery/2026-07/scaled-1680-/k0bimage.png). This will open the additional form for adjustments.</p>

1. Edit button
2. Edit option to open Address form
3. Manual adjustment

[![image.png](https://help.cloudex.app/uploads/images/gallery/2026-07/scaled-1680-/SwJimage.png)](https://help.cloudex.app/uploads/images/gallery/2026-07/SwJimage.png)
##### 2. Benefits of Obtaining GPS Coordinates

1\. Benefits of Obtaining GPS Coordinates  
Filling in the GPS coordinates field in logistics and transport systems provides several advantages that improve operational efficiency, transparency, and accuracy. Here are the main benefits of completing the GPS coordinates field:

2\. Planning Accuracy  
Precise locations can be viewed on the map, making logistics planning and route optimization easier.

3\. Trip Route Tracking  
The route is visible on the map in real time, helping monitor transport flow and ensuring that the vehicle follows the planned route.

4\. Accurate Location Identification  
GPS coordinates allow precise identification of the location where the driver must arrive, reducing misunderstandings and increasing delivery accuracy.

5\. Automatic Time Recording  
The system automatically records the time when the vehicle arrives at and leaves the loading/delivery address, helping improve operational tracking and analysis.

6\. Cargo Status Tracking  
Time and location data are integrated into cargo statuses, providing a complete overview of cargo movement and delivery status.

7\. Automatic Status Changes  
The system automatically changes the trip status when the vehicle approaches the loading or delivery address, speeding up the process and reducing manual actions.

8\. Downtime Monitoring  
GPS data makes it possible to track how long the vehicle stays at the loading or delivery address, helping identify and reduce unproductive downtime.

9\. Driver Activity Monitoring  
The system can verify whether the driver marks the cargo as loaded or delivered at the specified address by comparing it with the driver’s actual location data.

10\. Route Comparison  
It is possible to compare the driver’s planned route with the actual route traveled, helping identify deviations and opportunities for route optimization.

11\. Customer Portal Functionality  
Customers can view the vehicle’s current location and route to the loading/delivery address in the portal, improving transparency and customer satisfaction.  
12\. These benefits help optimize logistics processes, improve delivery accuracy and efficiency, and provide greater transparency and customer satisfaction.

# How to generate CMR

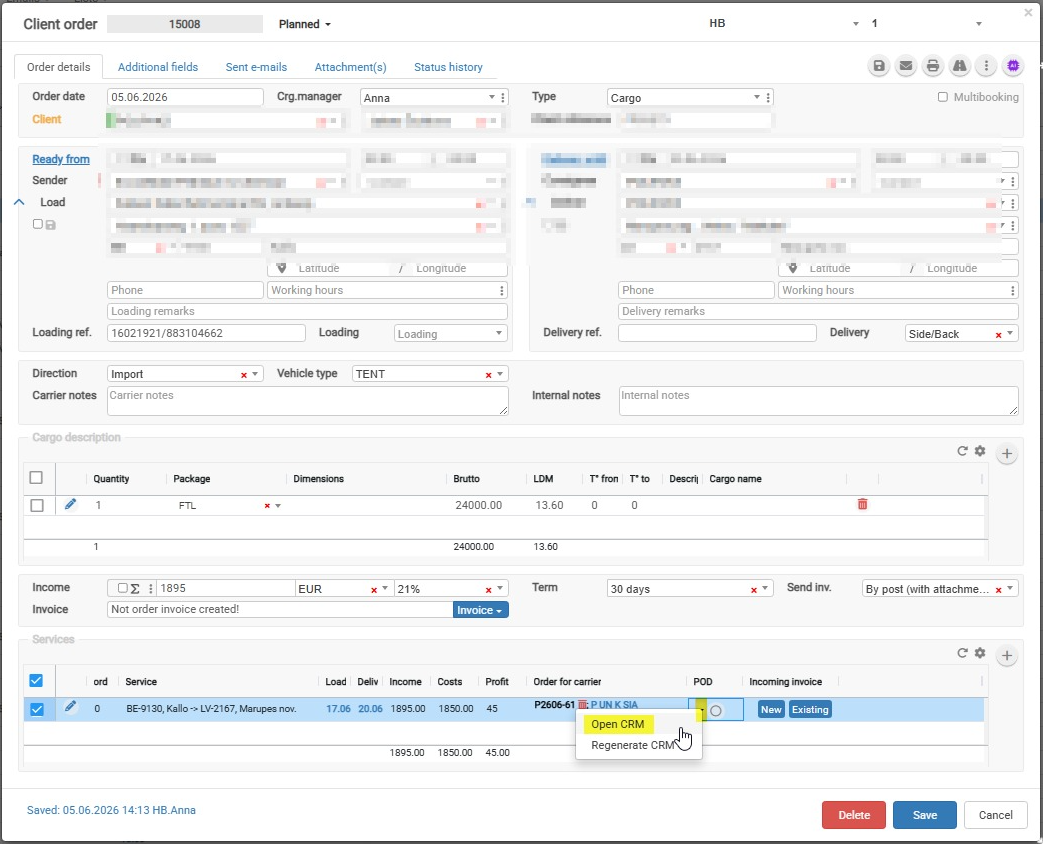
To generate a CMR, you have to open the order form. In the **Service** section, choose the service for which you want to generate the CMR. Locate the **POD** column and click it. [![image.png](https://help.cloudex.app/uploads/images/gallery/2026-07/scaled-1680-/F3Mimage.png)](https://help.cloudex.app/uploads/images/gallery/2026-07/F3Mimage.png)

[![image.png](https://help.cloudex.app/uploads/images/gallery/2026-07/scaled-1680-/Epyimage.png)](https://help.cloudex.app/uploads/images/gallery/2026-07/Epyimage.png)