There are 3 available options for configuring notifications:
- **By email** - **Through the client portal** - **Via API**, sending notifications directly to the client’s TMS system [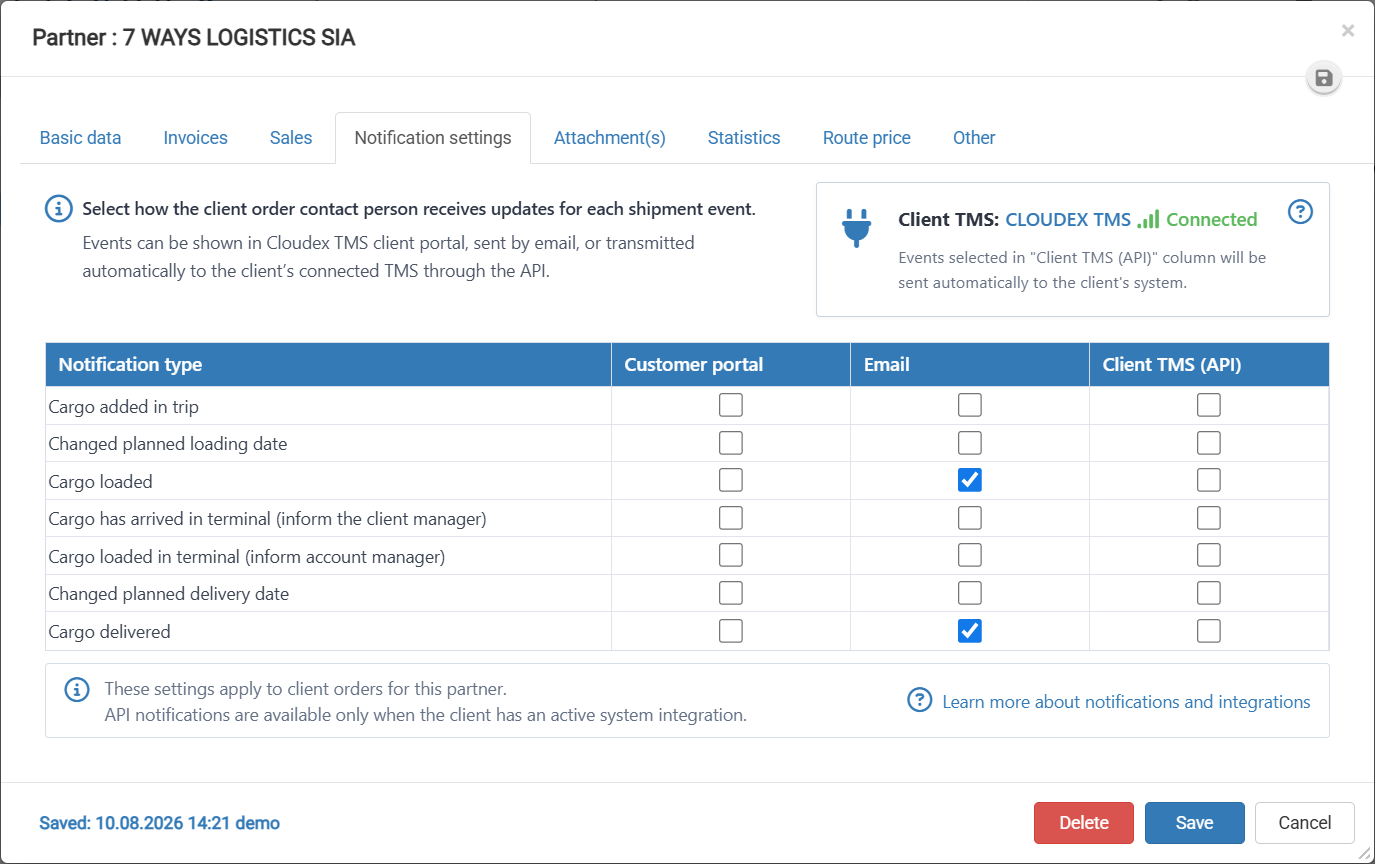](https://help.cloudex.app/uploads/images/gallery/2026-08/2C4image.png) # How to give access and rights to Client and Carrier portal and send Invitation for AccessThe customer portal can be activated from the customer profile.
1. Open **Lists** in the top navigation bar. 2. Select **Partners**. 3. Click **All Partners**. [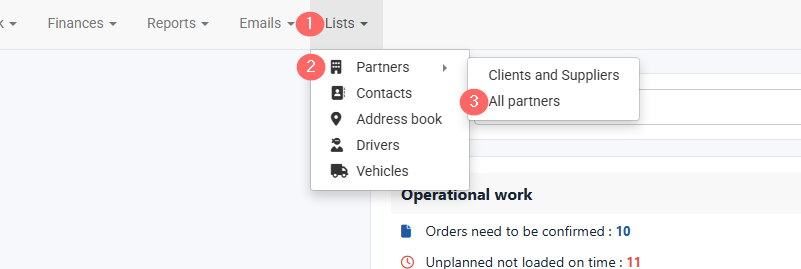](https://help.cloudex.app/uploads/images/gallery/2026-07/CEtimage.png) 4\. Find the required partner. 5\. Click the **Edit** icon . [](https://help.cloudex.app/uploads/images/gallery/2026-07/ePTimage.png) to open the partner profile. [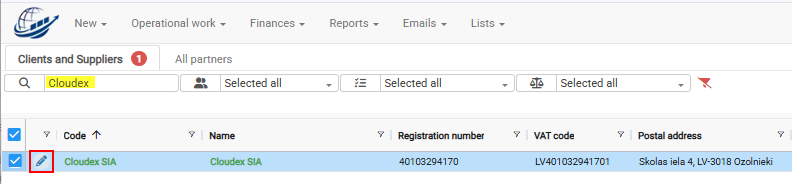](https://help.cloudex.app/uploads/images/gallery/2026-07/k9Oimage.png) 6\. Select the manager you want to grant portal access to, then click the **Edit** icon [](https://help.cloudex.app/uploads/images/gallery/2026-07/ePTimage.png) to open contact. [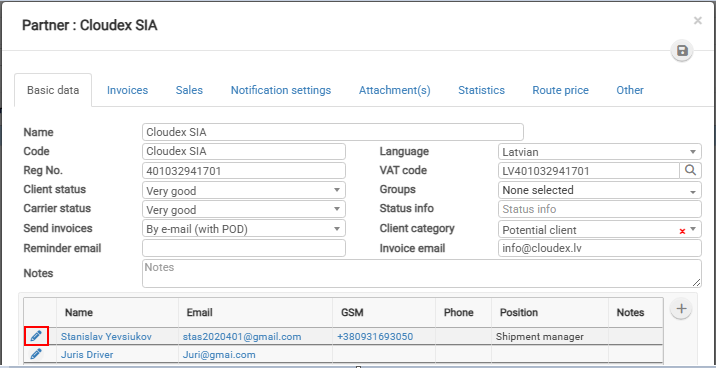](https://help.cloudex.app/uploads/images/gallery/2026-07/RCeimage.png) 7\. Switch from **Basic data** to the **Clients & Carriers Portal access** section to give **Access granted.** 8\. Review and click **** **Send invitation** to Client contact person. [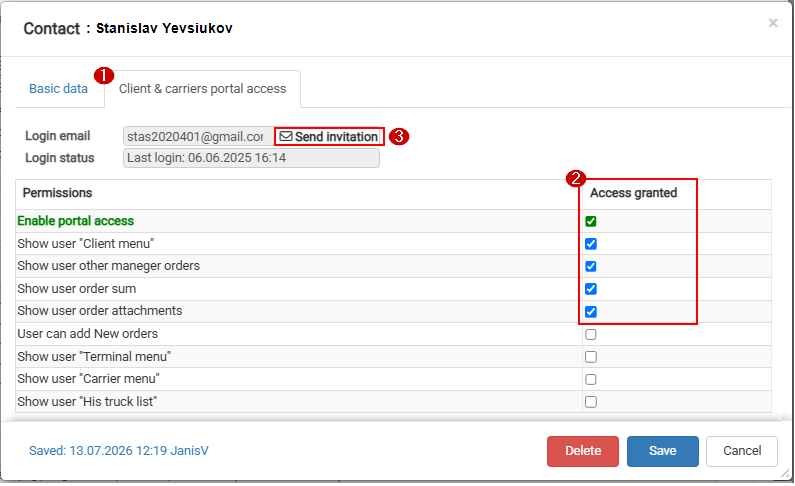](https://help.cloudex.app/uploads/images/gallery/2026-07/sv8image.png) # How to send an order to a carrier via API? You can send a transport order directly from **Cloudex TMS to your carrier's TMS** without sending the order manually by email or entering it again in another system. This option is available when an API integration with the selected carrier's TMS has been configured. #### How to send an order to the carrier 1. Open the required **Trip/Spedition**. 2. Select the **Carrier**. 3. If an API integration with this carrier is available, the **Send to carrier** icon appears next to the Carrier field. 4. Click the icon. 5. The transport order is sent electronically to the carrier's TMS. [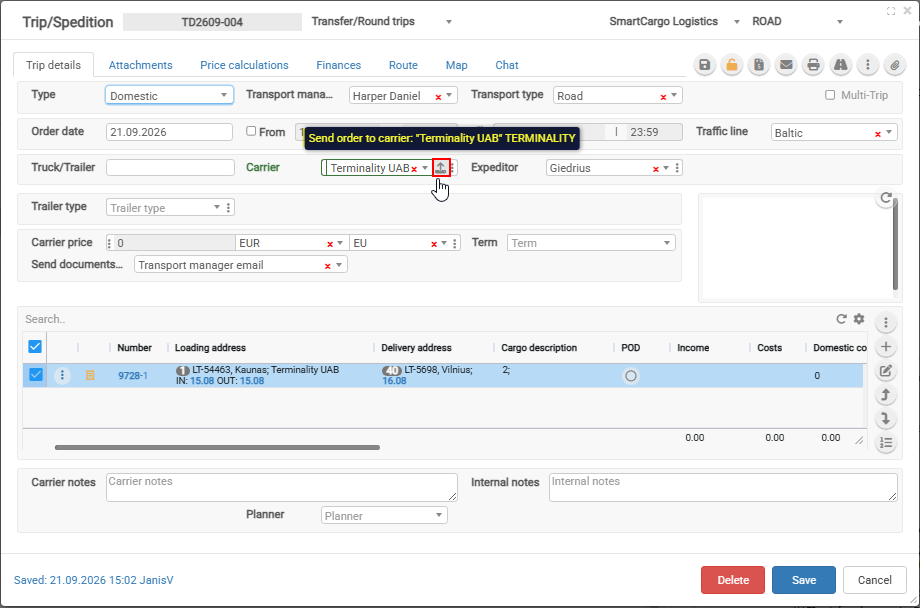](https://help.cloudex.app/uploads/images/gallery/2026-09/xx8image.png) #### When does the API button appear? ##### Carrier uses Cloudex TMS If the selected carrier also uses **Cloudex TMS**, the API connection is recognized automatically and the button appears without any additional API configuration. ##### Carrier uses another supported TMS If the carrier uses another supported TMS, the carrier's API integration must first be configured in Cloudex TMS. See: **How to add carrier API key?** After the integration has been configured, the API button becomes available when that carrier is selected in Trip/Spedition. #### Supported carrier TMS integrations Currently, transport orders can be sent directly to carriers using: - **Cloudex/Ozols TMS** - **XSPED** - **Terminality** - #### To which systems you can send Orders to carriers. If your carrier is using: - Cloudex - XSPED - Terminality - Danske Fragtmænd Sending the order via API helps to: - avoid manual order entry in the carrier's system; - reduce data-entry mistakes; - send transport information directly from Cloudex TMS; - enable further API communication, such as receiving shipment statuses and documents back from the carrier. #### What happens after the order is sent? Depending on the carrier integration, Cloudex TMS can also receive information back from the carrier, such as: - shipment status updates; - delivery milestones; - POD/CMR and other shipment documents. This allows information to move between Cloudex TMS and the carrier's TMS without repeatedly entering the same data manually. #### Related topics - [**How to add carrier API key?**](https://help.cloudex.app/books/cloudex-tms/page/how-to-add-a-carrier-tms-api-key) - **How to receive [statuses ](https://help.cloudex.app/books/cloudex-for-admins-only/page/how-to-send-shipment-milestones-to-cloudex-tms-via-api)and [documents ](https://help.cloudex.app/books/cloudex-for-admins-only/page/how-to-send-shipment-documents-to-cloudex-tms-via-api)from a carrier via API** - **How to receive statuses from a carrier via Carrier Link** # How to send automatic milestone and document request emails Cloudex TMS can automatically request shipment updates and missing documents from the carrier during transport. Instead of manually contacting the carrier to ask whether the cargo has been loaded or delivered, or to request a POD/CMR, Cloudex can send these requests automatically according to the planned loading and delivery dates. The request emails are sent to the **Carrier transport manager email**. The carrier receives a secure link to the shipment and does not need to log in to Cloudex TMS. #### What can Cloudex request automatically? Depending on your company settings, Cloudex can send the following requests: ##### Loading **Check loading details** Sent before the planned loading date. The carrier can check or update: - Planned loading date/time - Truck/Trailer number **Confirm loaded** Sent on the planned loading date if loading has not yet been confirmed. The carrier can: - Confirm that the shipment has been loaded - Update the Planned loading date/time if loading is delayed - Update the Truck/Trailer number When loading is confirmed, Cloudex records the **Actual loading date/time**. --- #### Delivery **Check delivery plan** For longer transports, Cloudex can ask the carrier to check the delivery plan before the planned delivery date. The carrier can update the **Planned delivery date/time** if the plan has changed. For example, this request can be configured to be sent only when there are more than 2 days between the agreed loading and delivery dates. **Confirm delivered** Sent on the planned delivery date if delivery has not yet been confirmed. The carrier can: - Confirm that the shipment has been delivered - Update the Planned delivery date/time if delivery is delayed - Upload required delivery documents if they are already available When delivery is confirmed, Cloudex records the **Actual delivery date/time**. If documents are not yet available, they can be uploaded later. --- #### Follow-up requests If the carrier does not confirm delivery, Cloudex can automatically send follow-up requests. For example: - 1 day after the Planned delivery date - 2 days after the Planned delivery date Cloudex can also send reminders when delivery has already been confirmed but required documents are still missing. Depending on the shipment, required documents can include: - POD / CMR - Pallet exchange document - Other required shipment documents Cloudex sends document reminders only while the required documents are still missing. --- #### Enable automatic requests for a Trip/Spedition Open the required **Trip/Spedition**. In the carrier section, enable: **Automatic requests** [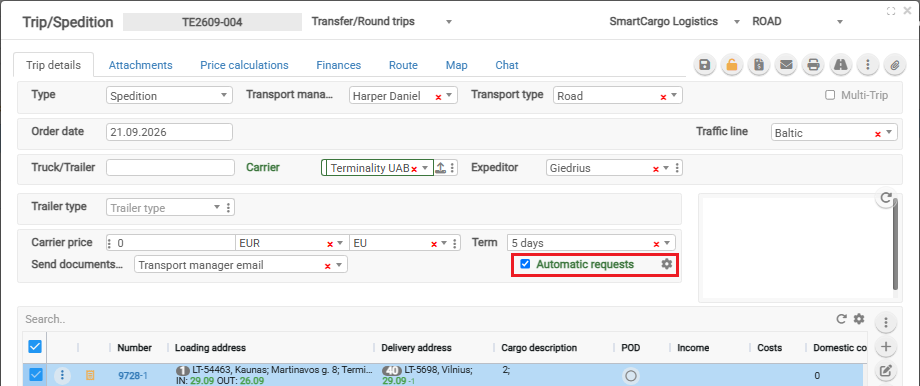](https://help.cloudex.app/uploads/images/gallery/2026-09/h98image.png) When this checkbox is selected, Cloudex can send automatic milestone and document requests for this Trip according to your company's **Automatic email request settings**. > Automatic milestone and document requests will be sent to the Carrier transport manager email. The carrier must therefore have a valid **Transport manager email**. The settings icon next to **Automatic requests** opens the company-level automatic request settings. --- #### Automatic email request settings The automatic request schedule is configured separately for each Cloudex company. Open **Automatic email request settings** to define which requests should be sent and when. [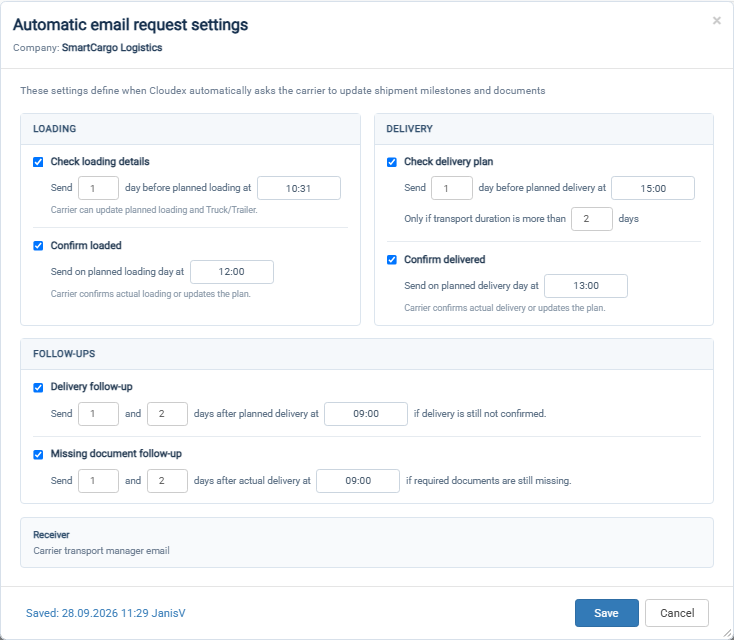](https://help.cloudex.app/uploads/images/gallery/2026-09/GbUimage.png) The settings include: ##### Loading **Check loading details** Example: > Send 1 day before planned loading at 15:00. **Confirm loaded** Example: > Send on planned loading day at 12:00. ##### Delivery **Check delivery plan** Example: > Send 1 day before planned delivery at 15:00. > Only if transport duration is more than 2 days. **Confirm delivered** Example: > Send on planned delivery day at 12:00. ##### Follow-ups **Delivery follow-up** Example: > Send 1 and 2 days after planned delivery at 09:00 if delivery is still not confirmed. **Missing document follow-up** Example: > Send 1 and 2 days after actual delivery at 09:00 if required documents are still missing. The recipient is always: **Carrier transport manager email** These are company-level settings. You do not need to configure the schedule separately for every Trip. --- #### What does the carrier receive? The carrier receives a simple email containing the shipment information and a button that opens the secure Cloudex shipment page. Depending on the request, the carrier can: - Update Planned loading or delivery - Update Truck/Trailer - Confirm loading - Confirm delivery - Upload POD/CMR and other required documents No Cloudex TMS login is required. Cloudex does not send a request if the requested action has already been completed. For example, if delivery has already been confirmed, Cloudex does not continue asking the carrier to confirm delivery. Here is an example of an email that was viewed on a phone: [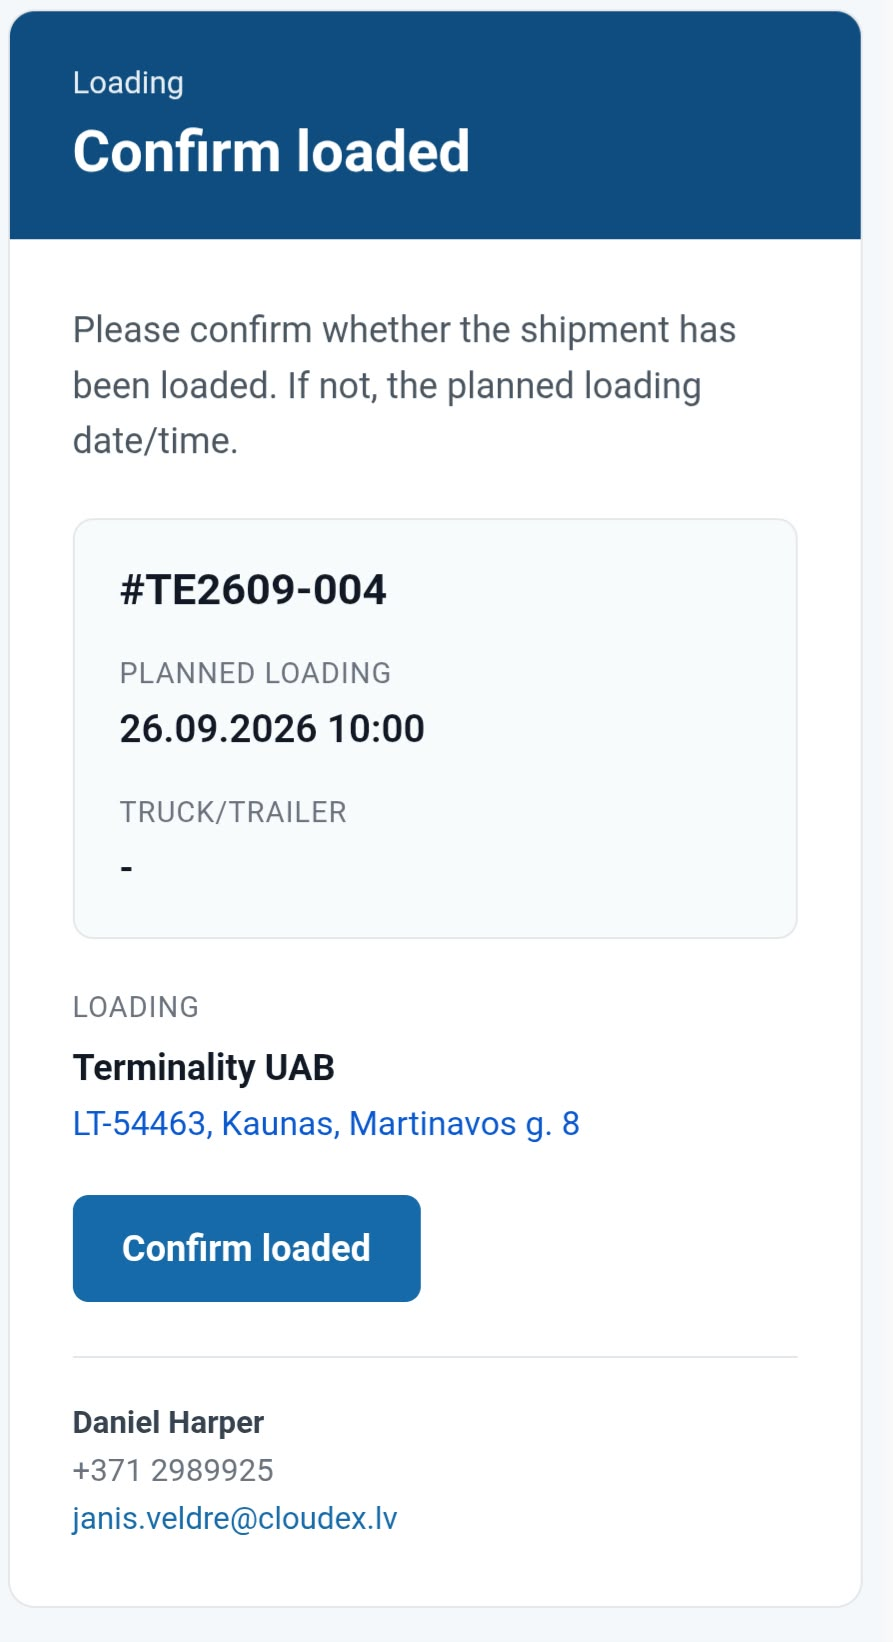](https://help.cloudex.app/uploads/images/gallery/2026-09/4oPimage.png) --- #### View sent automatic request emails All emails related to a Client order can be viewed directly from the **Client order**. Open: **Client order → Sent Emails** The list shows all sent emails connected to that order, including automatic carrier request emails. [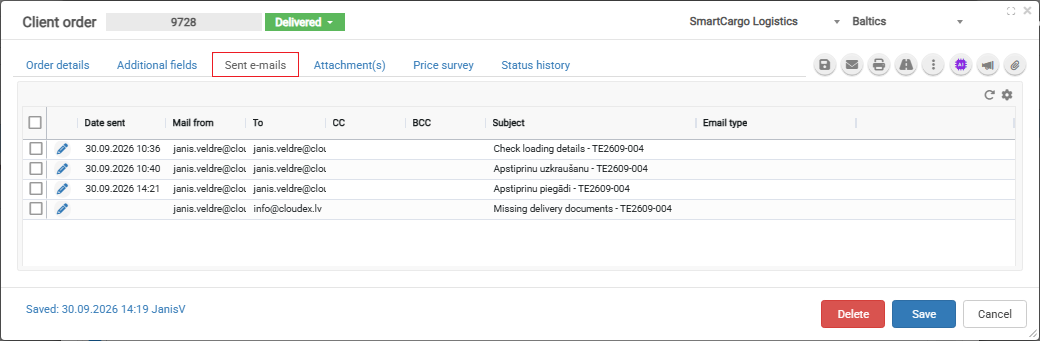](https://help.cloudex.app/uploads/images/gallery/2026-09/4jkimage.png) For example, you can see: - Check loading details - Confirm loaded - Confirm delivered - Missing delivery documents - Other emails sent regarding the Client order This makes it easy to verify **what was sent, when it was sent, and to which email address**. --- #### Example workflow A typical shipment could work like this: 1. **1 day before loading** Cloudex asks the carrier to check Planned loading and Truck/Trailer. 2. **Loading day** Cloudex asks the carrier to confirm that the shipment has been loaded. 3. **Before delivery** For a longer transport, Cloudex asks the carrier to check the Planned delivery date/time. 4. **Delivery day** Cloudex asks the carrier to confirm delivery and upload available delivery documents. 5. **After delivery** If required documents are still missing, Cloudex sends document follow-up requests. The forwarder therefore does not need to manually monitor every shipment date and repeatedly contact carriers for routine updates.