Important! CLOUDEX TMS provides two options - automated and manual outgoing invoice.
Only one of options can be used for the accounting period!
#### 1. Payment of Outgoing invoices - automated data Import from the Bank 1.1. **Export Account report from your Bank** Open your company's **Internet Bank** > prepare **the Bank Account report** for the desired period > **Export it in ISO format.** > **Save this document to your computer.** 1.2. Open **CLOUDEX TMS** 1. **Finance > Incoming payments** 2. **Import payments from the Bank** (using symbol ["](https://doc.ozols.lv/uploads/images/gallery/2024-07/image-1719928964263.png)") [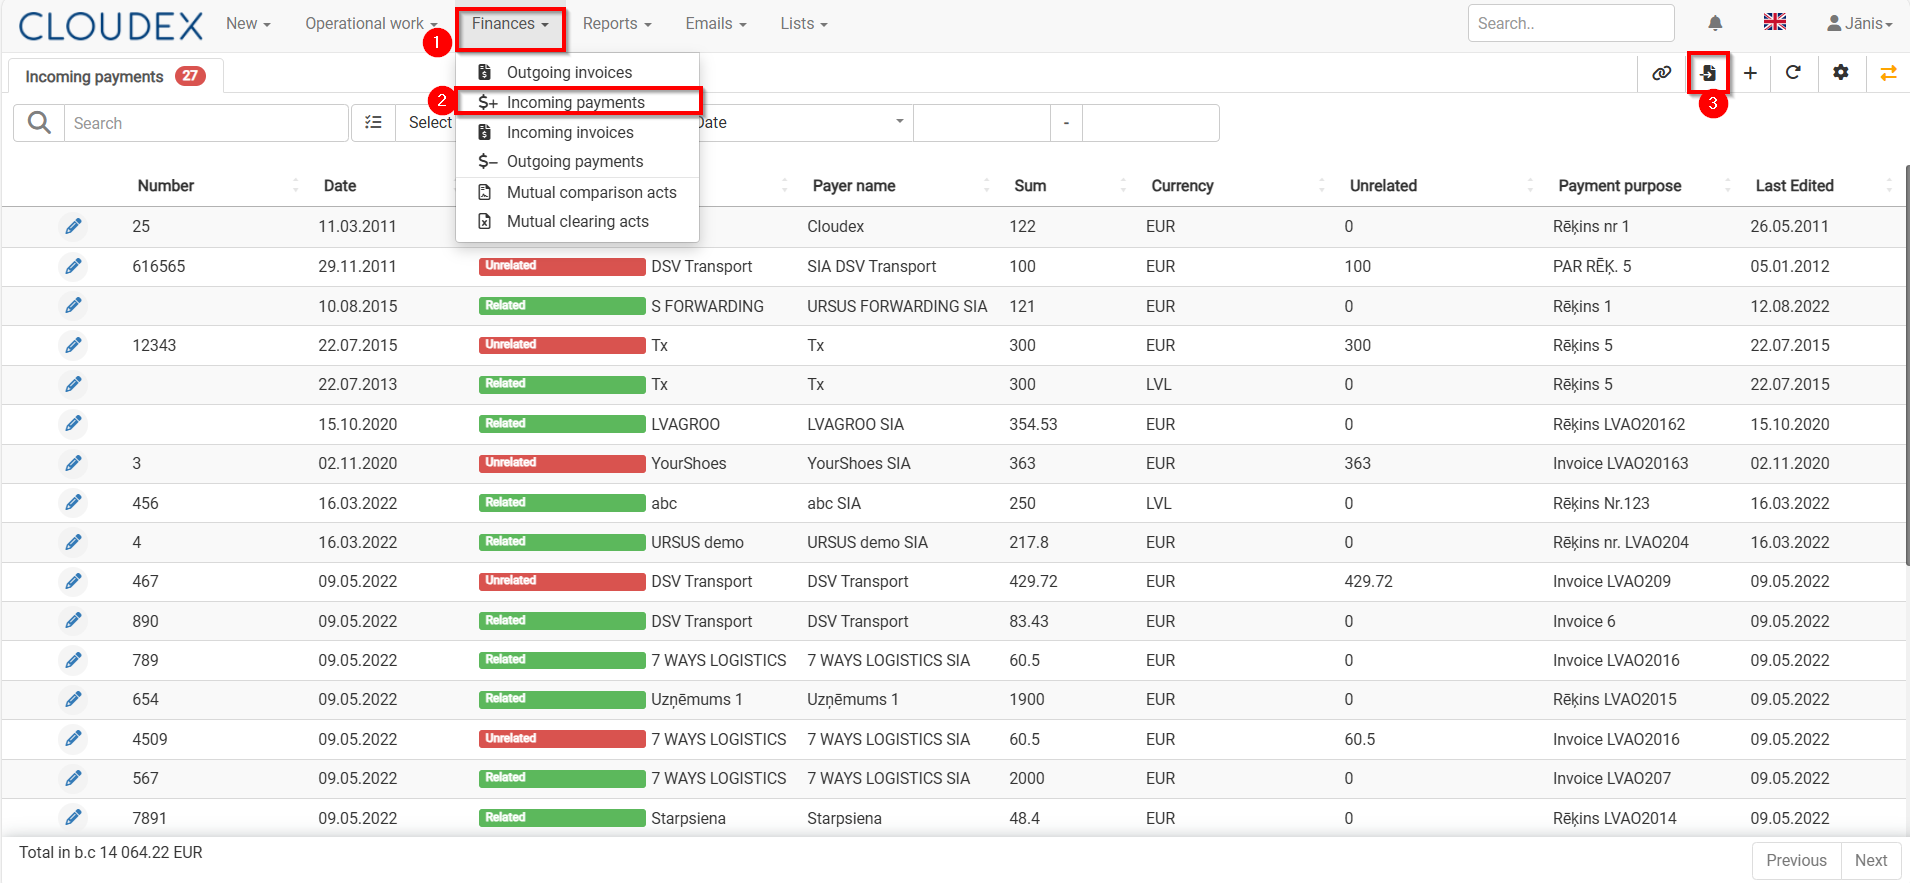](https://doc.ozols.lv/uploads/images/gallery/2024-07/import-from-bank.png)1.3. **Import** Bank payments 1\) Choose **the file** which you imported from **Internet Bank** 2) Press **Import [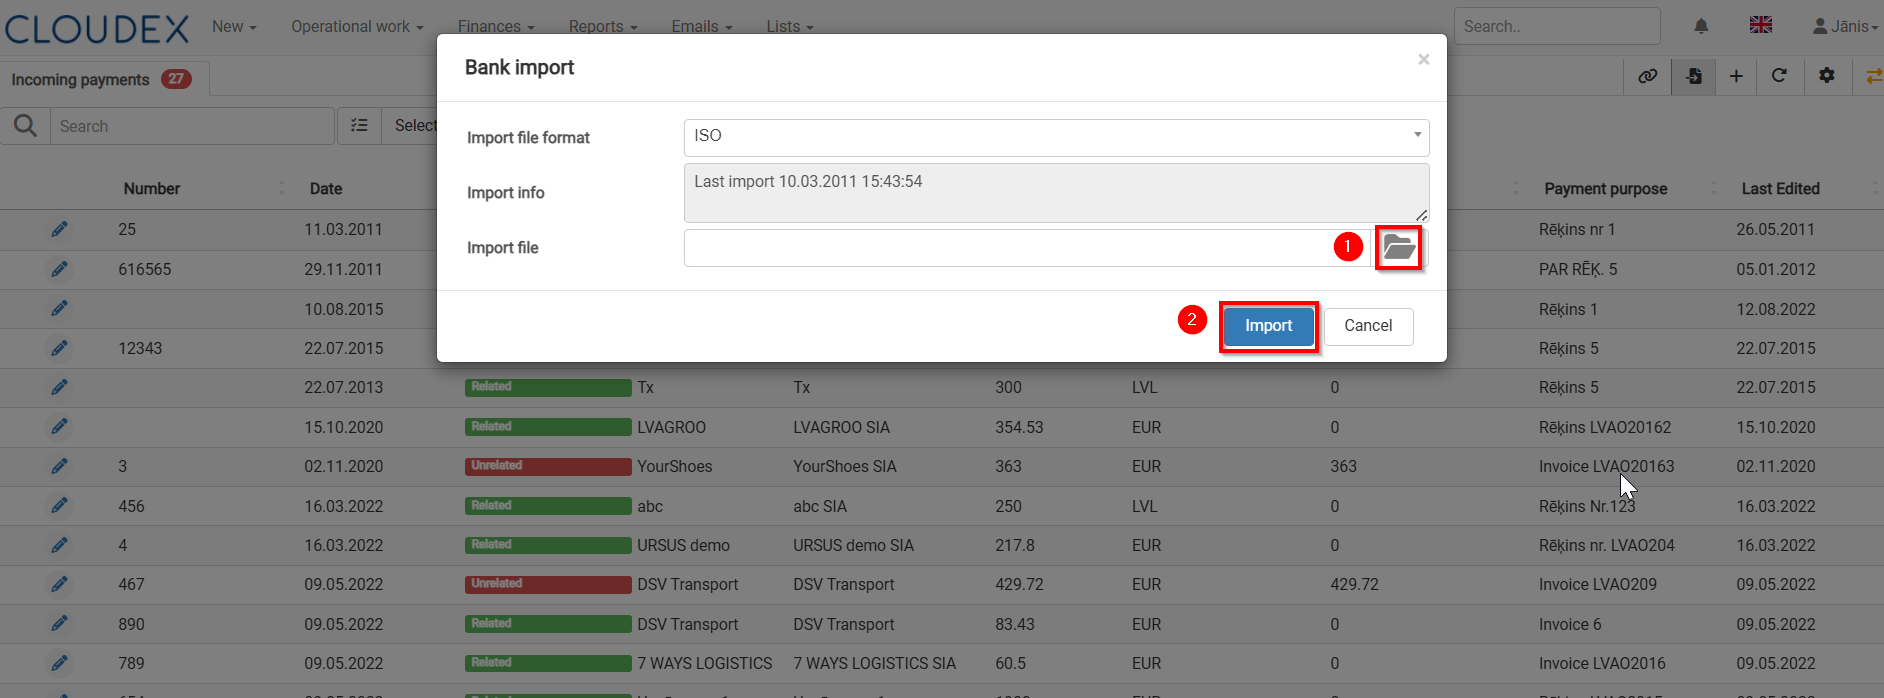](https://doc.ozols.lv/uploads/images/gallery/2024-07/import-the-fail.png)** #### 2. Linking "Incoming Bank payments" with "Outgoing invoices"When importing payments from the Internet bank, CLOUDEX TMS creates attachment of invoices, but if the invoices are not attached to the payment amount, then do the attachment according to the instructions bellow.
1\) **CLOUDEX TMS > Finaces >Incoming payments** 2) **Filter >**show only **Unrelated payments "Unrelated" (payments which are not related to invoices)** **[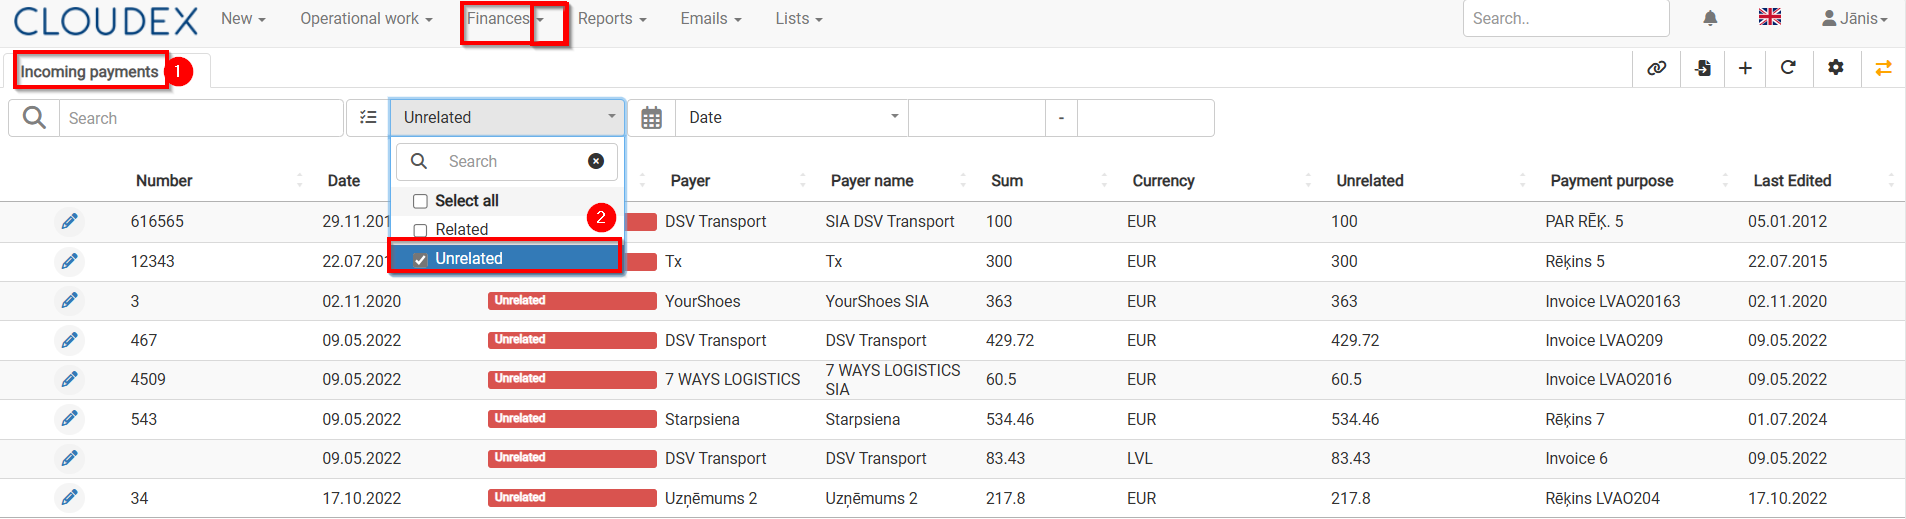](https://doc.ozols.lv/uploads/images/gallery/2024-07/puBunrelated-payments.png)** 3\) **Select** **Incoming Payment** which to "Relate" with Invoice 4\) Press the button "Relate invoices" [](https://doc.ozols.lv/uploads/images/gallery/2024-07/image-1719838166417.png) [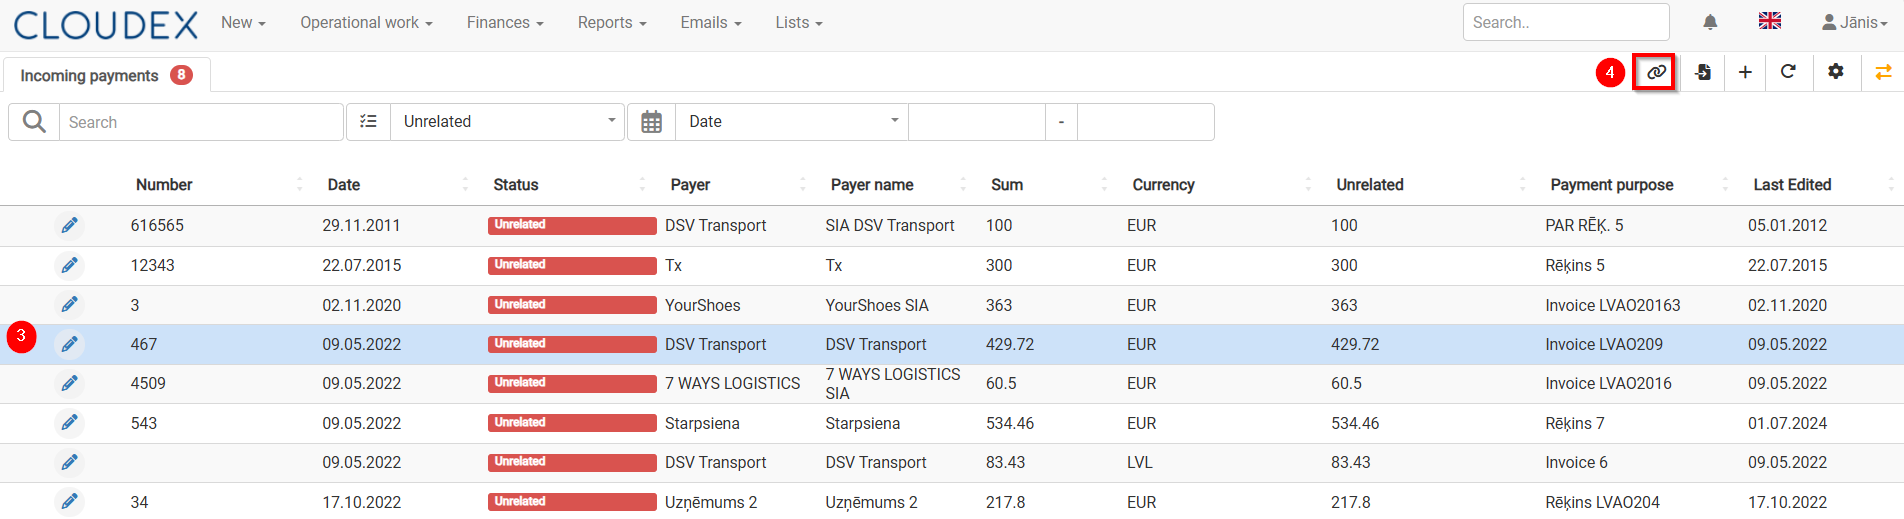](https://doc.ozols.lv/uploads/images/gallery/2024-07/relate.png) 5) In the list of Invoices, select the appropriate invoice/invoices for which payment has been made, mark them. 6) Selecting "the up arrow" you will be able to relate the invoice to payment. 7) Confirm with the button "Close". 8) With "the green arrows" it is possible to switch to another "Unlinked" payment. [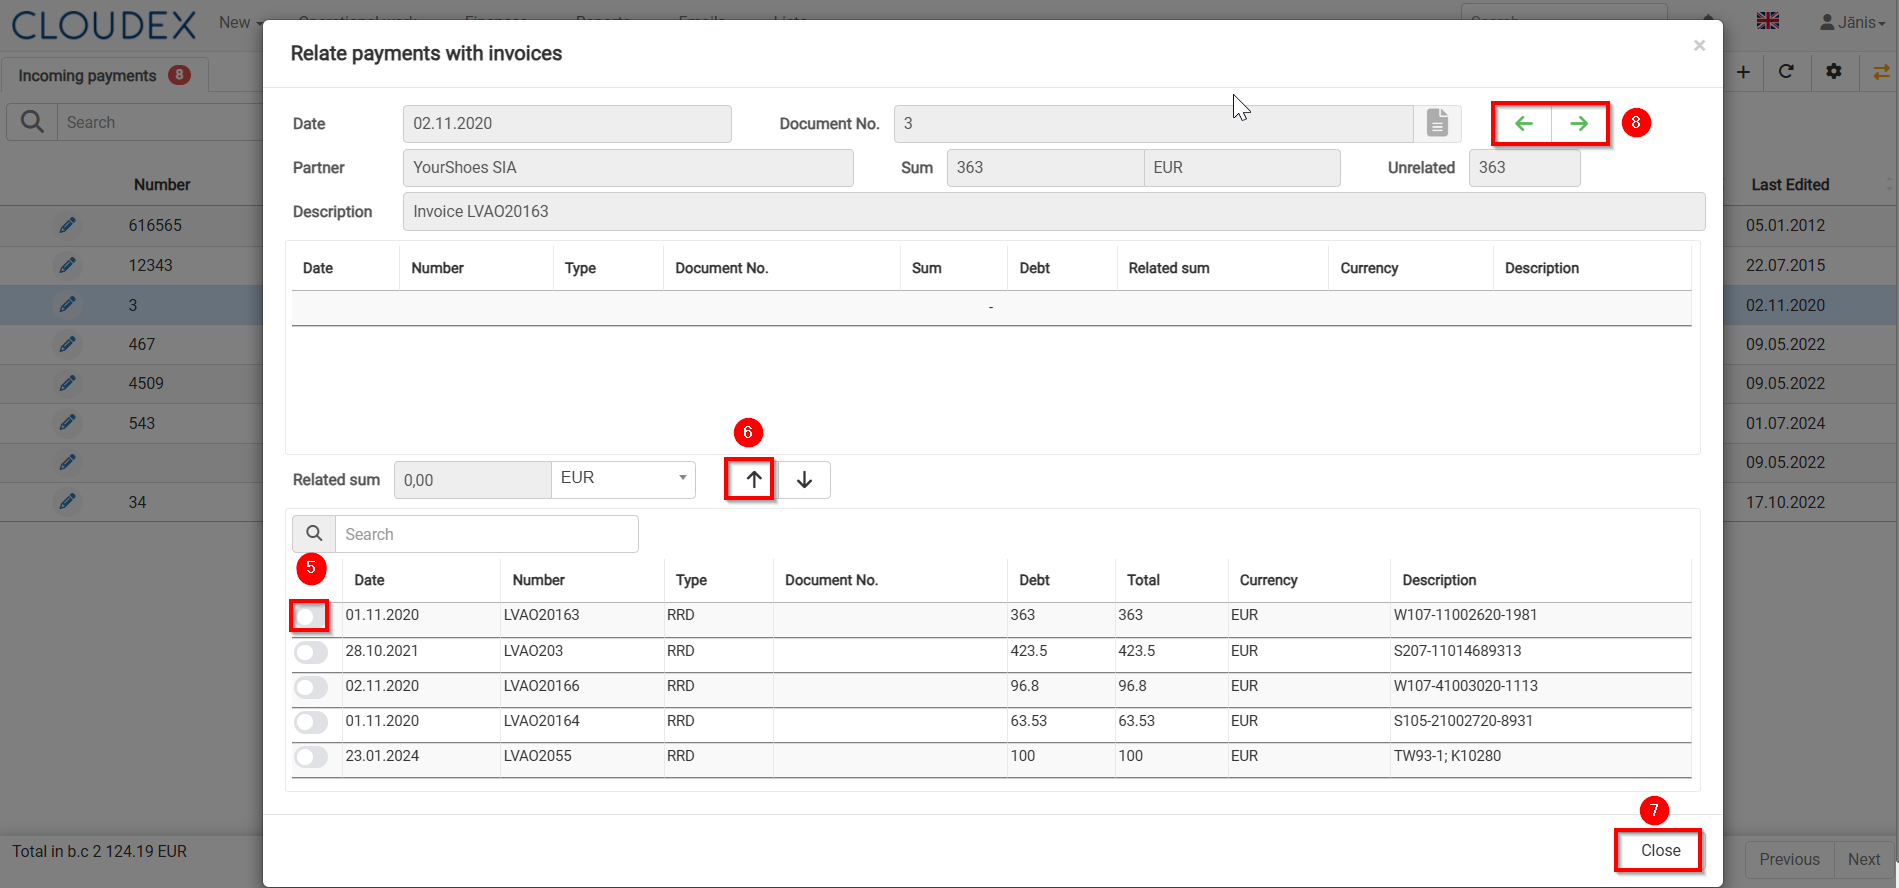](https://doc.ozols.lv/uploads/images/gallery/2024-07/relate-invoice-with-payment.png) 9) With the filter, you can quickly find the required invoice by number, amount, etc. [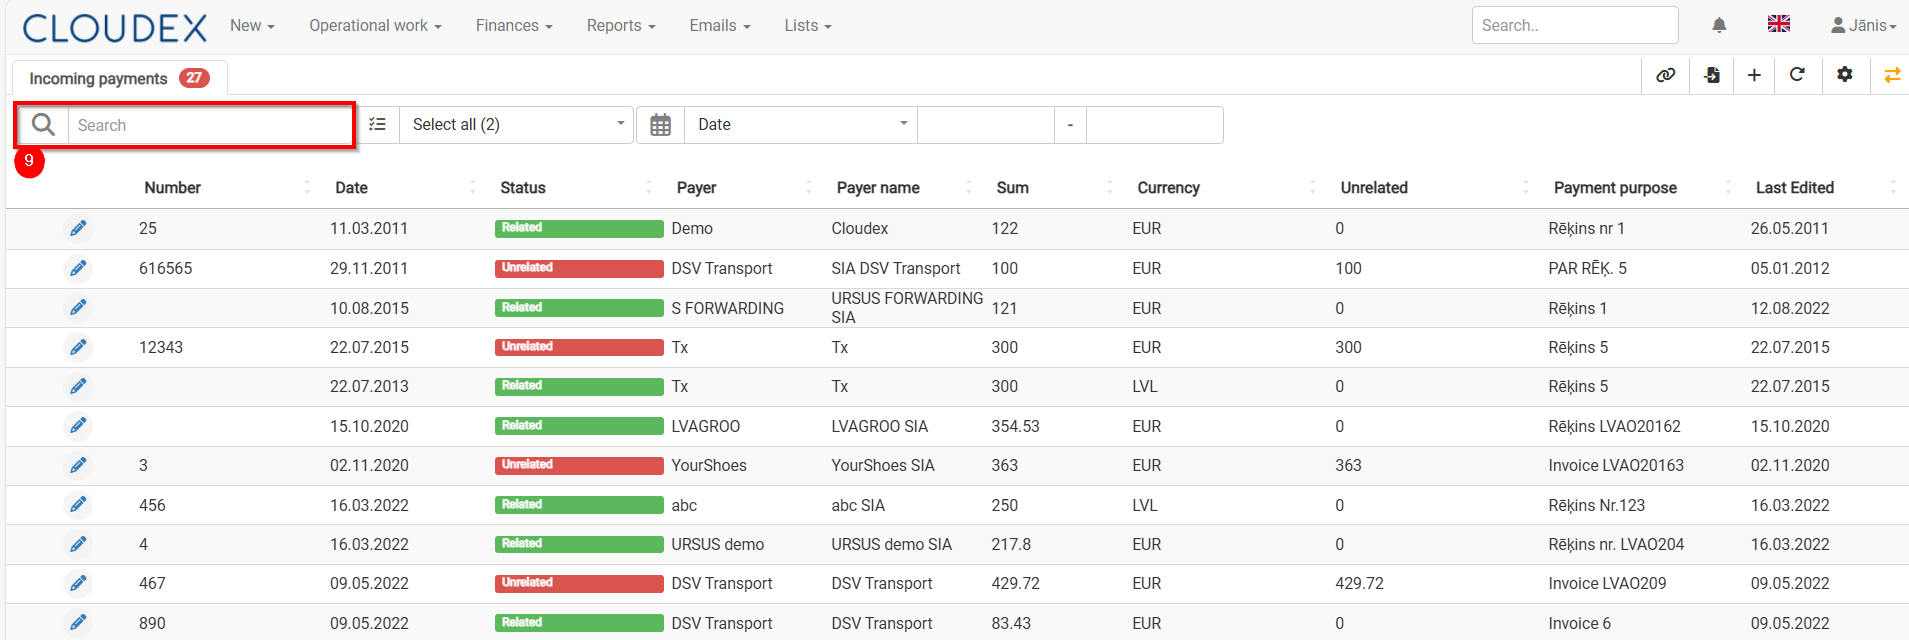](https://doc.ozols.lv/uploads/images/gallery/2024-07/filter.png)When the Incoming Payment is linked to the corresponding invoice, the amount in the "Unrelated" column in the Bank incomings list will be zero.
#### 3. Outgoing invoice payment - manual data entry 1. Go to **Finances >Outgoing Invoices** 2. Mark **Outgoing Invoices** which are **paid** 3. Choose function "Make Incoming payments for selected outgoing invoice" 4. Choose appropriate Bank account, if you have more than one account 5. Enter the Payment date. 6. Save [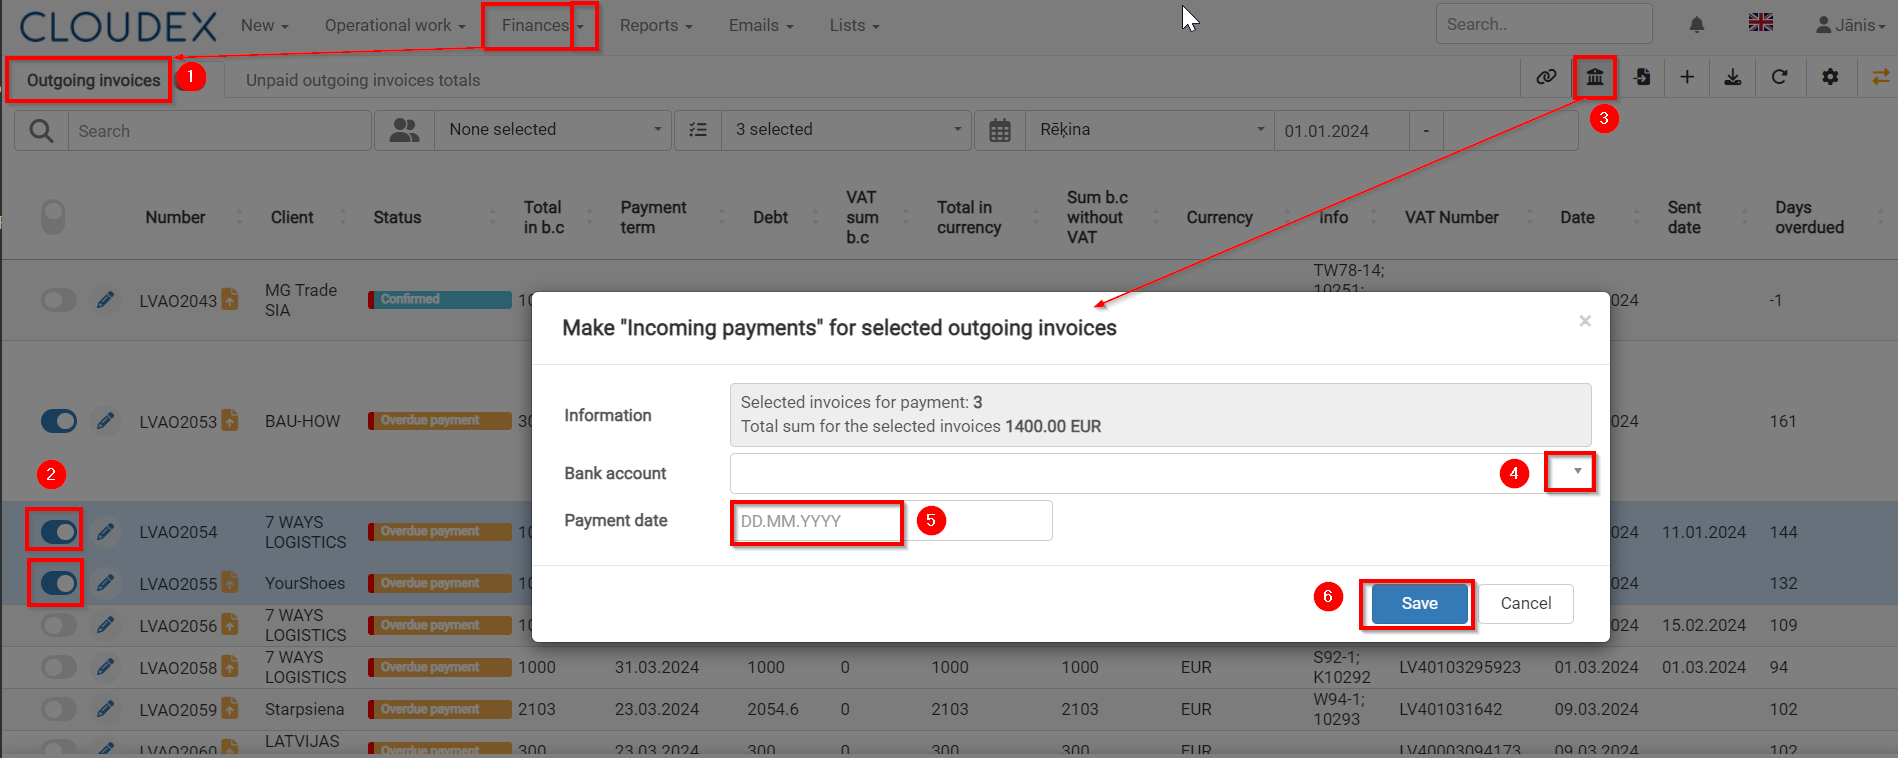](https://doc.ozols.lv/uploads/images/gallery/2024-07/manual-payment.png) #### 4. Tips and Tricks ##### 1 Trick. Add Bank account to payer in order to recognize Payer for next payments automaticaly 1. Choose **Payer** 2. Fill in the bank number. 3. Press **"Add Account to Payer Account."** [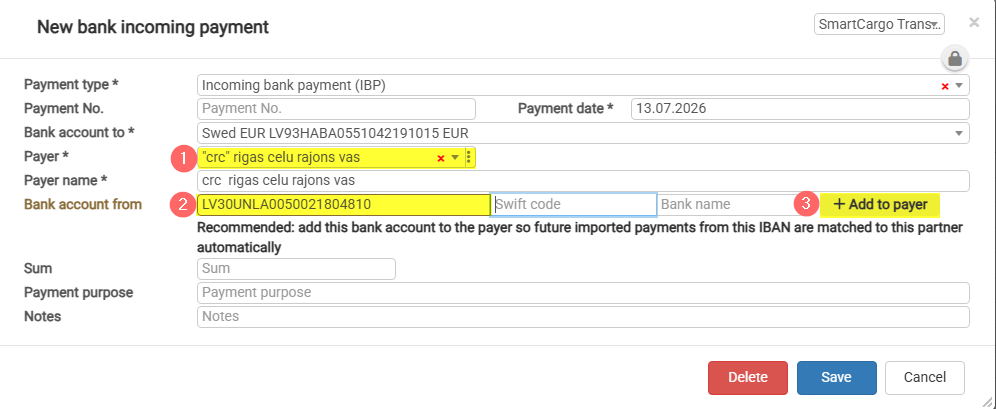](https://help.cloudex.app/uploads/images/gallery/2026-07/imwimage.png) ##### 2 Trick. How to unrelate payment from invoice [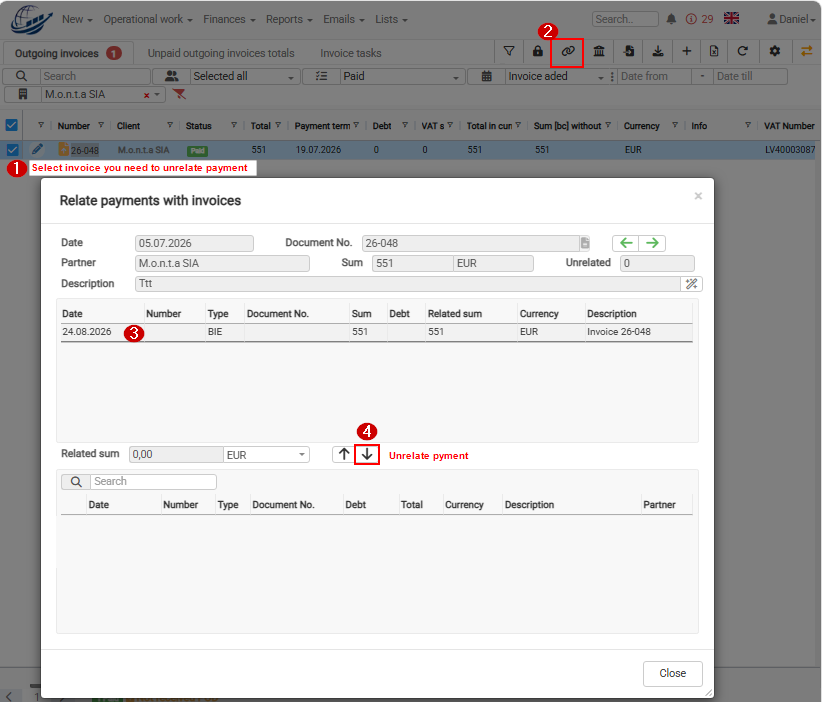](https://help.cloudex.app/uploads/images/gallery/2026-08/ftgimage.png) # When is the invoice “Date sent” field filled in automatically? Cloudex TMS fills in the **Date sent** field automatically when both of the following conditions are met: 1. **Send by email only** is selected. 2. The invoice is sent by email from Cloudex TMS. When the **Date sent** field contains a date, the invoice status changes automatically to **Invoice sent**. [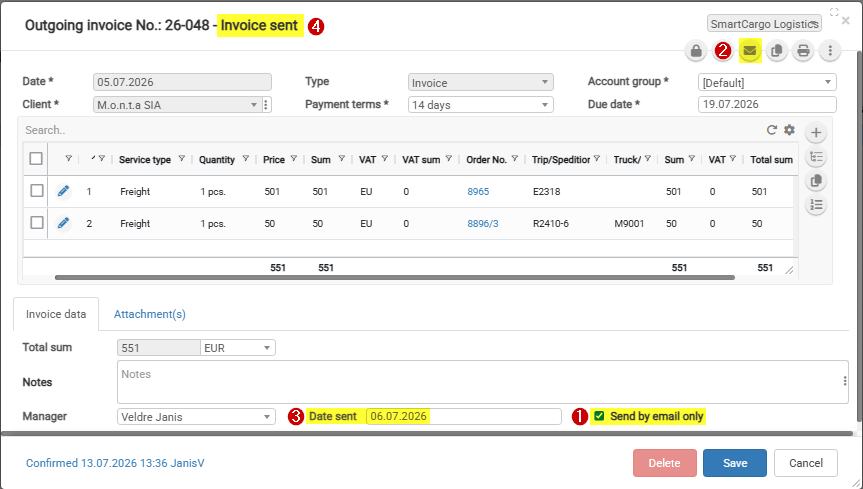](https://help.cloudex.app/uploads/images/gallery/2026-07/fM0image.png) The **“Send by email only”** checkbox value is set automatically when generating an invoice from an order. The checkbox value depends on the **“Send invoices”** field value. [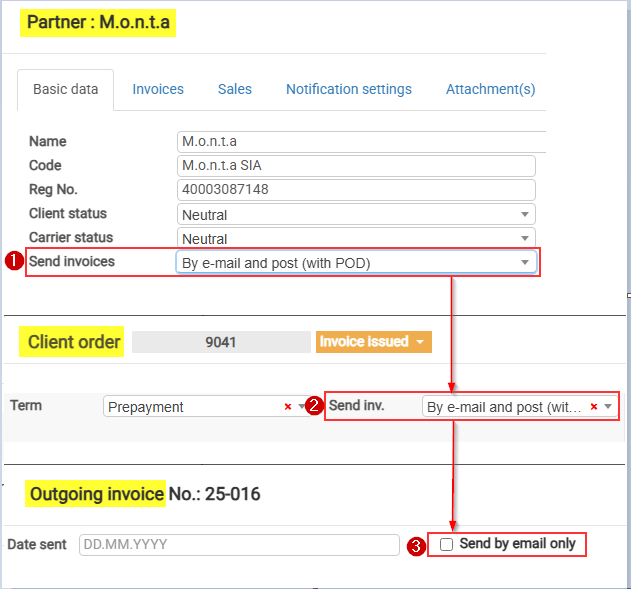](https://doc.ozols.lv/uploads/images/gallery/2026-01/image-1769069369331.png) **Send invoices** values marked with “\*” set the **“Send by email only”** checkbox value automatically:| **Send invoices setting** | **“Send by email only” selected automatically** |
|---|---|
| *By e-mail (with POD)* | Yes |
| By post (with POD) | No |
| By e-mail and post (with POD) | No |
| *Don’t send (Self-billing)* | Yes |
| *Download in Client Portal* | Yes |
| By e-mail (invoice upon delivery, second time with POD) | No |
| *By e-mail (without POD)* | Yes |
| Upload to the Client Portal together with POD | No |
**Finances** -> **Outgoing invoices** -> **Unpaid outgoing invcoices tools**
[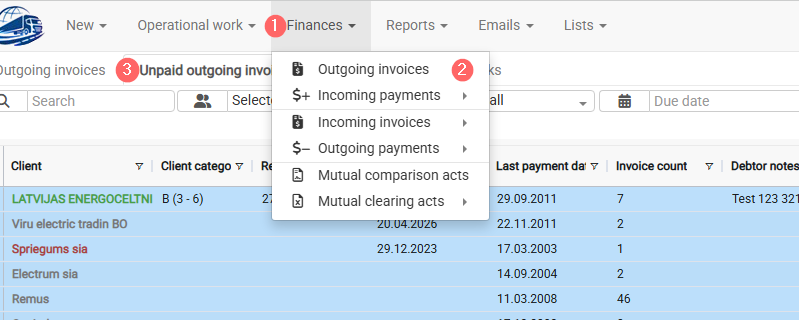](https://help.cloudex.app/uploads/images/gallery/2026-07/p8Zimage.png) [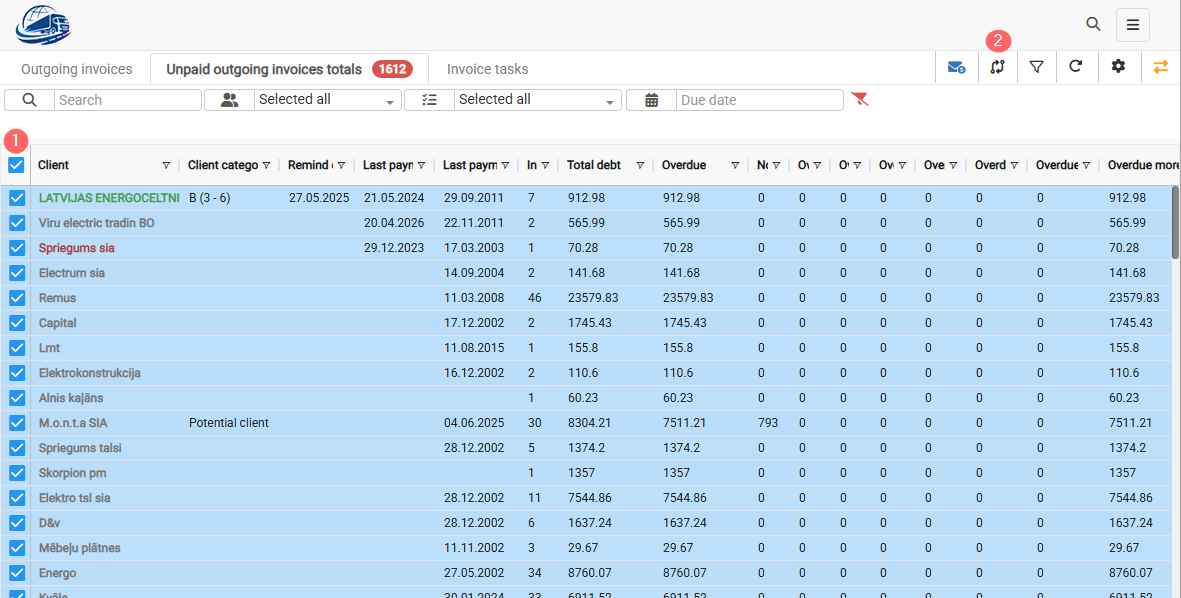](https://help.cloudex.app/uploads/images/gallery/2026-07/dm2image.png) [](https://help.cloudex.app/uploads/images/gallery/2026-07/B4Eimage.png) # How to send payment reminders for unpaid outgoing invoices? Use this instruction when you need to send payment reminders to customers for unpaid outgoing invoices. 1. Open **Finances → Outgoing invoices → Unpaid outgoing invoices totals**. [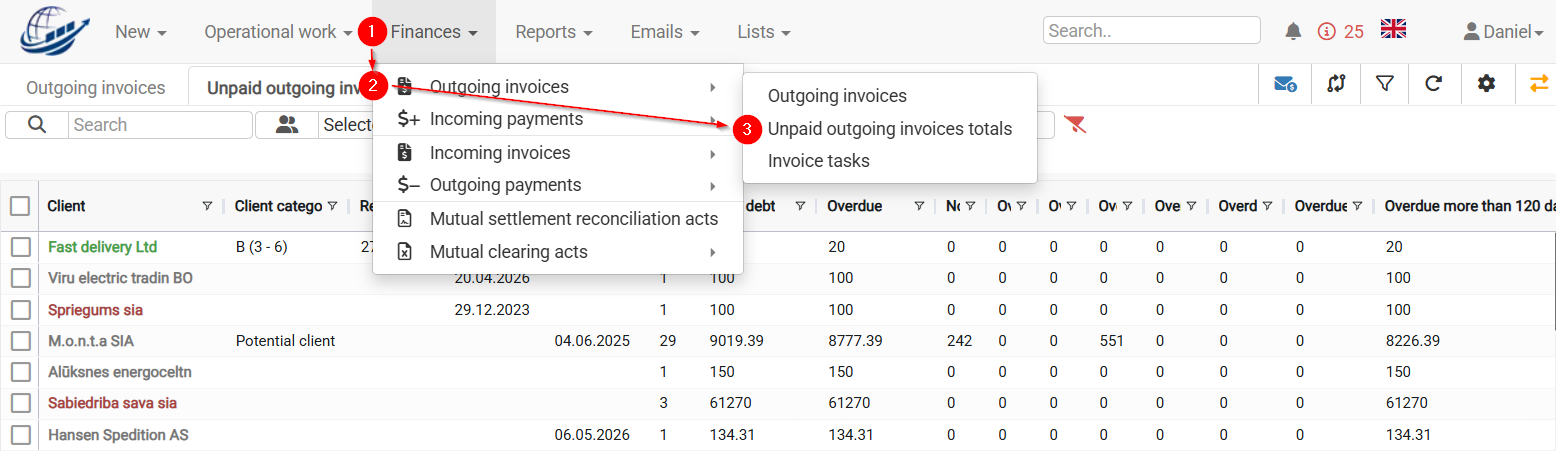](https://help.cloudex.app/uploads/images/gallery/2026-08/outgoing-invoice-upayed.png) 2\. In the **Due date** field, select the date you want to check (usually today). 3\. CLOUDEX TMS will show the invoices that were still unpaid for the selected due date.If no **Due date** is selected, the system will display all unpaid invoices. Usually, payment reminders should be sent only for overdue invoices.
4\. Select the customers for whom you want to send payment reminders. 5\. Click **Send payment reminders**. [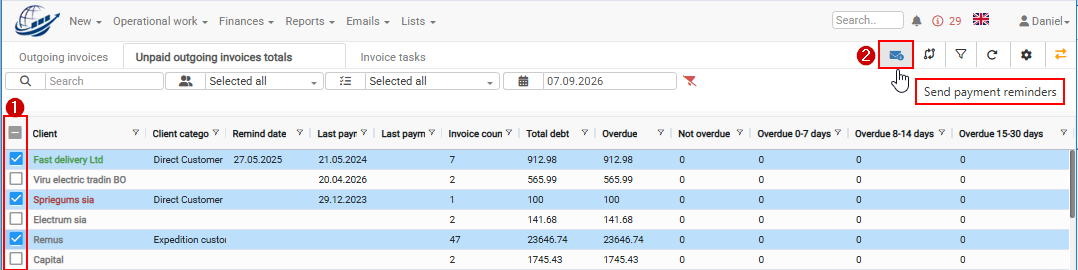](https://help.cloudex.app/uploads/images/gallery/2026-09/Bwgimage.png) 6\. In the reminder window, select the required payment reminder text. 7\. If needed, select **Attach unpaid invoices as PDFs**. 8\. Send the payment reminders. [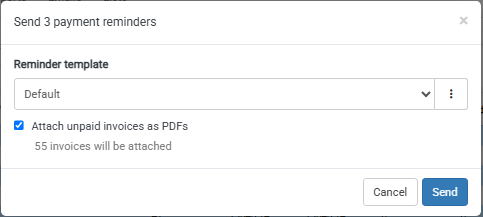](https://help.cloudex.app/uploads/images/gallery/2026-09/1G8image.png)If **Attach unpaid invoices as PDFs** is selected, the unpaid invoices will be added to the reminder email as separate PDF attachments.
##### **Where will the payment reminder be sent?** CLOUDEX TMS sends the payment reminder using this order: 1. To the customer’s **Reminder email**. 2. If the **Reminder email** is empty, to the customer’s **Invoice email**. 3. If both fields are empty, the reminder is sent to the manager responsible for the order included in the [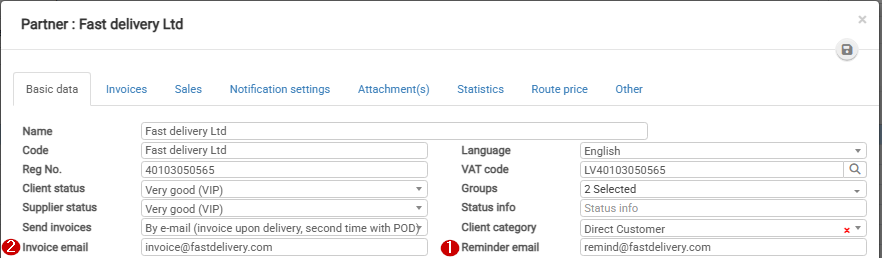](https://help.cloudex.app/uploads/images/gallery/2026-09/2jOimage.png) ##### **Common mistakes** - No **Due date** is selected, so all unpaid invoices are shown. - The wrong customer is selected. - The customer’s **Reminder email** is empty. - The invoice is unpaid in CLOUDEX TMS, but it has already been paid outside the system. - Unpaid invoice PDFs are not attached when the customer needs invoice copies. # How to send outgoing invoices automatically To generate an invoice automatically, the following criteria must be met: 1. In the client card Invoices tab has to be mark [](https://help.cloudex.app/uploads/images/gallery/2026-08/7yrimage.png) 2. Order must be in status "**Delivered**" [](https://help.cloudex.app/uploads/images/gallery/2026-08/PdNimage.png) 3. Depending on the selected **“Send inv.”** option, a POD/CMR may need to be **uploaded** and **approved** before the invoice can be generated.  [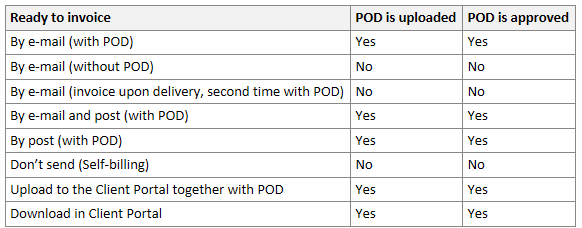](https://help.cloudex.app/uploads/images/gallery/2026-08/xWXimage.png) **Active orders** [](https://help.cloudex.app/uploads/images/gallery/2026-08/8Alactiveorderautoinvoicing-en.gif) [](https://help.cloudex.app/uploads/images/gallery/2026-08/B9vimage.png) Second orange empty circle means **POD/CMR approval is expected**,  icon indicates that the invoice is ready to be generated **manually,**  icon indicates that the invoice will be generated **automatically.** ##### Whre to find checkbox "Generate invoice automatically" [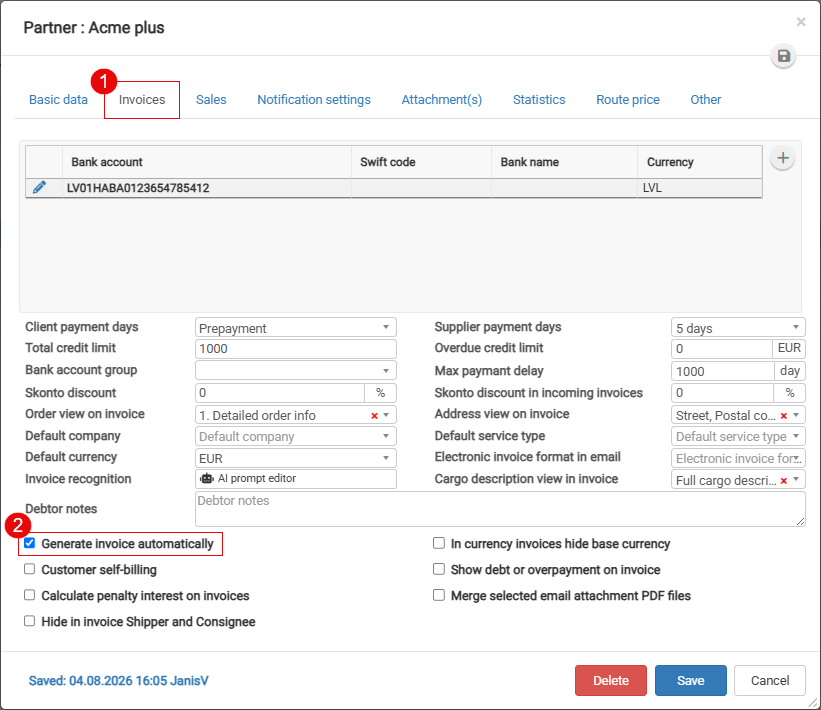](https://help.cloudex.app/uploads/images/gallery/2026-08/7x9image.png) # How to credit an outgoing invoice and create a new corrected invoice? Use this instruction when an outgoing invoice has already been created, but it must be corrected by creating a credit invoice and then creating a new corrected invoice. This process includes four main steps: 1. [Create a credit invoice for the existing invoice.](https://help.cloudex.app/link/78#bkmrk-1.-make-credit-invoi) 2. [Create a new corrected invoice.](https://help.cloudex.app/link/78#bkmrk-2.-make-new-invoice) 3. [Update the income amount in the client order.](https://help.cloudex.app/link/78#bkmrk-3.-edit-total-income) 4. [Clear the debts for the original invoice and the credit invoice.](https://help.cloudex.app/link/78#bkmrk-4.-clear-credited-in) #### 1. How to create a credit invoice? 1. Open the outgoing invoice that needs to be credited. 2. Click the **three-dot menu**. 3. Select **Create credit invoice**. [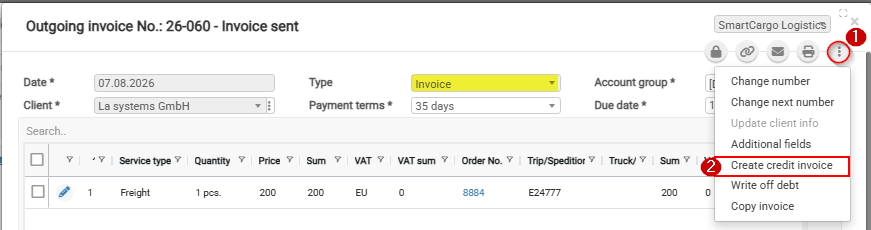](https://help.cloudex.app/uploads/images/gallery/2026-08/E69image.png) CLOUDEX TMS will create a new invoice with the type **Credit invoice**. The credit invoice will have the same amount as the original invoice, but with a minus value. If you only need to credit part of the invoice amount, click the **Edit** icon in the invoice content list and change the amount. [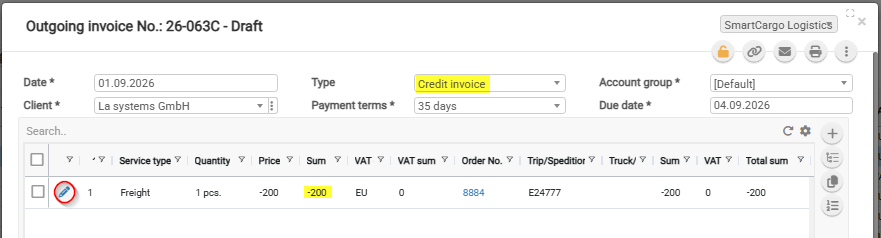](https://help.cloudex.app/uploads/images/gallery/2026-09/image.png) #### 2. How to create a new corrected invoice?Before creating the new invoice, correct the information in the related **Client order** that caused the original invoice to be incorrect.
Then create a new outgoing invoice from the same client order. [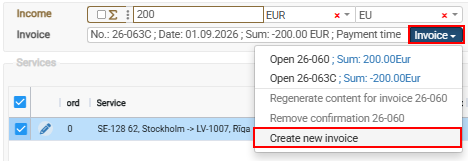](https://help.cloudex.app/uploads/images/gallery/2026-09/zfCimage.png) #### 3. How to update the income amount in the client order? Open the related **Client order** and update the **Income** amount so that it matches the total amount of all outgoing invoices connected to this order. This is important when the corrected invoice amount is different from the original invoice amount. [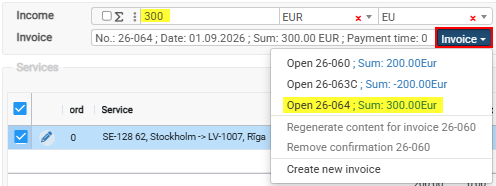](https://help.cloudex.app/uploads/images/gallery/2026-09/U6kimage.png) #### 4. How to clear the debts for the original invoice and credit invoice? After the credit invoice is created, clear the debts for both: - the original outgoing invoice; - the credit invoice. [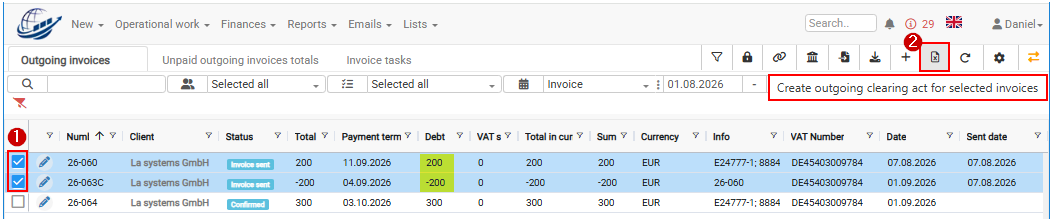](https://help.cloudex.app/uploads/images/gallery/2026-09/fryimage.png) Create an **Outgoing invoice clearing act**. After the clearing act is created, the debts for both invoices will be cleared and both invoice statuses will be changed to **Paid**. [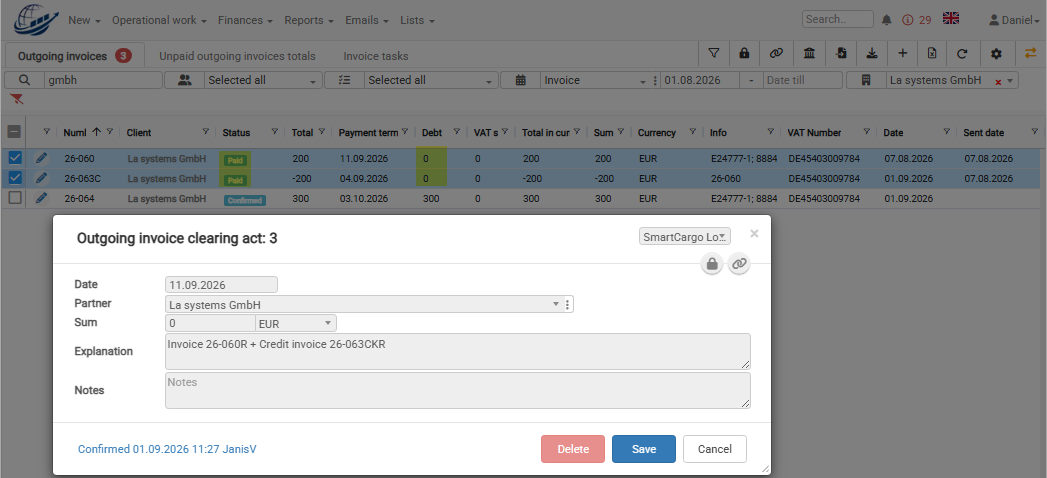](https://help.cloudex.app/uploads/images/gallery/2026-09/UM7image.png) #### **Common mistakes** - The client order is not corrected before creating the new invoice. - The credit invoice amount is not adjusted when only part of the invoice should be credited. - The income amount in the client order is not updated after creating the corrected invoice. - The original invoice and credit invoice debts are not cleared. # How to record a customer self-billing invoice? Use this function when your customer uses **self-billing** — meaning that the customer creates the invoice for your services on your behalf. In Cloudex TMS, you should still create the **Outgoing invoice** as usual so that the revenue, customer debt and related Client orders are correctly recorded in the system. Additionally, Cloudex TMS allows you to save the invoice number assigned by the customer in the **Self-billing No** field. This is especially useful when the customer later makes a payment using their self-billing invoice number as the payment reference. #### 1. How to enable self-billing for a customer? You only need to configure this once for each customer that uses self-billing. Go to: **Partners → Open the customer → Invoices** 1. Open the **Invoice** tab. 2. Select **Customer uses self-billing**. 3. Click the **Save** button. After this setting is enabled, the **Self-billing No** field will become available on outgoing invoices created for this customer. [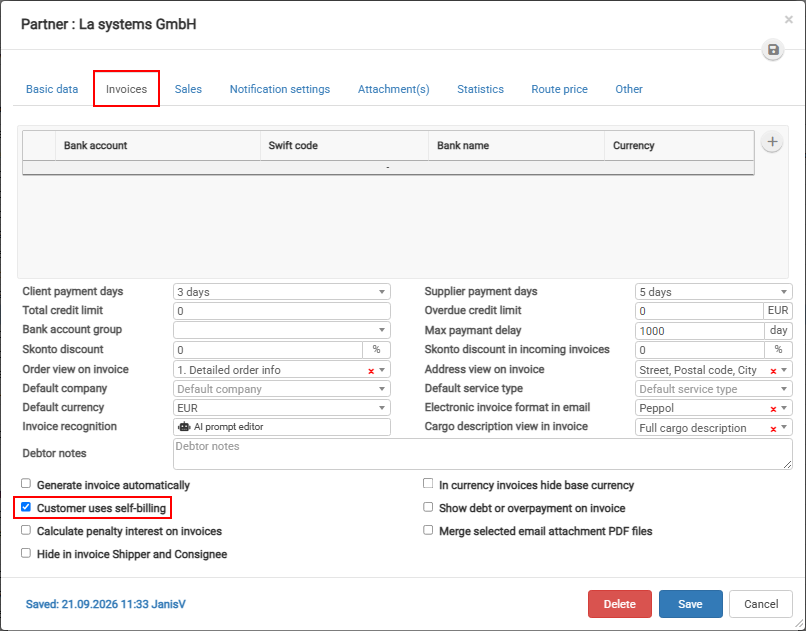](https://help.cloudex.app/uploads/images/gallery/2026-09/jIVimage.png) #### 2. How to enter the customer's self-billing invoice number? Create the customer's **Outgoing invoice** in Cloudex TMS as usual. On the outgoing invoice: 1. Find the **Self-billing No** field. 2. Enter the invoice number shown on the self-billing invoice received from the customer. 3. Click the **Save** button. ##### Example Cloudex TMS outgoing invoice number: **INV-2026-01584** Customer's self-billing invoice number: **SB-45879** Enter **SB-45879** in the **Self-billing No** field. The Cloudex TMS invoice number remains unchanged. [](https://help.cloudex.app/uploads/images/gallery/2026-09/zfUimage.png) #### Why is the Self-billing No important? Customers that use self-billing may use **their own invoice number** when making a payment. Saving this number in Cloudex TMS makes it easier to identify which outgoing invoice the received payment belongs to and helps with automatic or manual payment matching.