Settings
- How to set your email password to send emails from Cloudex TMS?
- How to update Order for Carrier and Order for Client rules?
- How to set up Office365 e-mail?
- How to add your signature with a company stamp to your profile?
- How to set up gmail e-mail?
- How to edit VAT rate description
- How to set up an AI mailbox for incoming invoice reading
- How to create API Key
- How to add a carrier TMS API key?
How to set your email password to send emails from Cloudex TMS?
To send emails from Cloudex TMS:
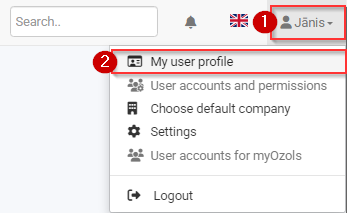
1. Click on the Your User Name icon
2. In menu select the My user profile
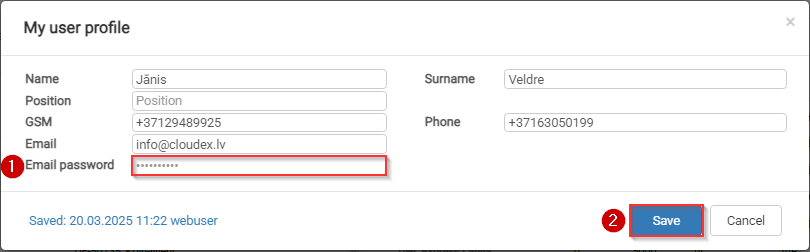
In the Email password field:
1. Enter your Email password
2. Click the Save button
How to update Order for Carrier and Order for Client rules?
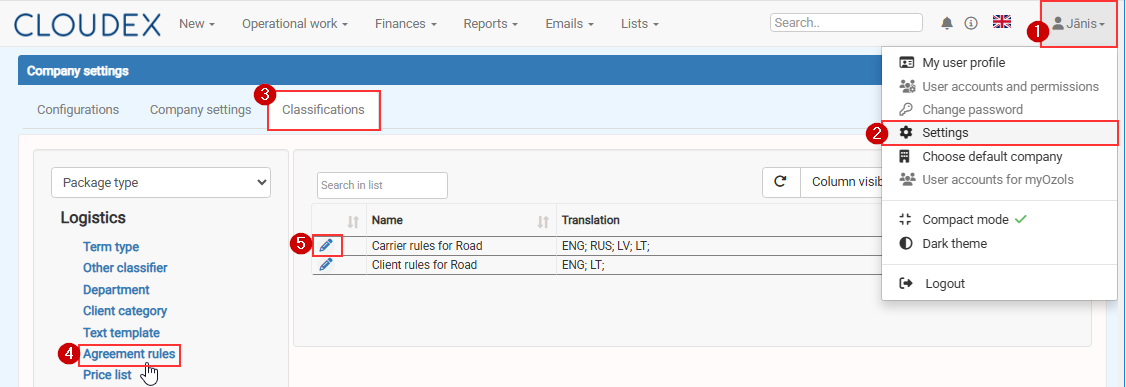
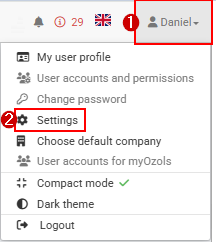
- Click Your name in the top-right corner.
- Select Settings.
- Open the Classifications tab.
- Select Agreement rules from the menu on the left.
- Click the Edit icon next to the required rule:
- Carrier rules for Road or
- Client rules for Road.
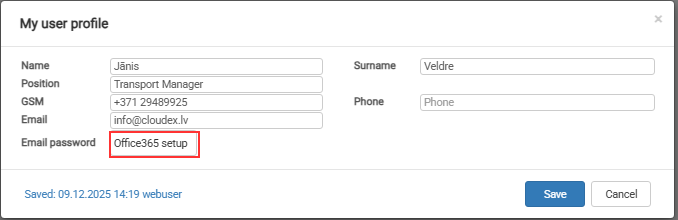
How to set up Office365 e-mail?
If your email provider is Microsoft Office365 You need o set up email sending following this instruction
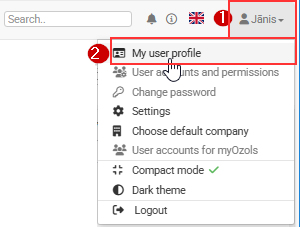
1. Click on your Name icon
2. Choose My user profile
Then press command button Connect to Microsoft
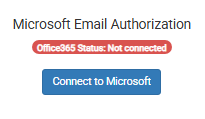
Login with your email and follow further instructions.
How to add your signature with a company stamp to your profile?
Correct example
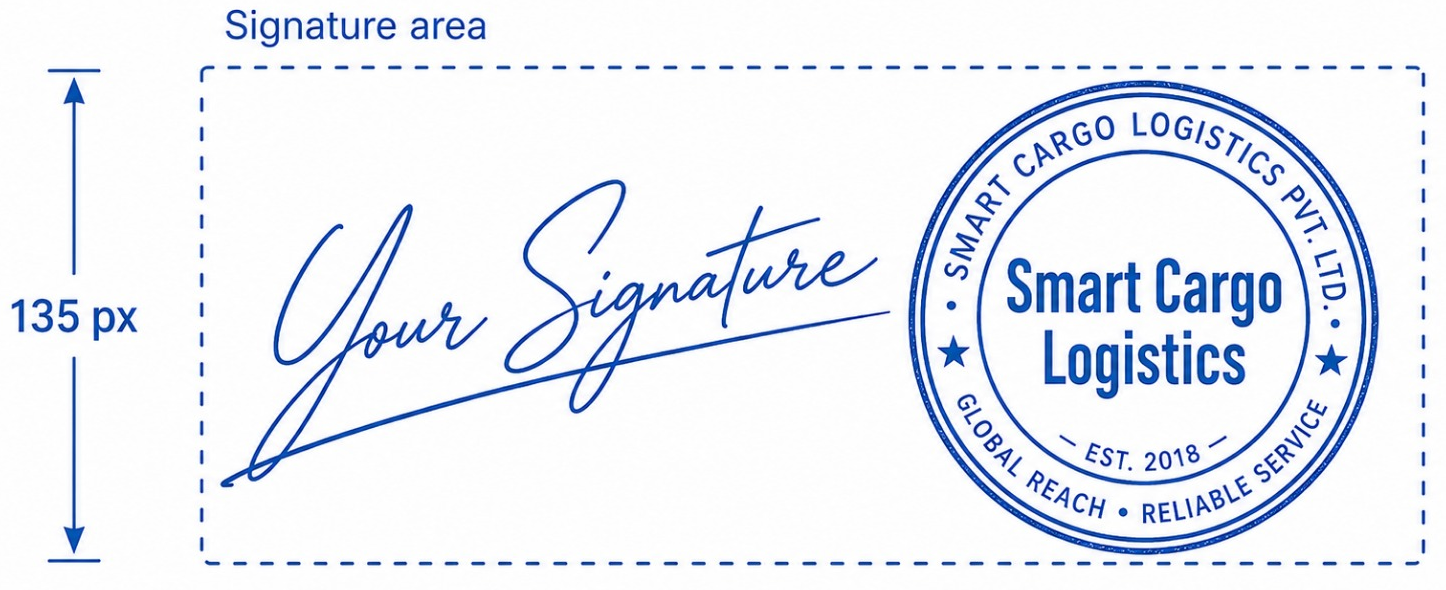
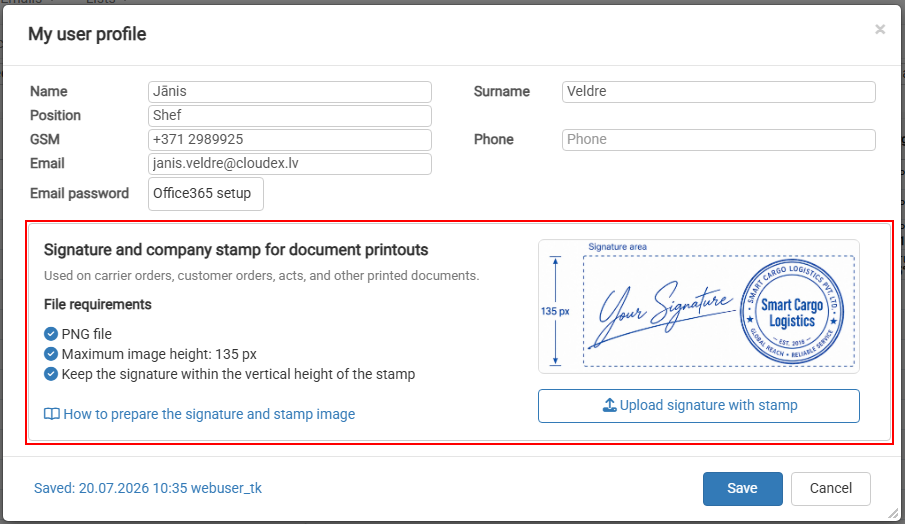
Tips and Tricks
use https://www.remove.bg to remove ugly grey signature background
How to set up gmail e-mail?
1. To send Gmail emails from within OZOLS TMS, follow these steps:
1) Open a Google account and authorize:
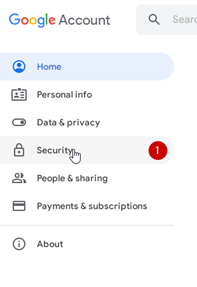
2) Opens the Security section
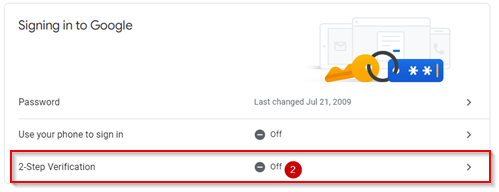
3) Activate two-step authentication (a confirmation code will be sent to the phone)
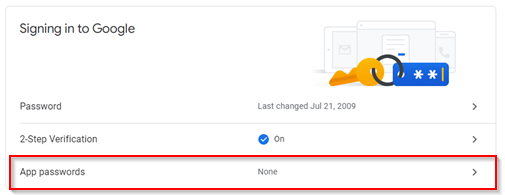
4) Select App passwords
4) Choose Other (Custom name)
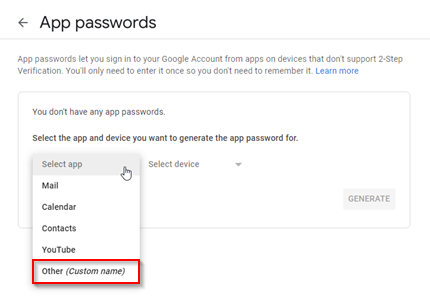
5) Type "Ozols" in the window and press GENERATE
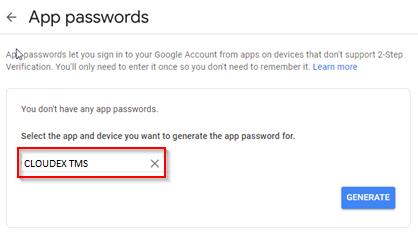
5) A gmail password for the OZOLS TMS system is created
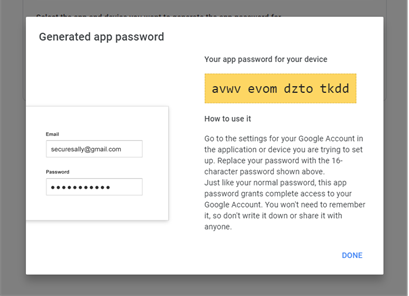
5) This password must be entered in the user's email settings in CLOUDEX TMS by following the instructions here.
How to edit VAT rate description
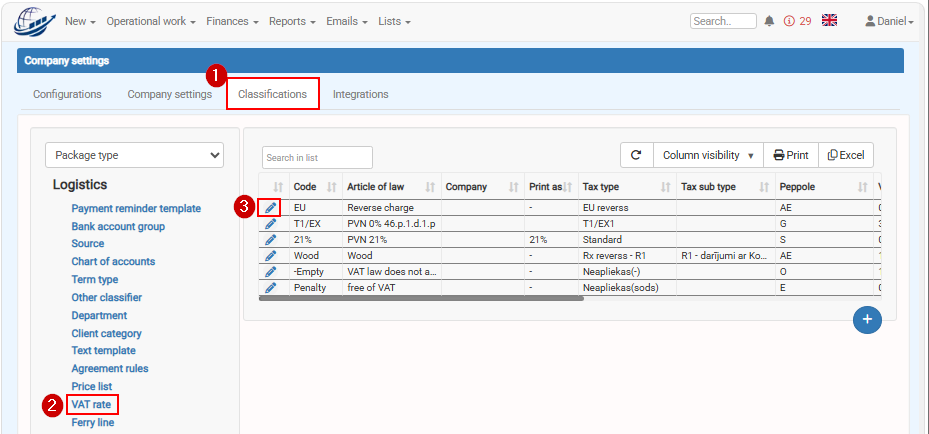
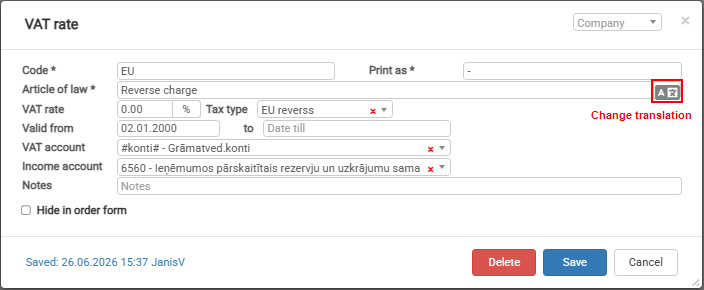
Pressing on Change translations button
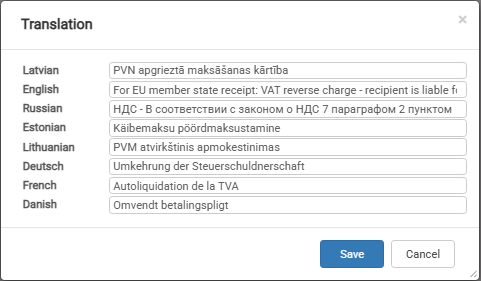
How to set up an AI mailbox for incoming invoice reading
Cloudex TMS can use AI to read incoming invoice emails and automatically create Incoming invoices from the information and attachments received by email.
To use this functionality, first connect the email mailbox that Cloudex TMS should monitor for incoming invoices.
When to use
Set up an AI mailbox if you want Cloudex TMS to automatically process invoices received from carriers or other suppliers by email.
After the mailbox is connected, Cloudex TMS can process incoming emails, read invoice information using AI, and create Incoming invoices for further review and processing.
Before you start
You need:
- an email account that will receive incoming invoices;
- the email account login details;
- access rights to Cloudex TMS integration settings.
We recommend using a dedicated email address for invoices whenever possible, for example an address where carriers and suppliers send their invoices.
How to connect the AI mailbox
-
Go to:
My profile → Settings → Integrations → Email password

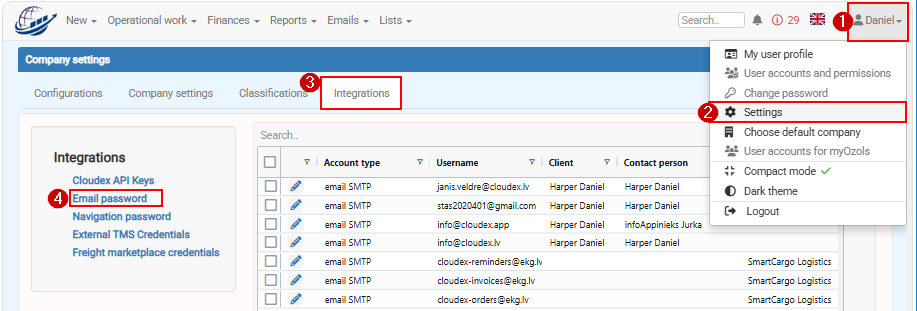
2. Click New

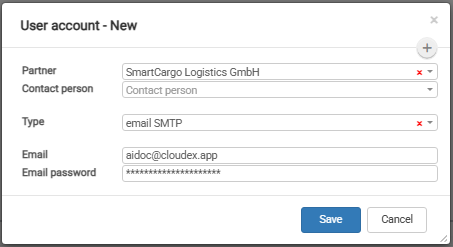
3. Enter the details of the email account that Cloudex TMS should use for AI invoice reading.
4. Check that the entered email account information is correct.
5. Click Save.
What happens after the mailbox is connected?
Incoming invoice emails received in the connected AI mailbox can be processed by Cloudex TMS.
AI can read information from the received invoice and use it to create an Incoming invoice in Cloudex TMS.
Email attachments are also added to the created Incoming invoice.
Important: AI-generated invoices should still be reviewed by a user before they are approved or used for further accounting processes. AI can interpret documents incorrectly or may not have enough information to identify all invoice details correctly.
Recommended next step
After setting up the mailbox, see:
How to work with Incoming invoices created by AI
This article explains how to review AI-generated invoices, check attachments, relate them to the correct Trip or Client order, and correct information when necessary.
Common problems
Cloudex TMS does not receive emails
Check that:
- the correct email account has been configured;
- the email login information is correct;
- invoices are actually being received in the configured mailbox.
How to create API Key
When should I create a Cloudex API key?
Create a Cloudex API key when another system needs to exchange data with your Cloudex TMS account through the Cloudex API.
For example, an API integration can be used to:
- Import shipments/orders into Cloudex TMS from another system.
- Retrieve shipment statuses and milestones.
- Download documents such as PODs or CMRs.
- Export outgoing invoices to an accounting system.
- Export incoming invoices to an accounting system.
- Retrieve debtor information for a credit-management system.
Cloudex API Keys are used when an external system connects to Cloudex TMS.
If Cloudex TMS needs to connect to another TMS, use External TMS Credentials instead.
What should I know before creating an API key?
An API key is a security credential that allows another system to access Cloudex TMS through the API.
Only create an API key for a trusted integration partner or system, and share it only with the intended recipient.
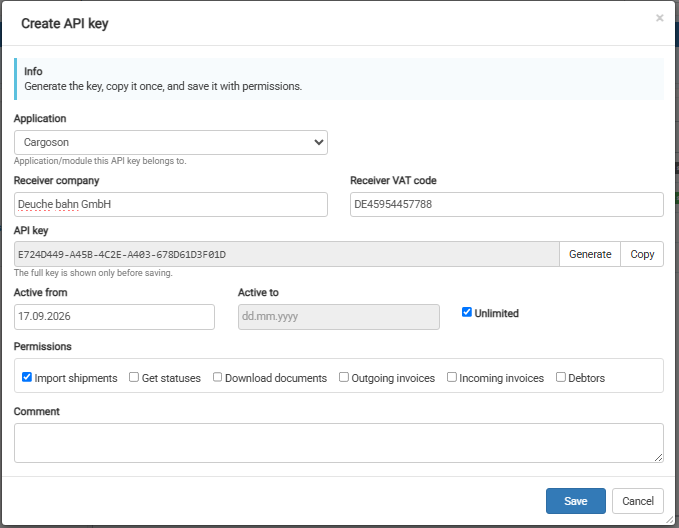
IMPORTANT: Copy the API key before saving it.
After the API key has been saved, the key itself will no longer be visible in Cloudex TMS.
How do I create a Cloudex API key?
Go to: Your name → Settings → Integrations → Cloudex API keys
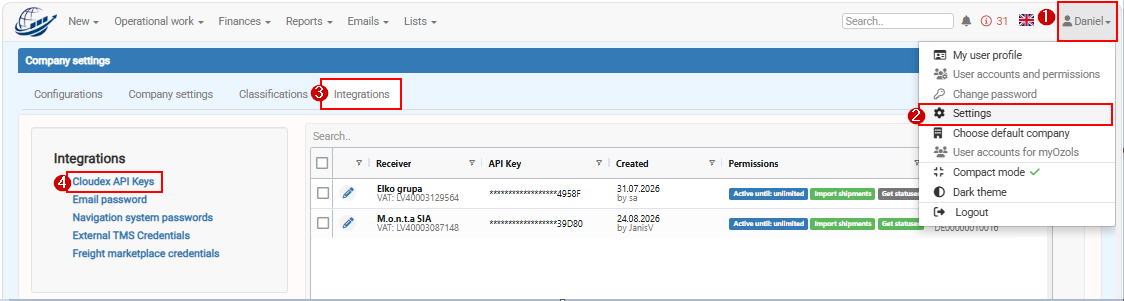
- Click (+) New API key.
- Fill in the required information in the API key form.
- Copy the generated API key before saving.
- Store the API key securely or send it securely to the integration partner who needs it.
- Click Save.
Your integration partner can now use the API key to authenticate requests to the Cloudex API.
What if I forgot to copy the API key?
For security reasons, the API key is not displayed again after it has been saved.
Therefore, always copy the key before clicking Save.
Security recommendations
Treat an API key like a password.
Do not include API keys in screenshots, help documentation, public messages, or other places where unauthorized users could access them.
If an API key should no longer be used, it should be disabled or removed from Cloudex TMS.
How to add a carrier TMS API key?
Add a carrier's TMS API key when Cloudex TMS needs to send transport orders or other information directly to the carrier's external TMS.
For example, if your carrier uses XSPED or Terminality, their API credentials must be registered in Cloudex TMS before you can send orders to their system via API.
Note: This is not a Cloudex API key.
Here you enter API credentials provided by the carrier or their TMS provider.
When do you need this?
You need to add carrier TMS credentials when:
- the carrier uses an external TMS supported by Cloudex TMS;
- you want to send transport orders directly from Cloudex TMS to the carrier's TMS;
- the integration requires API authentication provided by the carrier.
If the carrier also uses Cloudex TMS, you normally do not need to enter an external API key. Cloudex recognizes the Cloudex-to-Cloudex connection automatically.
Before you start
Ask the carrier or their TMS provider for the API credentials required for the integration.
You will also need to know which carrier in your Partners list the credentials belong to.
How to add the carrier TMS API key
Go to: My Profile → Settings → Integrations → External TMS credentials
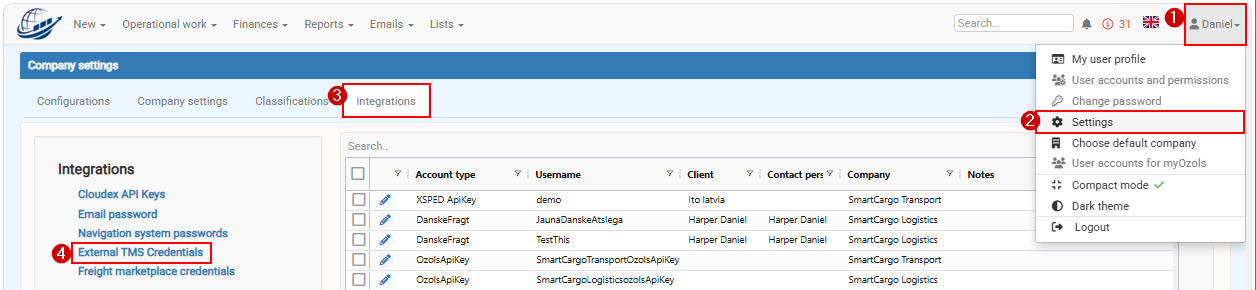
- Click Add.
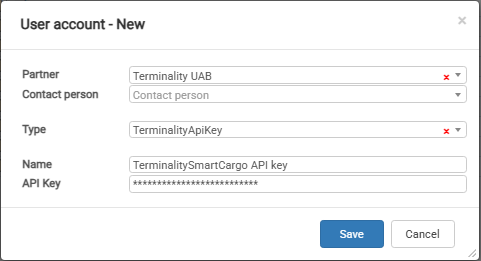
- In Partner, select the carrier whose TMS credentials you are adding.
- In Type, select the carrier's TMS system.
- In API key, enter the API key provided by the carrier or their TMS provider.
- Click Save.
The credentials are now linked to that carrier.
What happens after the API key is added?
When you select this carrier in Trip/Spedition, Cloudex TMS can recognize that an external TMS integration is configured.
If the integration supports sending transport orders, the Send order to carrier function becomes available.
You can then send the transport order directly from Cloudex TMS to the carrier's TMS without manually entering the same order in another system.
Cloudex API key vs. External TMS credentials
These two settings are used for opposite integration directions:
| Setting | Direction | Who provides the API key? |
|---|---|---|
| Cloudex API keys | External system → Cloudex TMS | Cloudex TMS |
| External TMS credentials | Cloudex TMS → External TMS | Carrier / external TMS provider |
Use Cloudex API keys when another system needs access to Cloudex TMS.
Use External TMS credentials when Cloudex TMS needs access to another TMS.
Related topics
- How to send an order to a carrier via API?
- How to create API key
- How to receive statuses and documents from a carrier via API