CLOUDEX TMS
- Settings
- How to set your email password to send emails from Cloudex TMS?
- How to update Order for Carrier and Order for Client rules?
- How to set up Office365 e-mail?
- How to add your signature with a company stamp to your profile?
- How to set up gmail e-mail?
- How to edit VAT rate description
- How to set up an AI mailbox for incoming invoice reading
- How to create API Key
- How to add a carrier TMS API key?
- Client orders
- How to create a new client order?
- How to Add Multiple Loading or Delivery Addresses – Multibooking?
- How to Add order to the trip?
- How to search, filter, and adjust the Client Orders list?
- How to send an order acceptance confirmation to a client?
- How to add Delivery via Terminal to a Client order?
- How to add GPS coordinates to a client order address?
- How to generate CMR
- Trip planning
- How to open the Active Trips view?
- How to open the Unplanned Cargo Map?
- How to open Trip Tracking / Map / Chat?
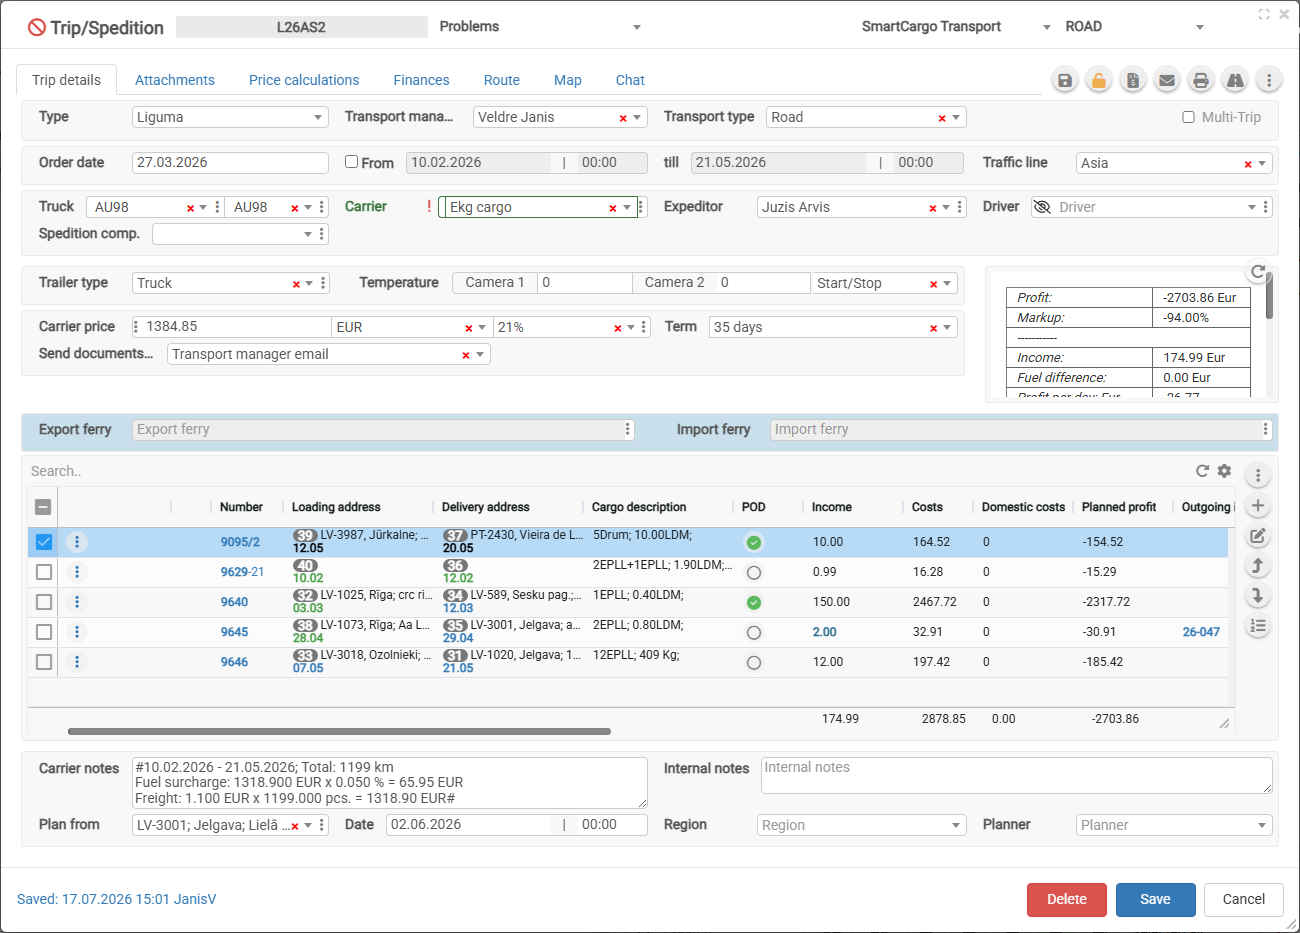
- How to create a new trip?
- How to cauculate trip price
- How to change the loading and delivery sequence in a trip?
- Order Execution & Delivery
- How to send an order to a carrier?
- How to send a trip to the driver?
- How to Configure Customer Shipment Notifications?
- How to give access and rights to Client and Carrier portal and send Invitation for Access
- How to send an order to a carrier via API?
- How to send automatic milestone and document request emails
- Outgoing invoices (debtors)
- How to Import Bank Payments and Mark Invoices as Paid
- When is the invoice “Date sent” field filled in automatically?
- How to connect your bank account for automatic payment import?
- How to send electronic Invoice to your client?
- How to create a mutual comparison?
- How to send payment reminders for unpaid outgoing invoices?
- How to send outgoing invoices automatically
- How to credit an outgoing invoice and create a new corrected invoice?
- How to record a customer self-billing invoice?
- Incoming Invoices (Creditors)
- How to register an Incoming Invoice?
- How to apply a discount (Skonto) to an incoming invoice?
- How to find carrier orders or trips for which an incoming invoice has not been received?
- How to pay Incoming invoices?
- How to review AI-generated Incoming invoices and POD/CMR documents?
- Tips and Tricks
Settings
How to set your email password to send emails from Cloudex TMS?
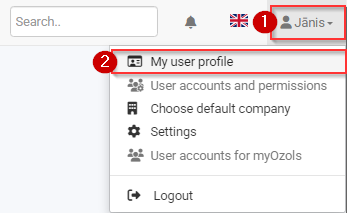
To send emails from Cloudex TMS:
1. Click on the Your User Name icon
2. In menu select the My user profile
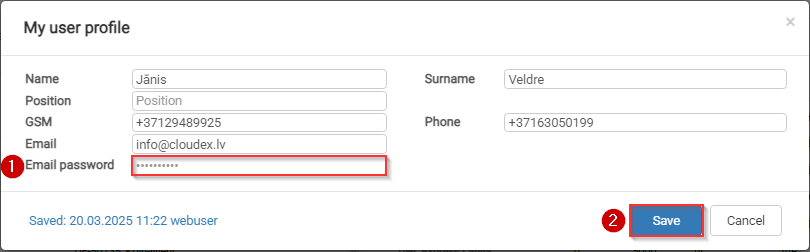
In the Email password field:
1. Enter your Email password
2. Click the Save button
How to update Order for Carrier and Order for Client rules?
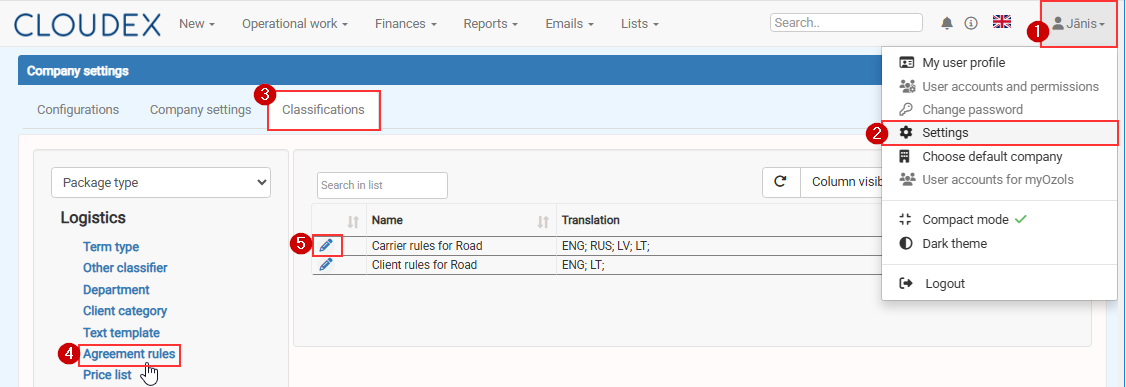
- Click Your name in the top-right corner.
- Select Settings.
- Open the Classifications tab.
- Select Agreement rules from the menu on the left.
- Click the Edit icon next to the required rule:
- Carrier rules for Road or
- Client rules for Road.
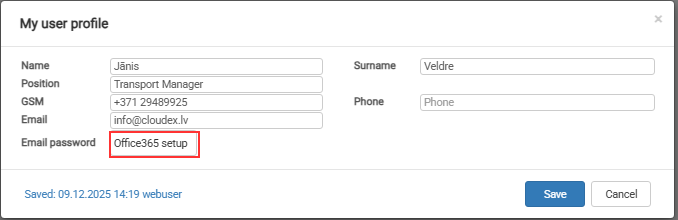
How to set up Office365 e-mail?
If your email provider is Microsoft Office365 You need o set up email sending following this instruction
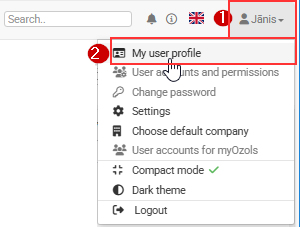
1. Click on your Name icon
2. Choose My user profile
Then press command button Connect to Microsoft
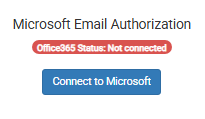
Login with your email and follow further instructions.
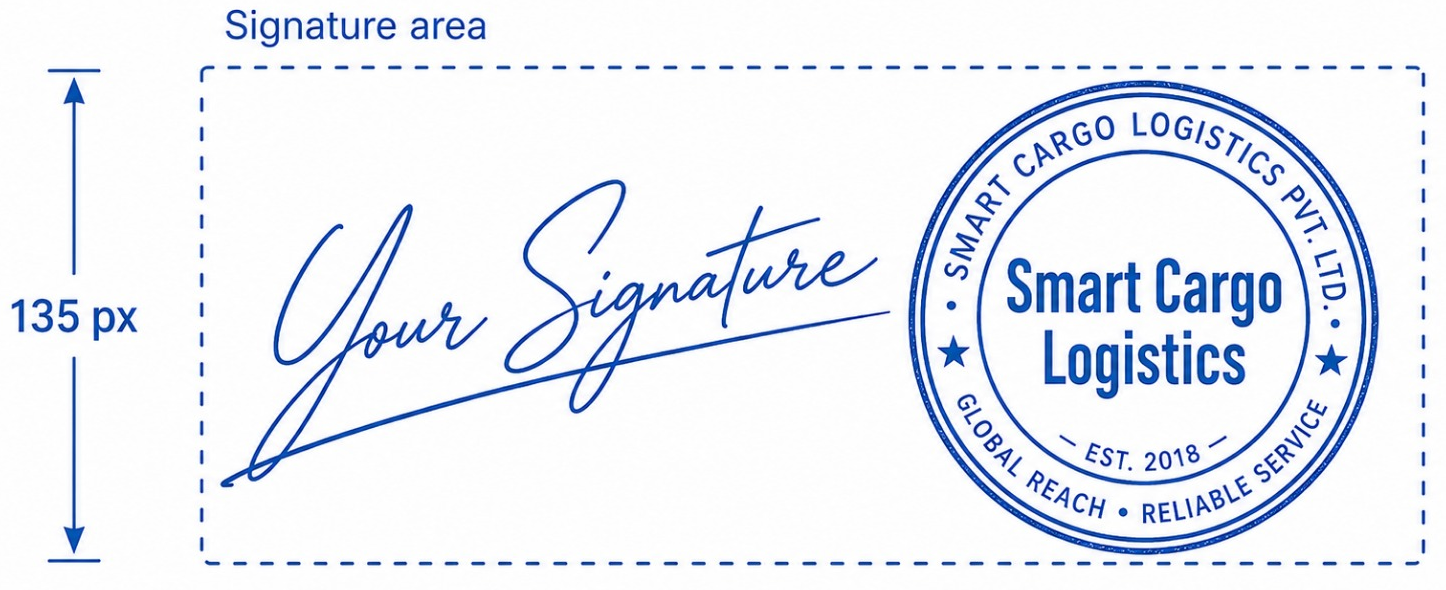
How to add your signature with a company stamp to your profile?
Correct example
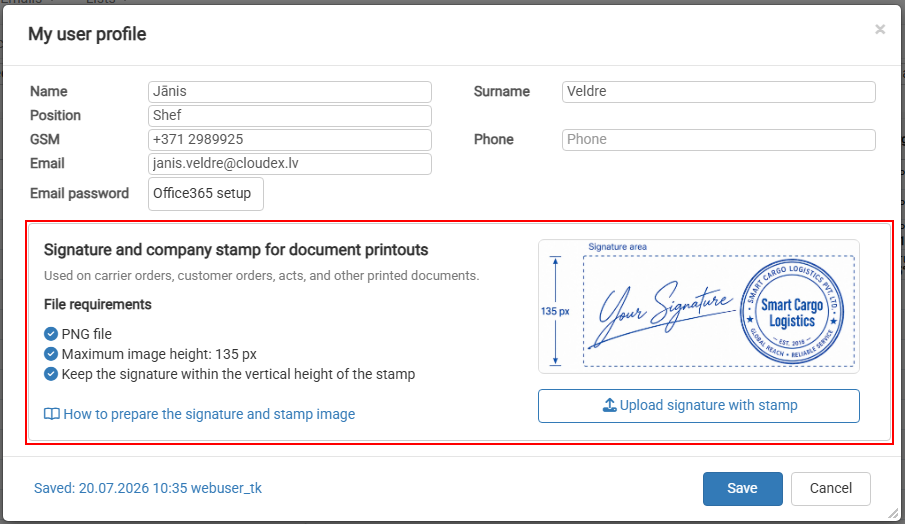
Tips and Tricks
use https://www.remove.bg to remove ugly grey signature background
How to set up gmail e-mail?
1. To send Gmail emails from within OZOLS TMS, follow these steps:
1) Open a Google account and authorize:
2) Opens the Security section
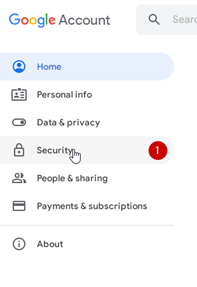
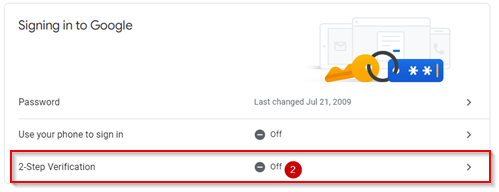
3) Activate two-step authentication (a confirmation code will be sent to the phone)
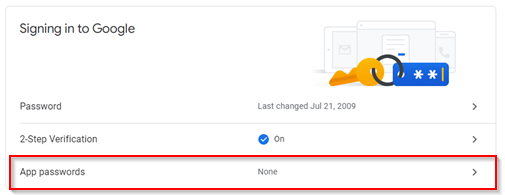
4) Select App passwords
4) Choose Other (Custom name)
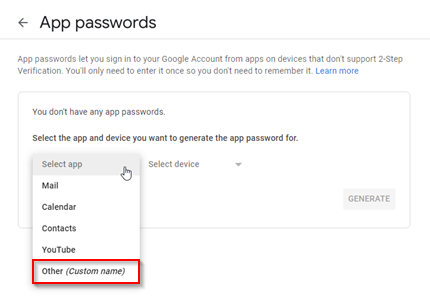
5) Type "Ozols" in the window and press GENERATE
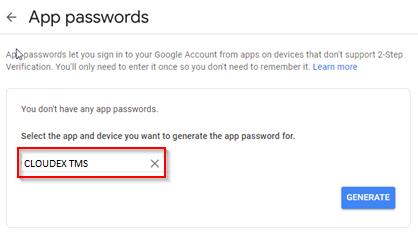
5) A gmail password for the OZOLS TMS system is created
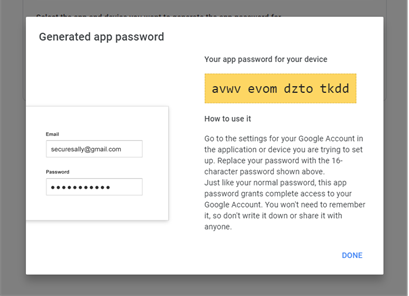
5) This password must be entered in the user's email settings in CLOUDEX TMS by following the instructions here.
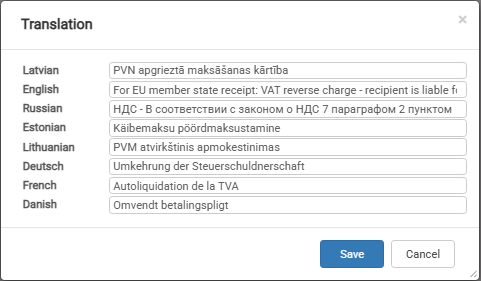
How to edit VAT rate description
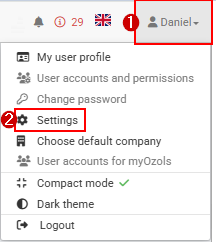
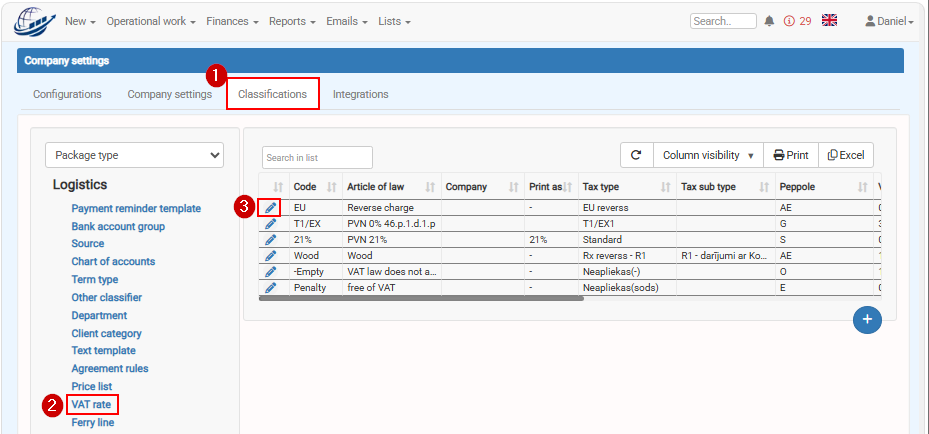
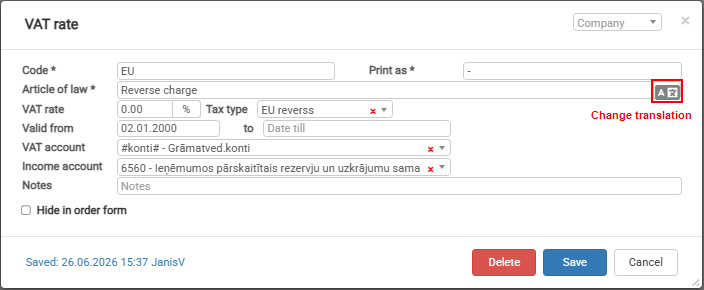
Pressing on Change translations button
How to set up an AI mailbox for incoming invoice reading
Cloudex TMS can use AI to read incoming invoice emails and automatically create Incoming invoices from the information and attachments received by email.
To use this functionality, first connect the email mailbox that Cloudex TMS should monitor for incoming invoices.
When to use
Set up an AI mailbox if you want Cloudex TMS to automatically process invoices received from carriers or other suppliers by email.
After the mailbox is connected, Cloudex TMS can process incoming emails, read invoice information using AI, and create Incoming invoices for further review and processing.
Before you start
You need:
- an email account that will receive incoming invoices;
- the email account login details;
- access rights to Cloudex TMS integration settings.
We recommend using a dedicated email address for invoices whenever possible, for example an address where carriers and suppliers send their invoices.
How to connect the AI mailbox
-
Go to:
My profile → Settings → Integrations → Email password

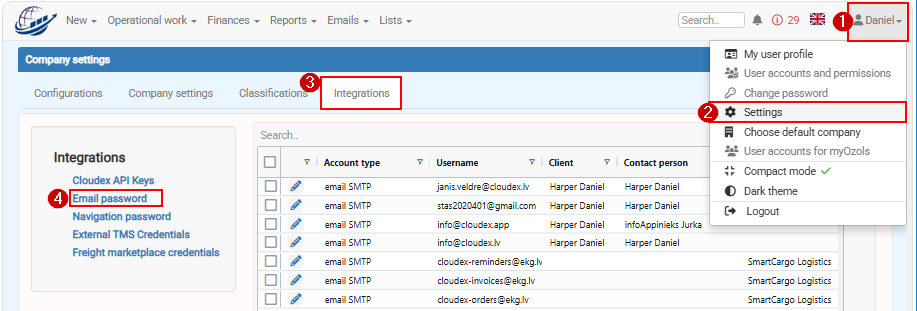
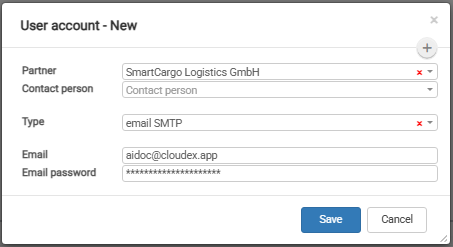
2. Click New

3. Enter the details of the email account that Cloudex TMS should use for AI invoice reading.
4. Check that the entered email account information is correct.
5. Click Save.
What happens after the mailbox is connected?
Incoming invoice emails received in the connected AI mailbox can be processed by Cloudex TMS.
AI can read information from the received invoice and use it to create an Incoming invoice in Cloudex TMS.
Email attachments are also added to the created Incoming invoice.
Important: AI-generated invoices should still be reviewed by a user before they are approved or used for further accounting processes. AI can interpret documents incorrectly or may not have enough information to identify all invoice details correctly.
Recommended next step
After setting up the mailbox, see:
How to work with Incoming invoices created by AI
This article explains how to review AI-generated invoices, check attachments, relate them to the correct Trip or Client order, and correct information when necessary.
Common problems
Cloudex TMS does not receive emails
Check that:
- the correct email account has been configured;
- the email login information is correct;
- invoices are actually being received in the configured mailbox.
How to create API Key
When should I create a Cloudex API key?
Create a Cloudex API key when another system needs to exchange data with your Cloudex TMS account through the Cloudex API.
For example, an API integration can be used to:
- Import shipments/orders into Cloudex TMS from another system.
- Retrieve shipment statuses and milestones.
- Download documents such as PODs or CMRs.
- Export outgoing invoices to an accounting system.
- Export incoming invoices to an accounting system.
- Retrieve debtor information for a credit-management system.
Cloudex API Keys are used when an external system connects to Cloudex TMS.
If Cloudex TMS needs to connect to another TMS, use External TMS Credentials instead.
What should I know before creating an API key?
An API key is a security credential that allows another system to access Cloudex TMS through the API.
Only create an API key for a trusted integration partner or system, and share it only with the intended recipient.
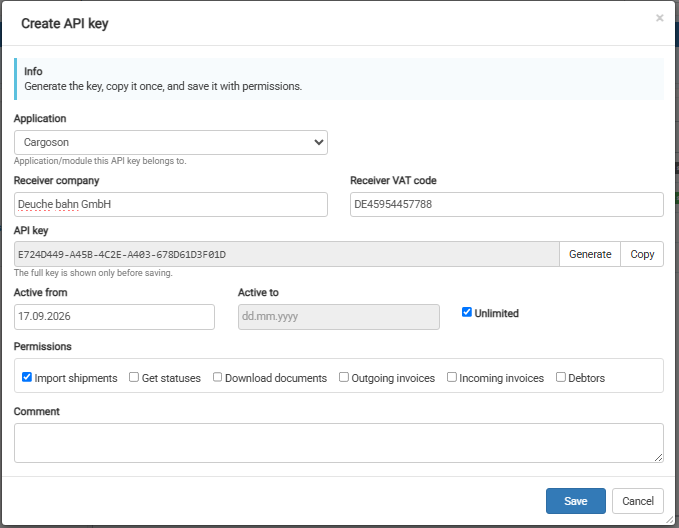
IMPORTANT: Copy the API key before saving it.
After the API key has been saved, the key itself will no longer be visible in Cloudex TMS.
How do I create a Cloudex API key?
Go to: Your name → Settings → Integrations → Cloudex API keys
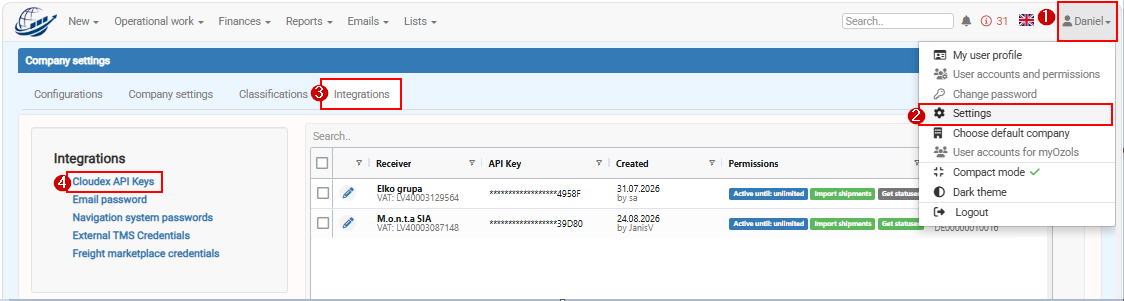
- Click (+) New API key.
- Fill in the required information in the API key form.
- Copy the generated API key before saving.
- Store the API key securely or send it securely to the integration partner who needs it.
- Click Save.
Your integration partner can now use the API key to authenticate requests to the Cloudex API.
What if I forgot to copy the API key?
For security reasons, the API key is not displayed again after it has been saved.
Therefore, always copy the key before clicking Save.
Security recommendations
Treat an API key like a password.
Do not include API keys in screenshots, help documentation, public messages, or other places where unauthorized users could access them.
If an API key should no longer be used, it should be disabled or removed from Cloudex TMS.
How to add a carrier TMS API key?
Add a carrier's TMS API key when Cloudex TMS needs to send transport orders or other information directly to the carrier's external TMS.
For example, if your carrier uses XSPED or Terminality, their API credentials must be registered in Cloudex TMS before you can send orders to their system via API.
Note: This is not a Cloudex API key.
Here you enter API credentials provided by the carrier or their TMS provider.
When do you need this?
You need to add carrier TMS credentials when:
- the carrier uses an external TMS supported by Cloudex TMS;
- you want to send transport orders directly from Cloudex TMS to the carrier's TMS;
- the integration requires API authentication provided by the carrier.
If the carrier also uses Cloudex TMS, you normally do not need to enter an external API key. Cloudex recognizes the Cloudex-to-Cloudex connection automatically.
Before you start
Ask the carrier or their TMS provider for the API credentials required for the integration.
You will also need to know which carrier in your Partners list the credentials belong to.
How to add the carrier TMS API key
Go to: My Profile → Settings → Integrations → External TMS credentials
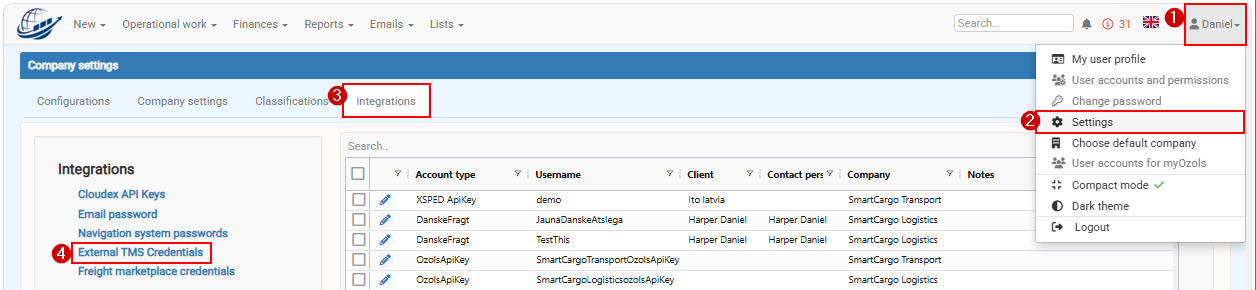
- Click Add.
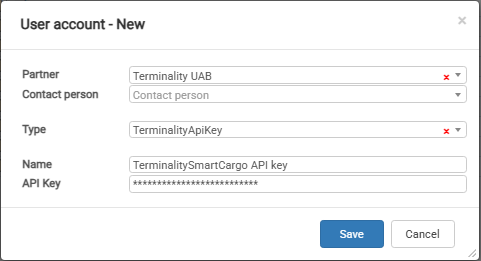
- In Partner, select the carrier whose TMS credentials you are adding.
- In Type, select the carrier's TMS system.
- In API key, enter the API key provided by the carrier or their TMS provider.
- Click Save.
The credentials are now linked to that carrier.
What happens after the API key is added?
When you select this carrier in Trip/Spedition, Cloudex TMS can recognize that an external TMS integration is configured.
If the integration supports sending transport orders, the Send order to carrier function becomes available.
You can then send the transport order directly from Cloudex TMS to the carrier's TMS without manually entering the same order in another system.
Cloudex API key vs. External TMS credentials
These two settings are used for opposite integration directions:
| Setting | Direction | Who provides the API key? |
|---|---|---|
| Cloudex API keys | External system → Cloudex TMS | Cloudex TMS |
| External TMS credentials | Cloudex TMS → External TMS | Carrier / external TMS provider |
Use Cloudex API keys when another system needs access to Cloudex TMS.
Use External TMS credentials when Cloudex TMS needs access to another TMS.
Related topics
- How to send an order to a carrier via API?
- How to create API key
- How to receive statuses and documents from a carrier via API
Client orders
How to create a new client order?
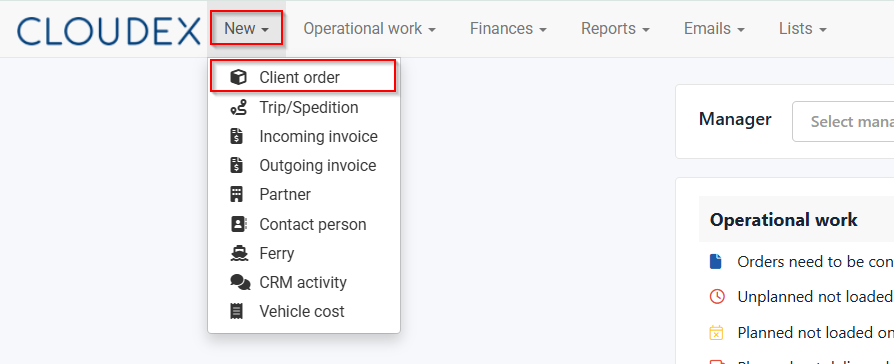
- How to create a new Client order?
- How to add a new client?
- How to Add a Partner from the EU VAT register?
How to create a new Client order?
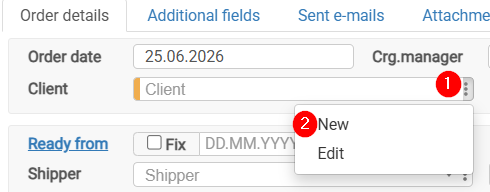
How to add a New client?
- Click on the three dots to open additional options.
- Click New to open the new partner form.
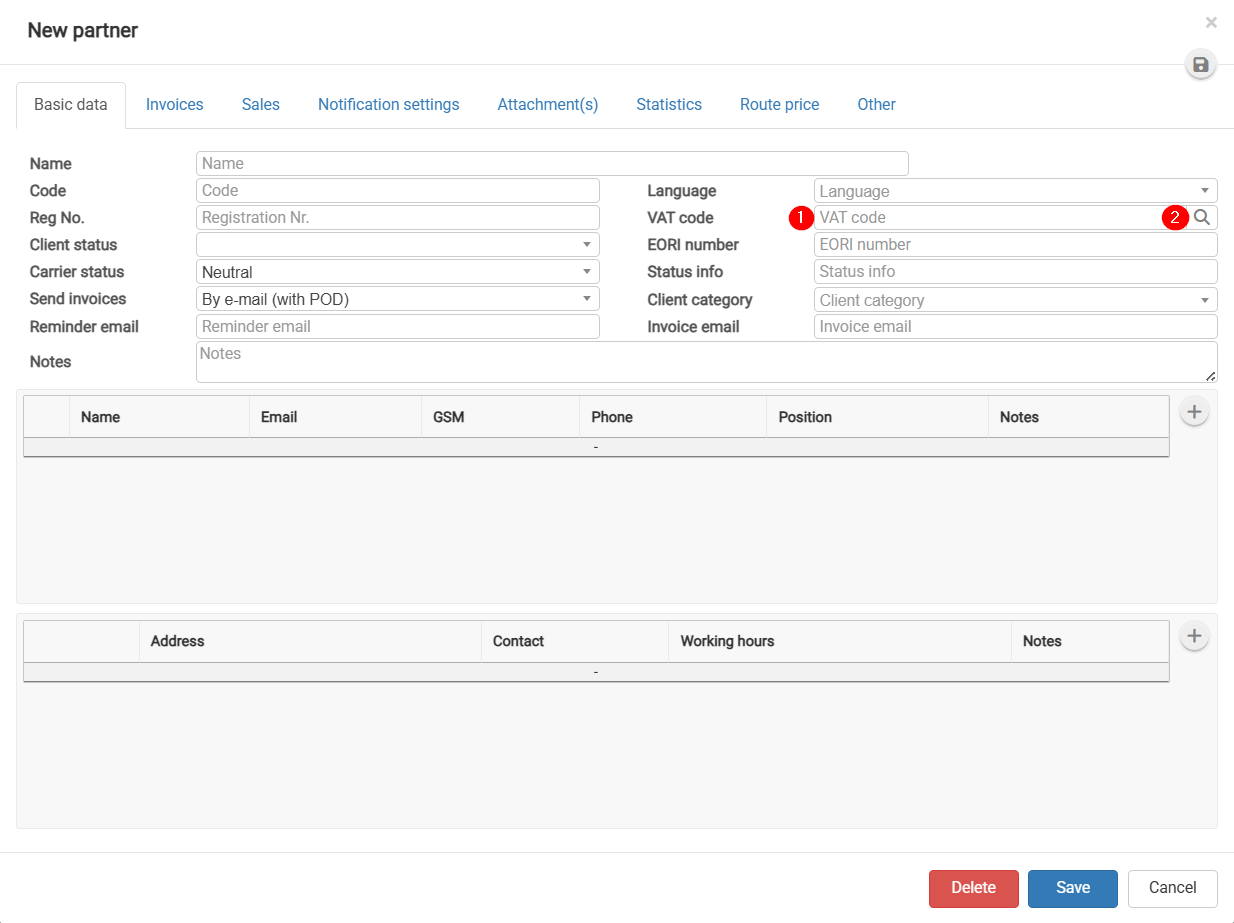
How to Add a Partner from the EU VAT Register?
- Paste the VAT number.
- Click the button
 to automatically fill in the fields.

How to Add Multiple Loading or Delivery Addresses – Multibooking?
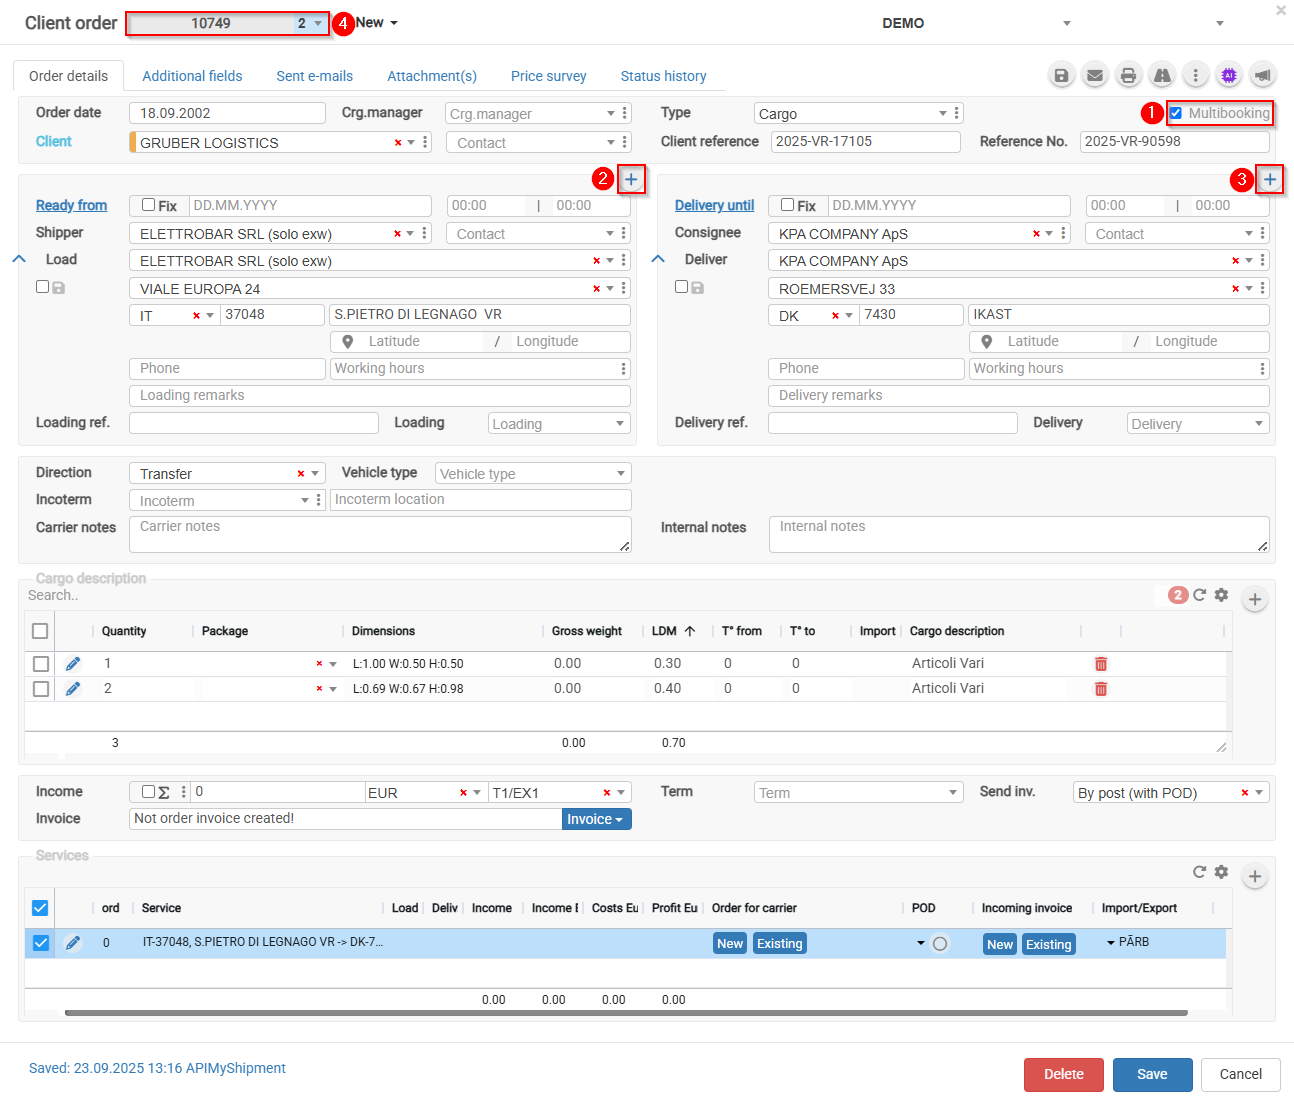
Multibooking is used when a single customer order includes multiple pickup or delivery addresses.
Form path: Client order → Multibooking → Loading/Delivery address sections → Order sub-number
- Select the Multibooking checkbox.

- Click the
 icon in the Loading section to add another loading address.
 - Click the icon in the Delivery section to add another delivery addresses.
- The order number will be assigned a sub-number.
 allows you to switch between multibooking order parts.


How to Add order to the trip?
How to add cargo from cargo form?
- Open the client order
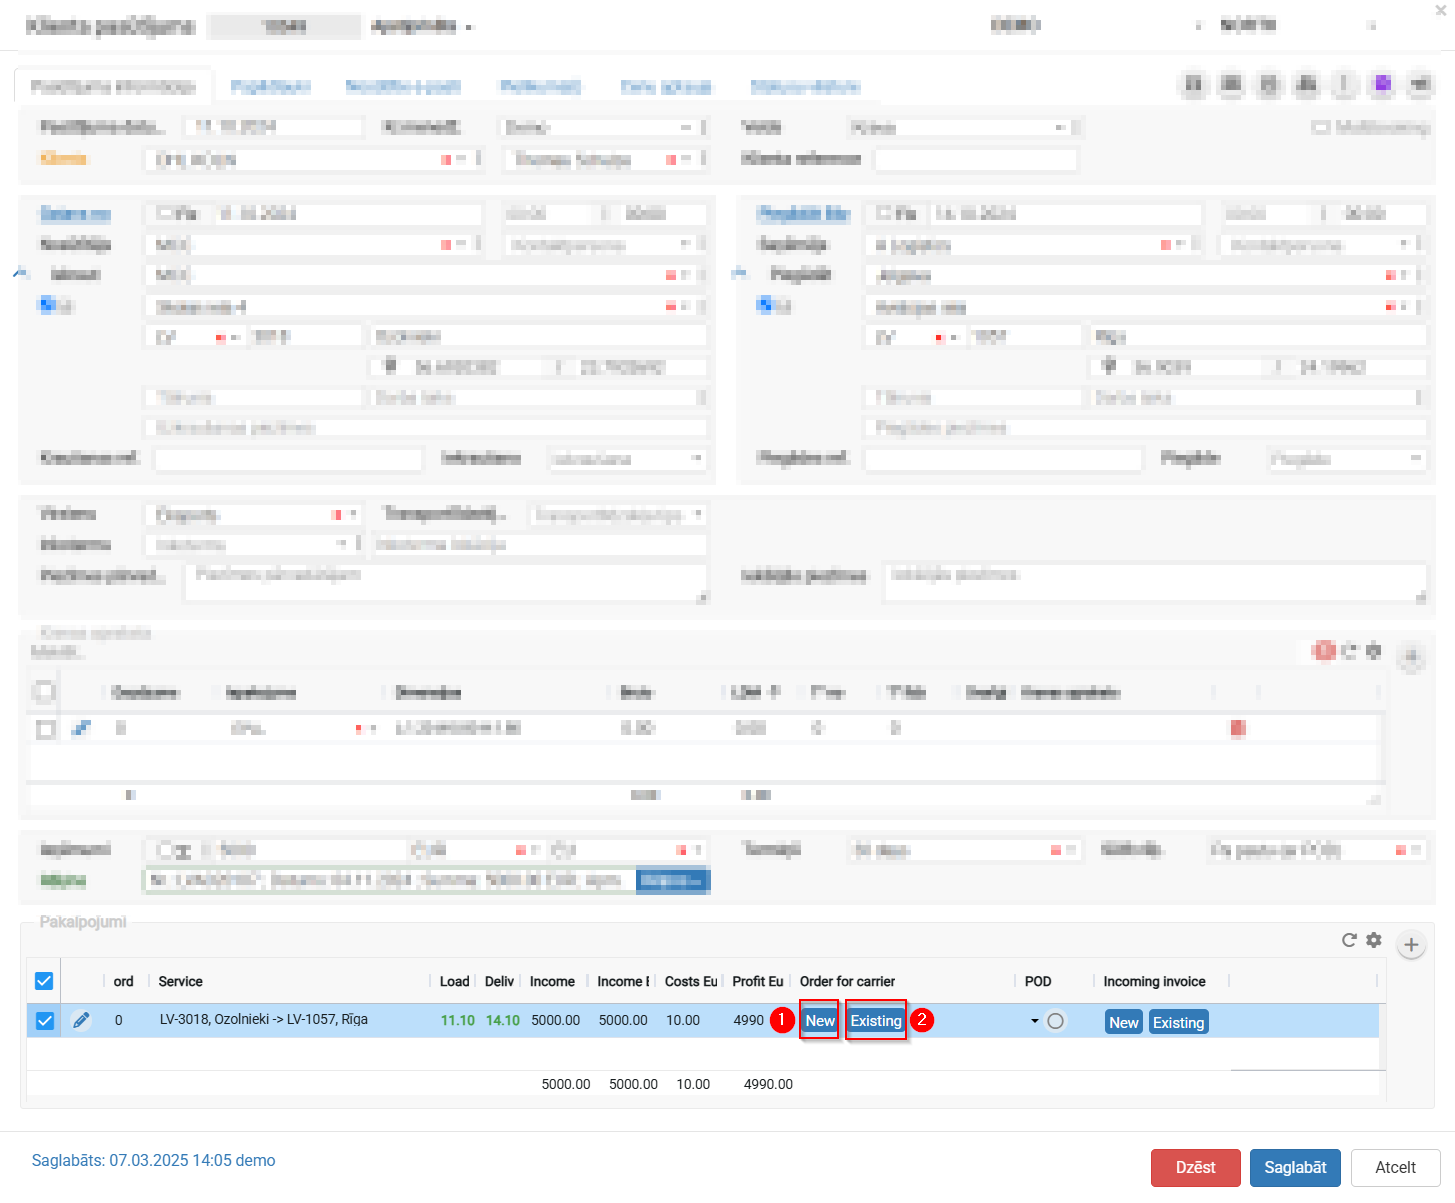
- Scroll down to the "Services" section at the bottom of the screen.
- In this table you'll see a service row with the route (e.g., LV-3018, Ozolnieki → LV-1057, Riga), loading and unloading dates, income, and costs.
- In the "Order for carrier" column there are two buttons:
- "New"
 — create a new trip/order for the carrier and assign this cargo to it.
 - "Existing"
 — assign this cargo (order) to an already existing trip.
- "New"
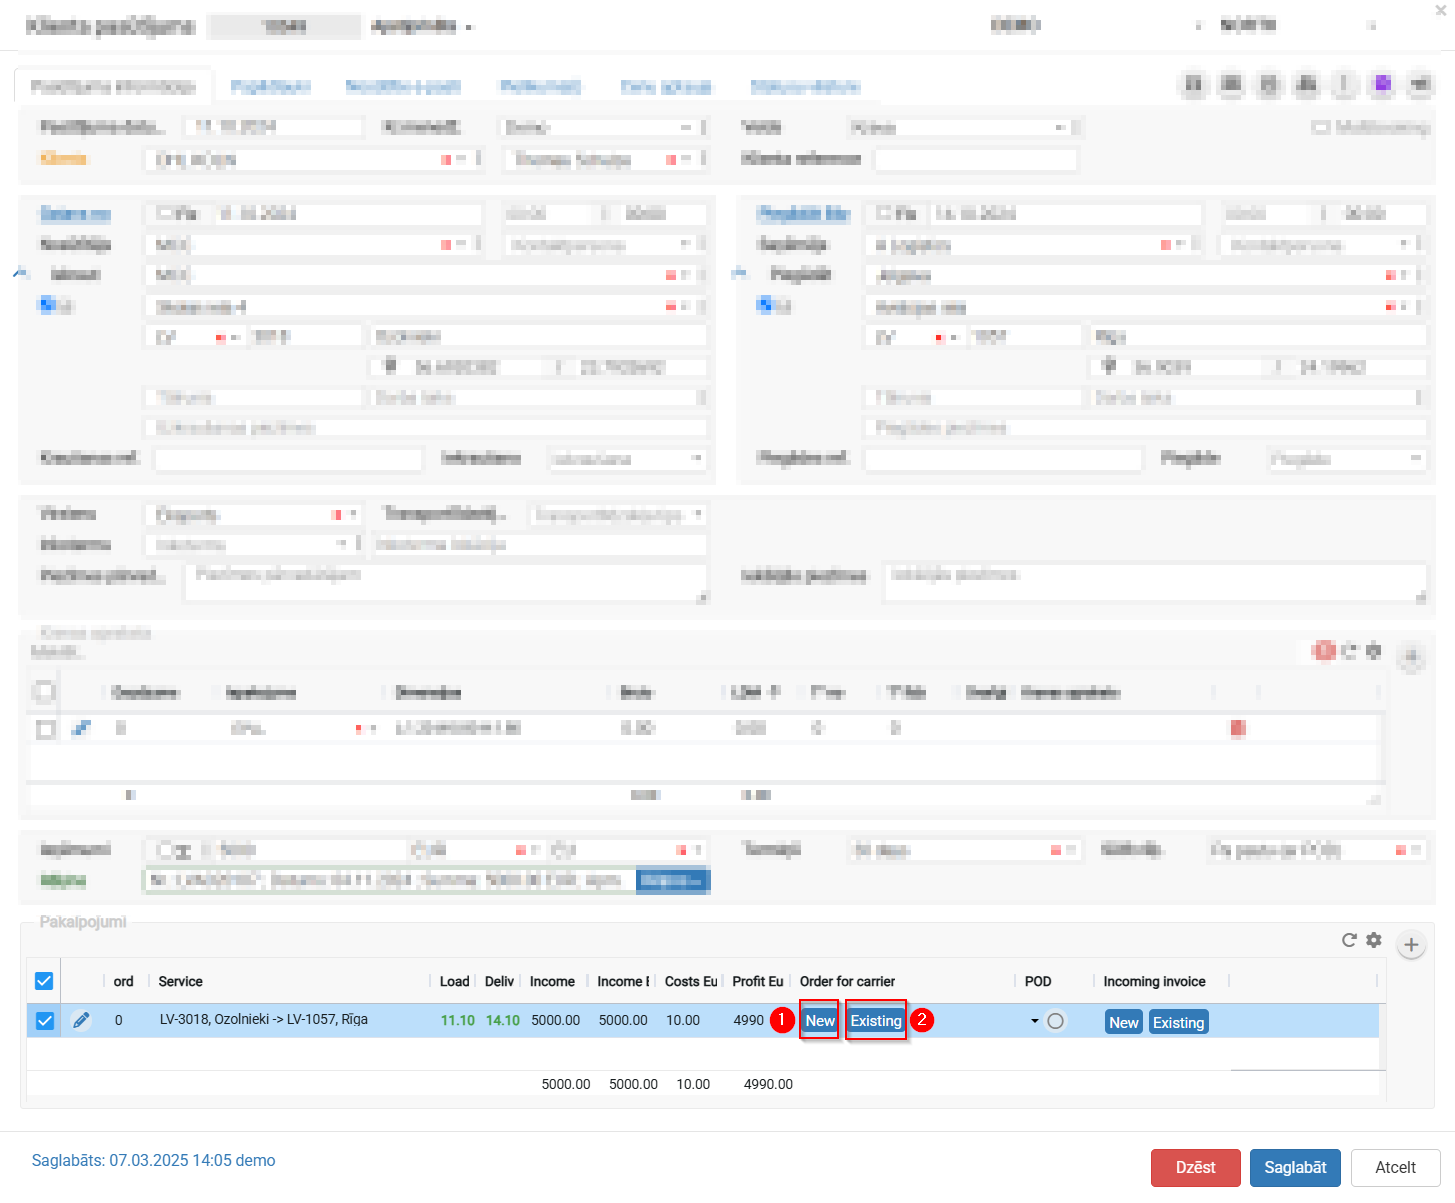
- To add the order to an existing trip:
- Click the "Existing" button.
- A window/list will open showing available trips (filterable by route, date, vehicle, etc.).
- Select the matching trip from the list and confirm.
- To create a new trip for this order:
- Click the "New" button.
- The system will create a new carrier order/trip using this client order's data (route, cargo details, dates).
- Click "Save" at the bottom of the screen to confirm the changes.


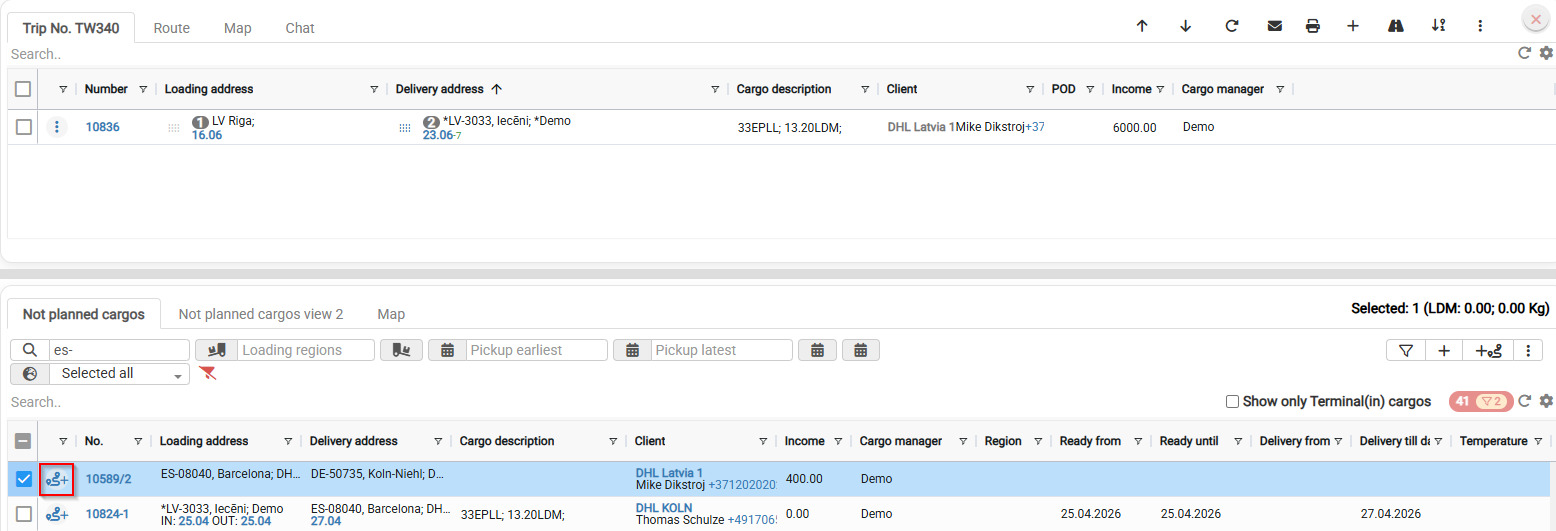
How to add cargo from planning desk?
Select the appropriate shipment from the “Not planned cargos” window, mark it, and press  button; the shipment will then be assigned to the selected trip or dispatch.
How to search, filter, and adjust the Client Orders list?
How to find client orders using Search?
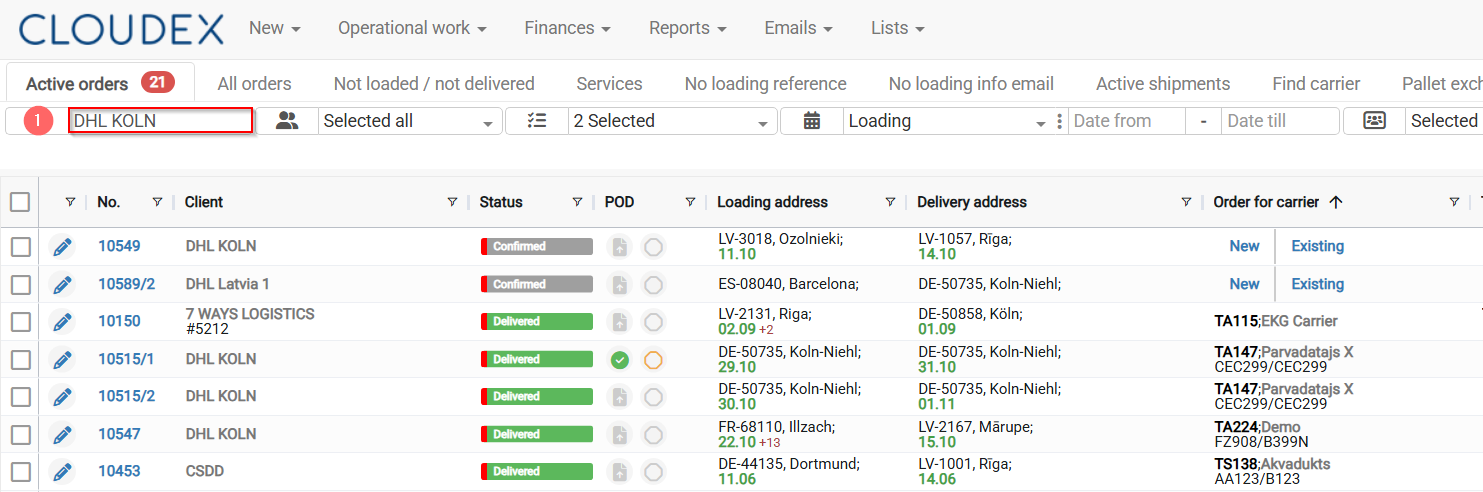
Use the Search field to find client orders related to a specific company.
1. Enter the Company name in the Search field.
CLOUDEX TMS will show all orders where this company is used, for example as a supplier, recipient, sender, consignee, or another partner.
Check the number of found records next to the search result. The number 21 indicates that 21 records have been found.
How can I see more orders?
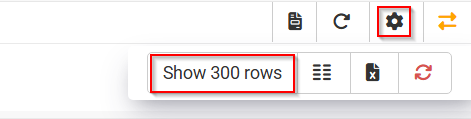
2. Change the number of rows displayed per page if you want to see more client orders on one screen. For example, if you choose 300 rows, a larger amount of data will immediately be visible on the screen, making it easier to analyze information without switching pages.
How to use the Client column filter?
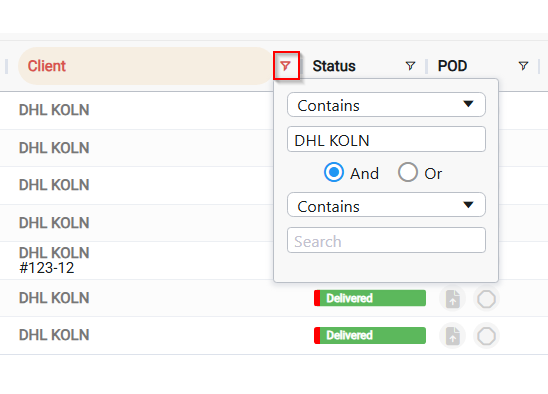
3. Use the Client column filter to show only orders related to one selected customer. This narrows the list to only the records related to that specific Client, excluding all others.

What is the difference between Search and Filters?
Search looks for matching records across the client order list. It is useful when you want to quickly find all orders related to a company or keyword.
Filters narrow the list by a specific column, for example Client, Status, POD, Delivery date, or Manager.
How to send an order acceptance confirmation to a client?
Send an order acceptance confirmation directly from a Client order to let your client know that you have accepted their transport order.
The email includes order details and a Track & Trace link, allowing the client to follow the shipment’s progress. You can also send the transport order document and other shipment documents.
Before you start
-
Make sure your email account is configured to send emails from Cloudex TMS.
-
Check the client’s email address and the order details.
-
Check the language selected in the Client card. Cloudex TMS uses this language for the order acceptance email, transport order email, and other shipment status notifications.
Send the confirmation
-
Open the relevant Client order.
-
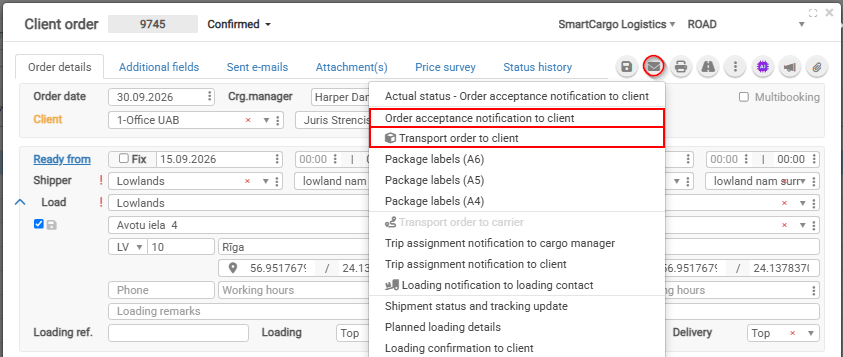
Click the envelope icon in the toolbar.
-
Select the appropriate email option:
| Email option | When to use it |
|---|---|
| Order acceptance notification to client | To confirm that you have accepted the client’s transport order. |
| Transport order to client | To send the transport order document to the client together with the email. |
-
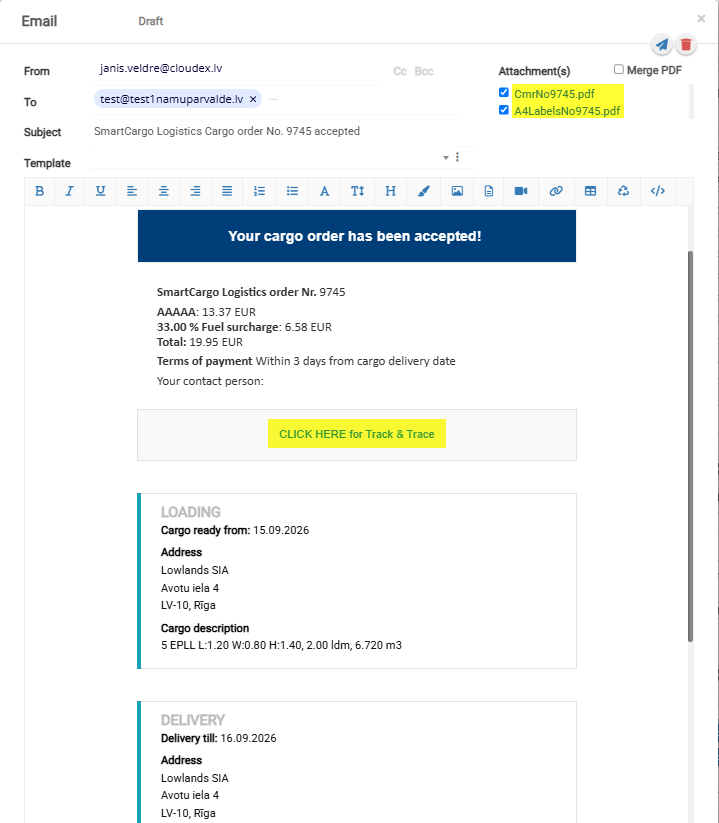
In the email window, review:
-
Attachment(s) — check which documents are selected for sending.
Attachments can include the shipment’s CMR, package labels, and, when you select Transport order to client, the transport order document.
-
-
Click the Send icon in the upper-right corner of the email window.
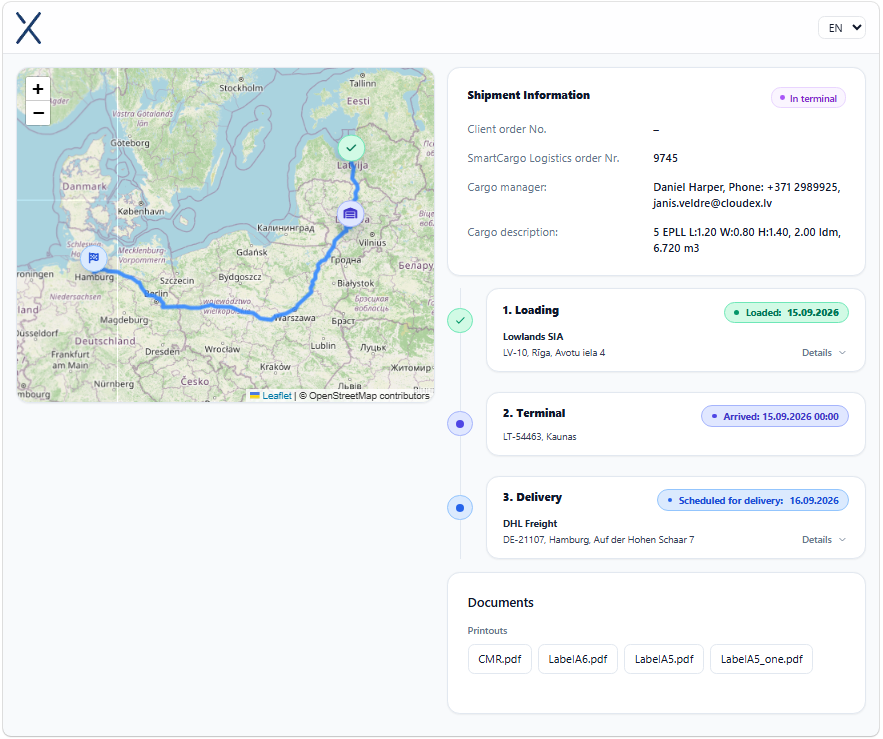
What can the client see through Track & Trace?
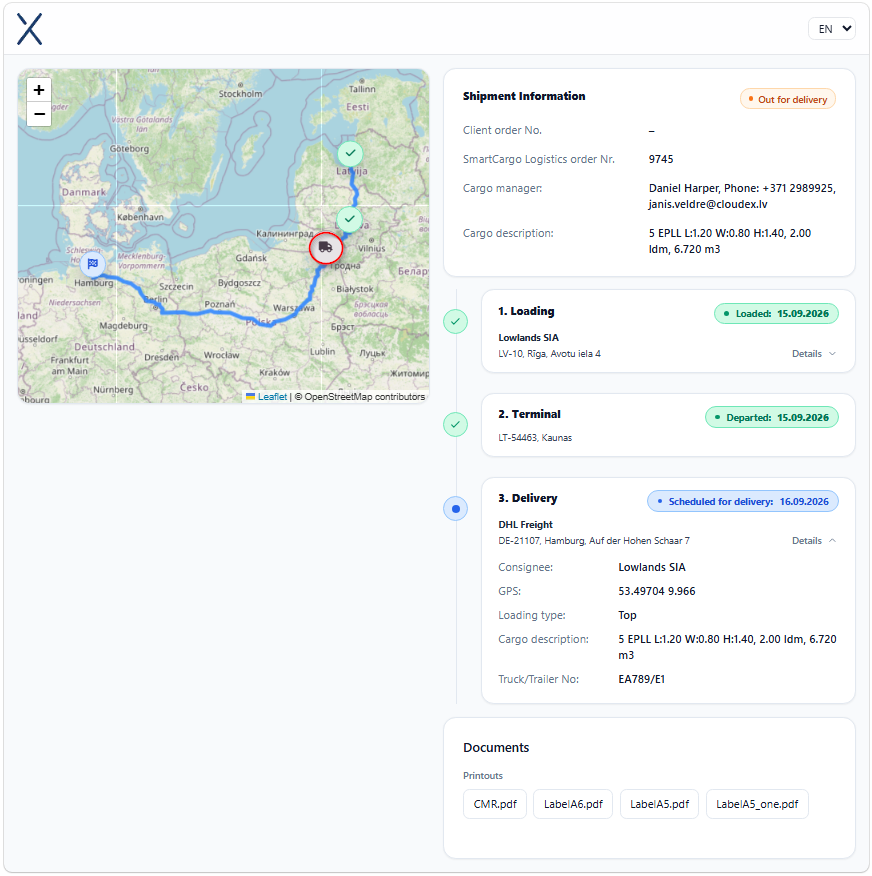
The email contains a unique Track & Trace link for the shipment. The client can open it to view the current shipment status and milestones, such as loading, arrival at a terminal, and delivery.
If the truck’s GPS or navigation system is connected to Cloudex TMS and location data is available, the client can also see the truck’s location on the map.
View all active shipments in the Client portal
To view all their active shipments and statuses in one place, the client can use the Client portal.
Clicking a shipment in the portal opens its Track & Trace page, where the client can view the shipment’s current status and milestones.
The client must first be granted portal access. See How to give access and rights to the Client and Carrier portal and send an invitation.
Common questions
Why is the email generated in the wrong language?
Check the language selected in the Client card.
How do I include the transport order document?
Choose Transport order to client from the email menu and check the selected attachments before sending.
Why is the truck’s location missing from Track & Trace?
Truck location is available only when the truck’s GPS or navigation system is connected to Cloudex TMS and provides location data.
Related articles
How to add Delivery via Terminal to a Client order?
-
How to select Delivery via Terminal in the Services section?
-
How does the Services view change after adding Delivery via Terminal?
Where can I find the Delivery via Terminal service?
Client Order → Services → + →Delivery via Terminal
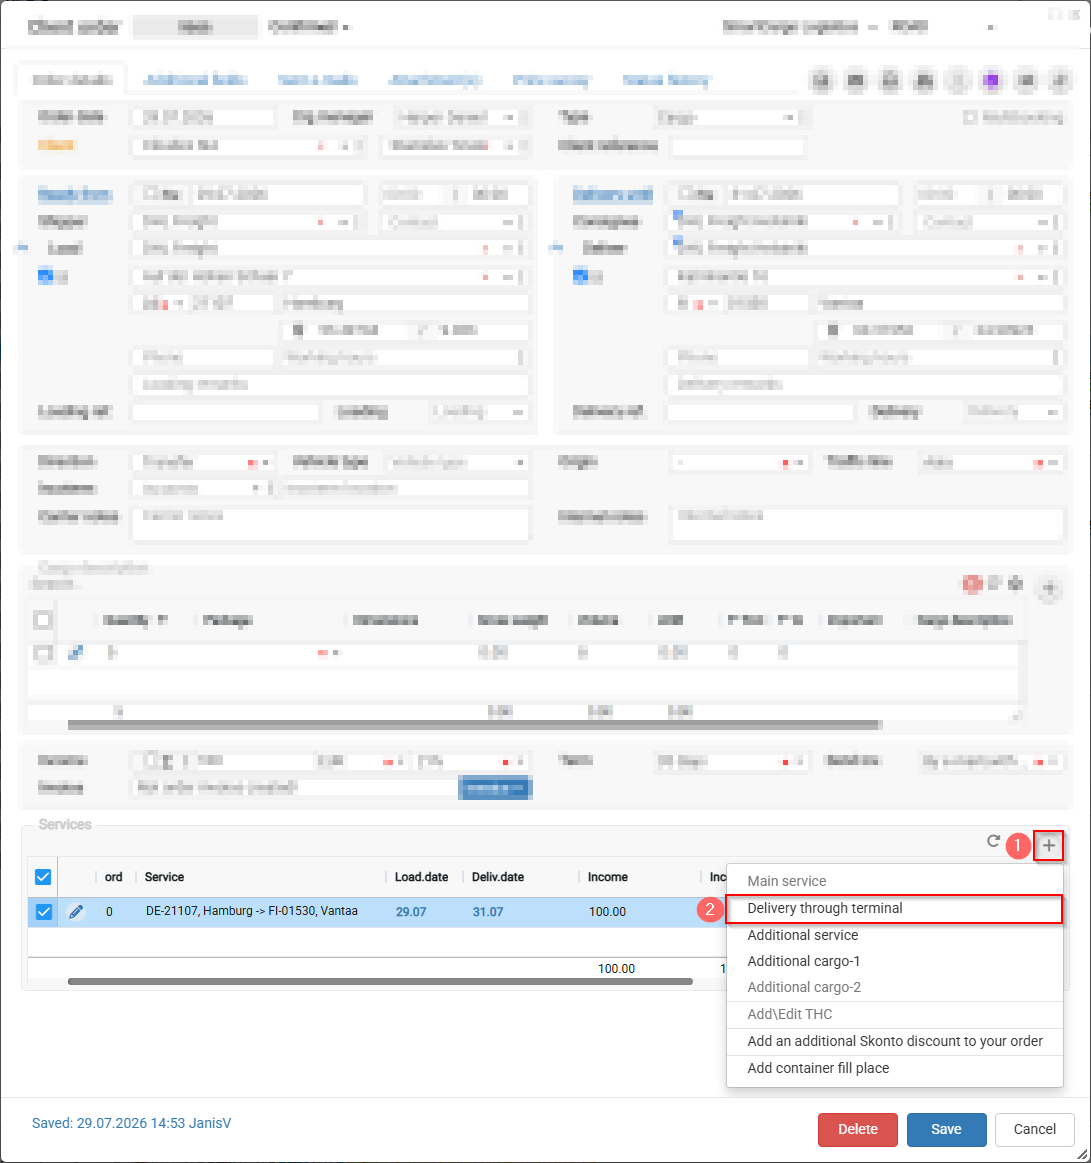
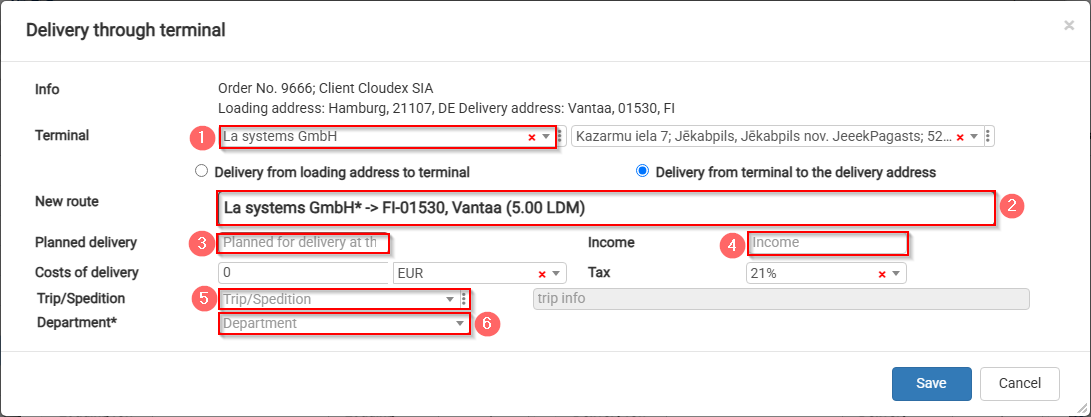
How to select Delivery via Terminal in the Services section?
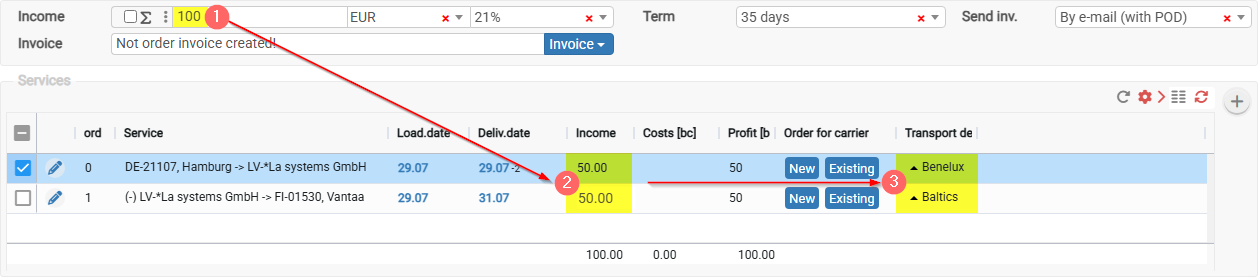
- Select the required terminal; the address will be filled in automatically.
- Split the route La systems GmbH → FI-01530 into two parts.
- Planned delivery deadline to the terminal.
- Specify the amount allocated for the stage from the terminal to the delivery address.
- If you know which truck will transport the cargo, you can create a new trip or add it to an existing trip.
- Assign it to the department responsible for delivery from the terminal to the delivery address.
How does the Services view change after adding Delivery via Terminal?
The overall delivery process is divided into two stages, and each stage is assigned a specific amount:
- Total amount to be received from the customer.
- Revenue distributed among departments.
- Departments responsible for specific delivery stages.
How to add GPS coordinates to a client order address?
Use this instruction when the loading or delivery address in a client order does not have correct GPS coordinates or the location needs to be adjusted manually.
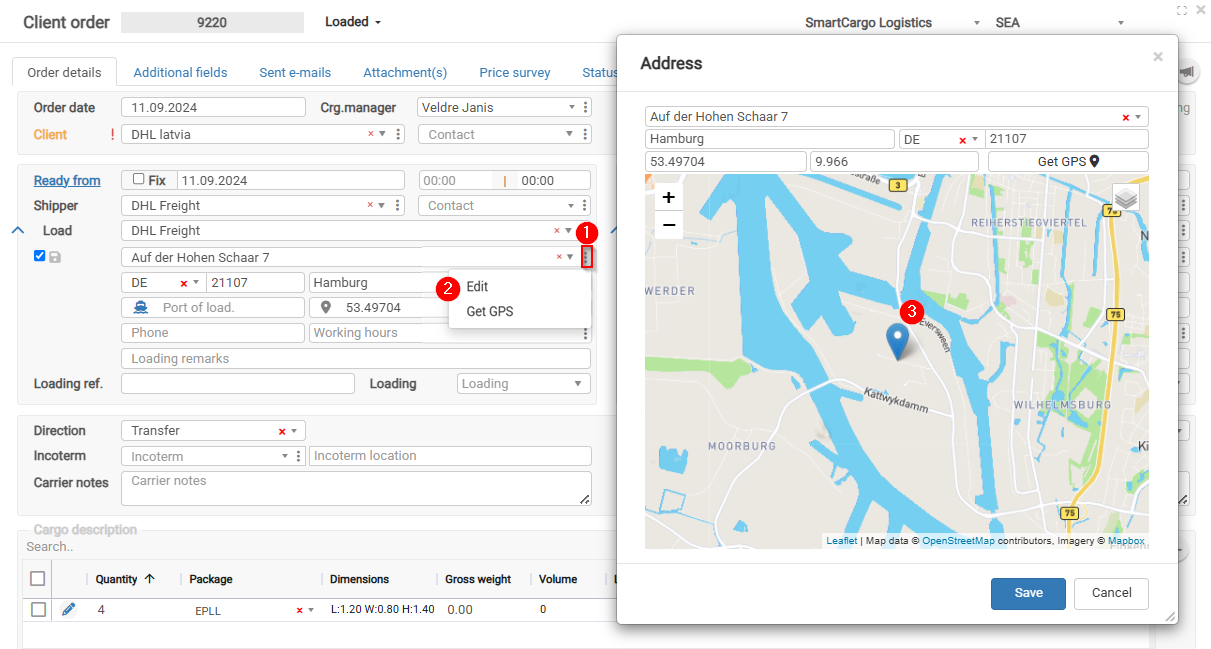
- Open the required Client order.
- Get GPS - if address is found then GPS coordinates will be automatically set
In order to check or adjust the GPS coordinates
- Click the Edit icon next to the address.
- Open the address edit form.
- Enter or adjust the GPS coordinates manually.
- Click Save.
Correct GPS coordinates are needed for map display, route planning, trip tracking, and automatic status updates.
If the route is not shown correctly on the map, check whether the loading and delivery addresses have correct GPS coordinates.
Benefits of Obtaining GPS Coordinates
1. Benefits of Obtaining GPS Coordinates
Filling in the GPS coordinates field in logistics and transport systems provides several advantages that improve operational efficiency, transparency, and accuracy. Here are the main benefits of completing the GPS coordinates field:
2. Planning Accuracy
Precise locations can be viewed on the map, making logistics planning and route optimization easier.
3. Trip Route Tracking
The route is visible on the map in real time, helping monitor transport flow and ensuring that the vehicle follows the planned route.
4. Accurate Location Identification
GPS coordinates allow precise identification of the location where the driver must arrive, reducing misunderstandings and increasing delivery accuracy.
5. Automatic Time Recording
The system automatically records the time when the vehicle arrives at and leaves the loading/delivery address, helping improve operational tracking and analysis.
6. Cargo Status Tracking
Time and location data are integrated into cargo statuses, providing a complete overview of cargo movement and delivery status.
7. Automatic Status Changes
The system automatically changes the trip status when the vehicle approaches the loading or delivery address, speeding up the process and reducing manual actions.
8. Downtime Monitoring
GPS data makes it possible to track how long the vehicle stays at the loading or delivery address, helping identify and reduce unproductive downtime.
9. Driver Activity Monitoring
The system can verify whether the driver marks the cargo as loaded or delivered at the specified address by comparing it with the driver’s actual location data.
10. Route Comparison
It is possible to compare the driver’s planned route with the actual route traveled, helping identify deviations and opportunities for route optimization.
11. Customer Portal Functionality
Customers can view the vehicle’s current location and route to the loading/delivery address in the portal, improving transparency and customer satisfaction.
These benefits help optimize logistics processes, improve delivery accuracy and efficiency, and provide greater transparency and customer satisfaction.
How to generate CMR
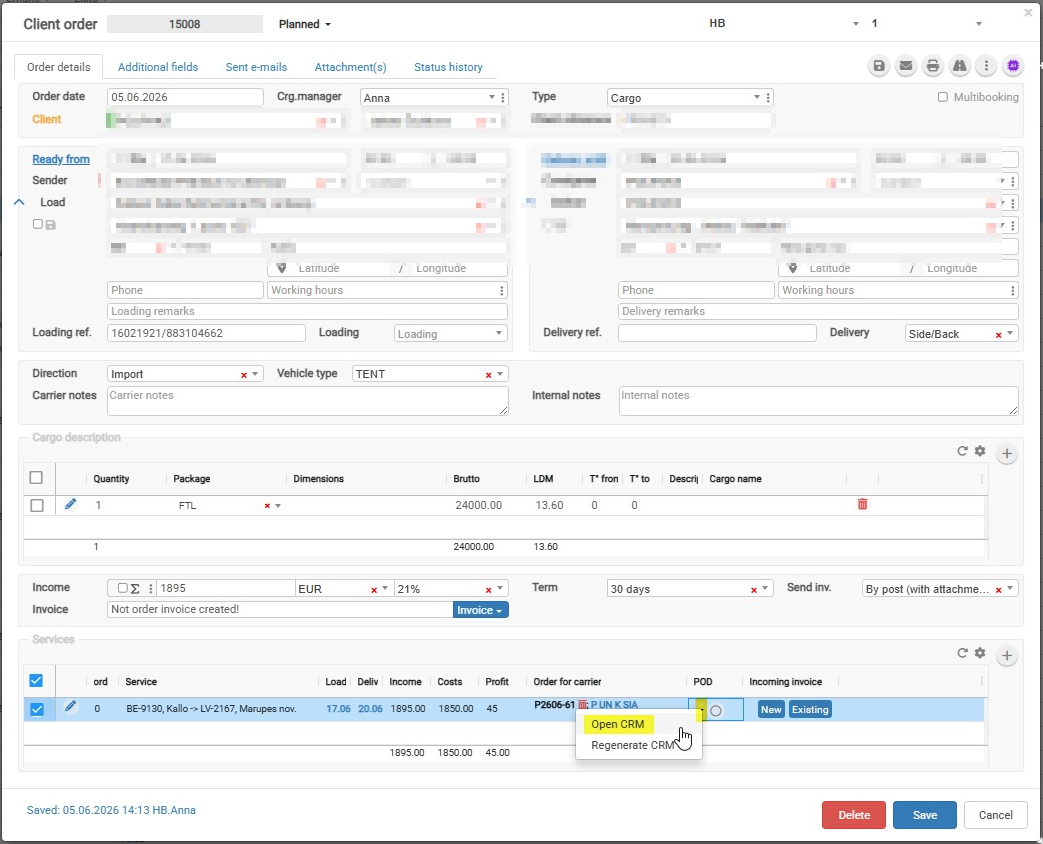
To generate a CMR, you have to open the order form. In the Service section, choose the service for which you want to generate the CMR. Locate the POD column and click it. 
Trip planning
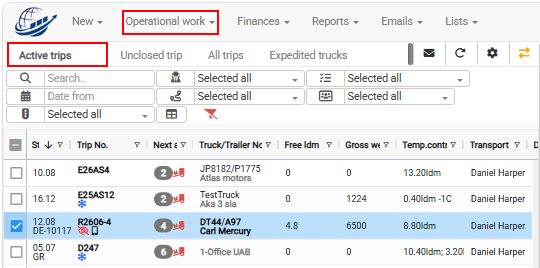
How to open the Active Trips view?
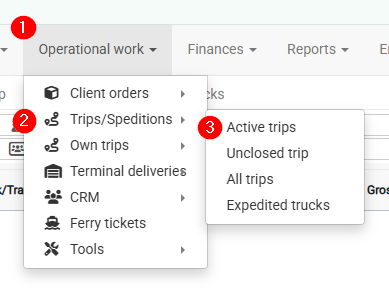
-
Operational work
- Trips / Speditions
- Active trips
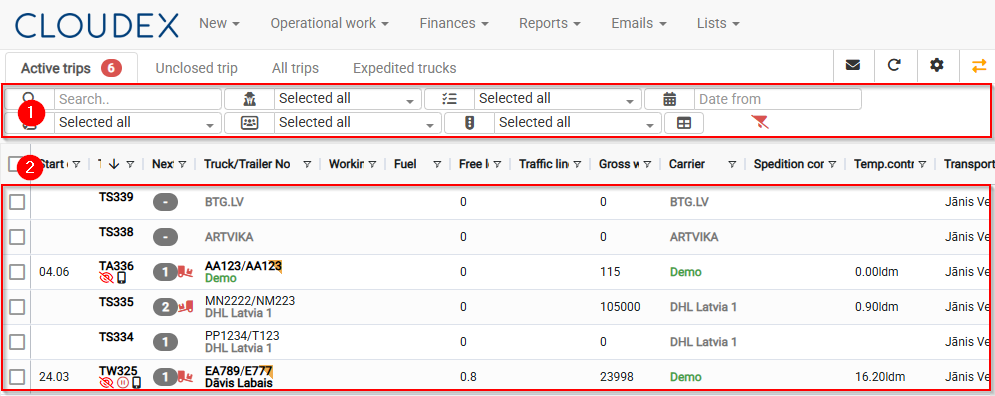
How to use the Active Trips view?
- Filters
- List of currently available trips
By default, trips/shipments will remain in the Active Trips list until their status  is changed to "Delivered."
How to open the Unplanned Cargo Map?
- Click “New” in the top navigation bar
- From the pop-up menu, select “Trips/Expeditions”
Required workflow: Operational work → Trips/Expeditions.
You will open the Trips/Expeditions window.
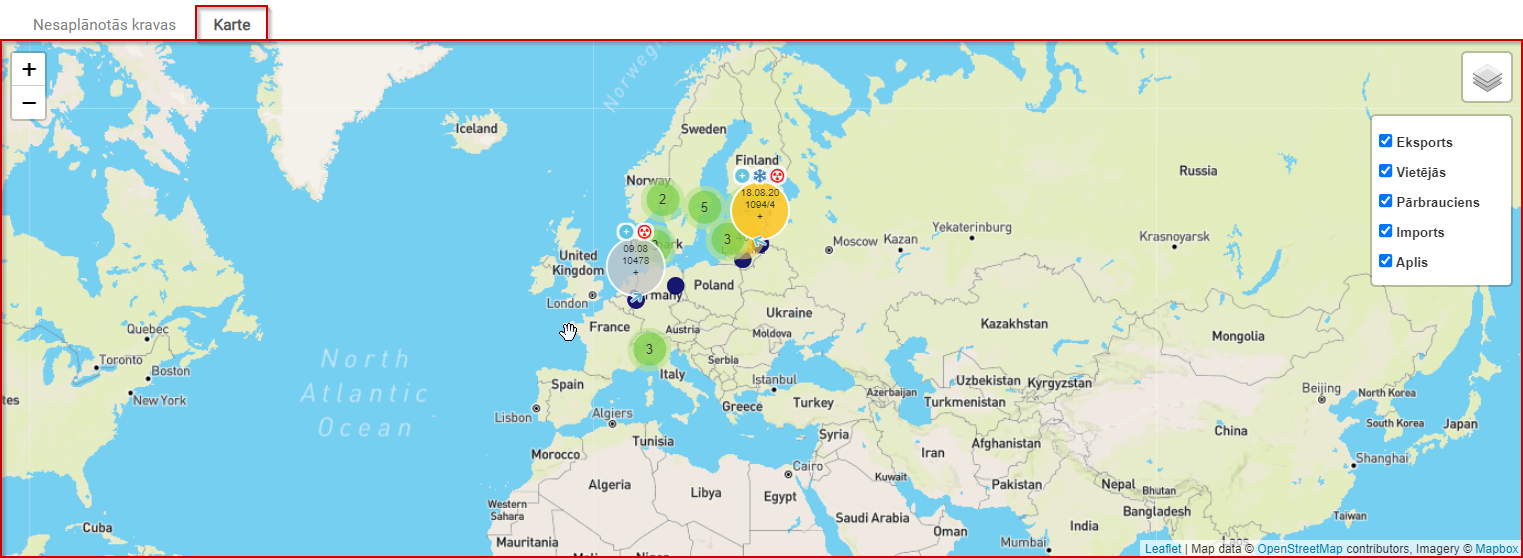
Current Unplanned Cargo Map
The current unplanned cargo map displays cargo in a visually clear way, making it easier to search for shipments.
For cargo to be properly displayed on the map, loading and unloading coordinates are important. See the image below.

Cargo can be filtered by the following attributes: Export, Local, Transit, Import, Round trip.
How to open Trip Tracking / Map / Chat?
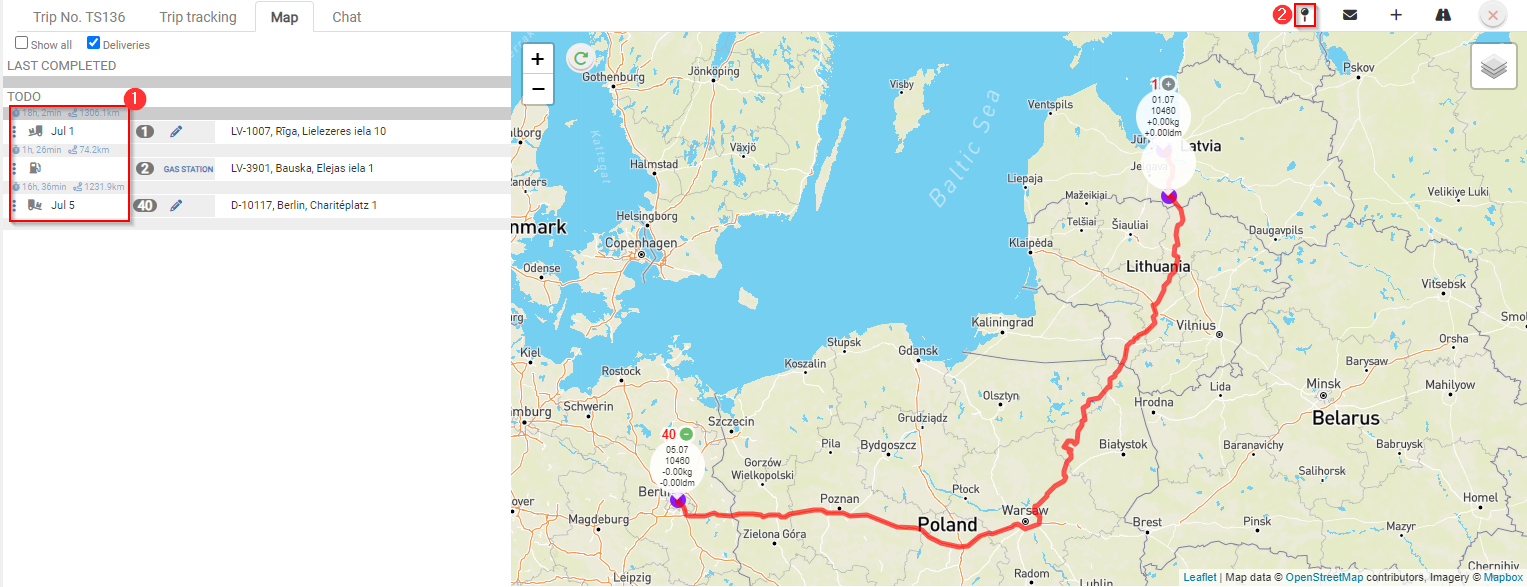
- Open Trip Tracking / Map / Chat.
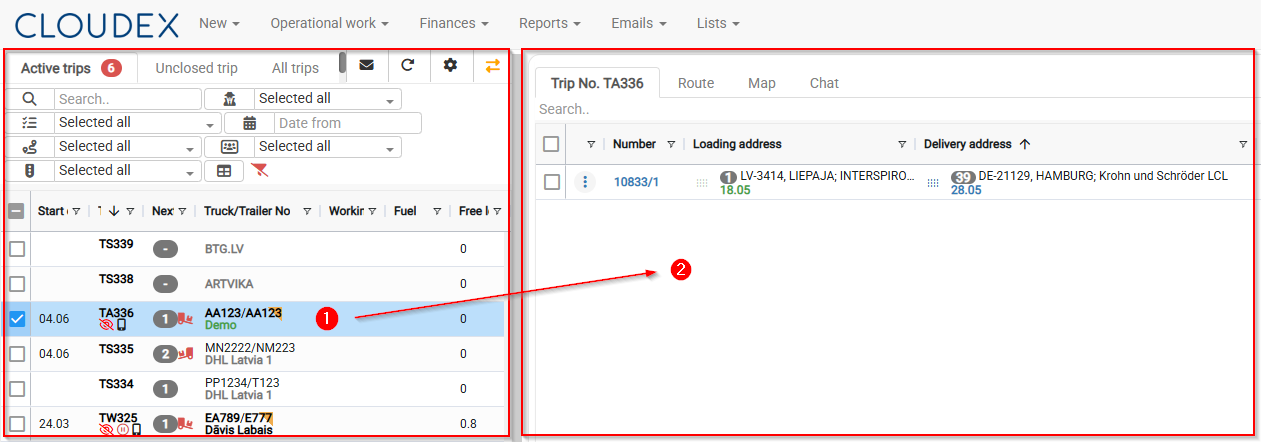
- Trip Tracking / Map / Chat

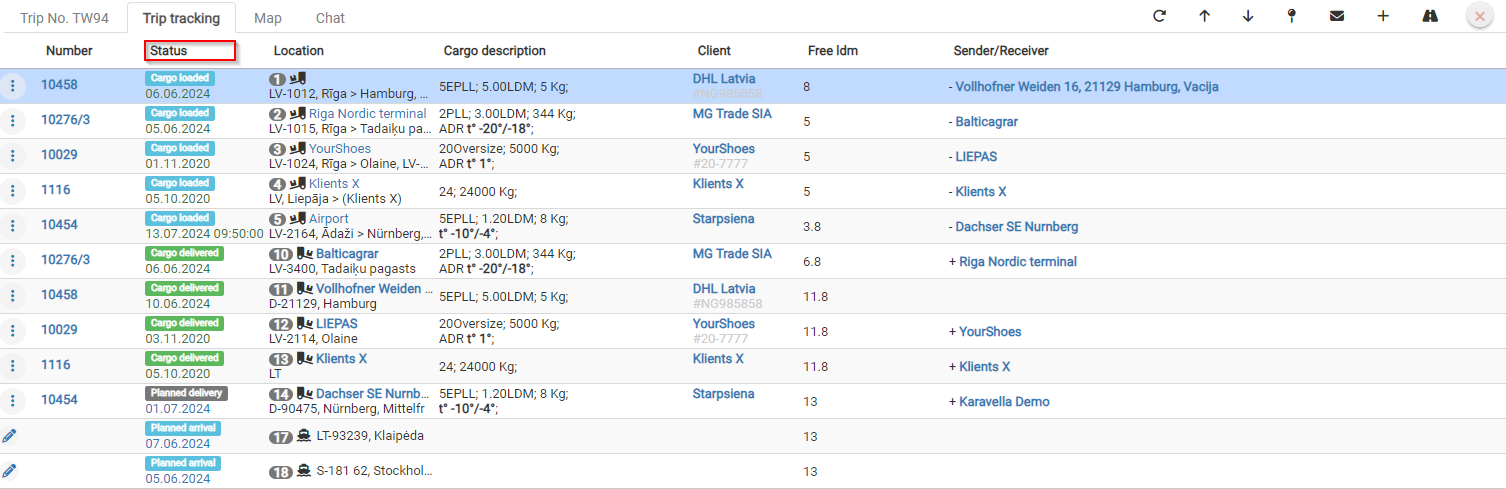
- Trip Tracking
- Map
- Distance in kilometers between stops.
- Add additional stops by clicking the + symbol.


How to create a new trip?
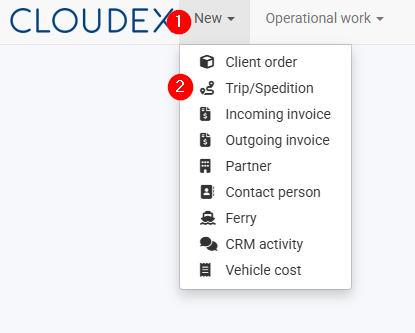
- Click the “New” button in the toolbar.
- From the menu that opens, select “Trip/Expedition”.
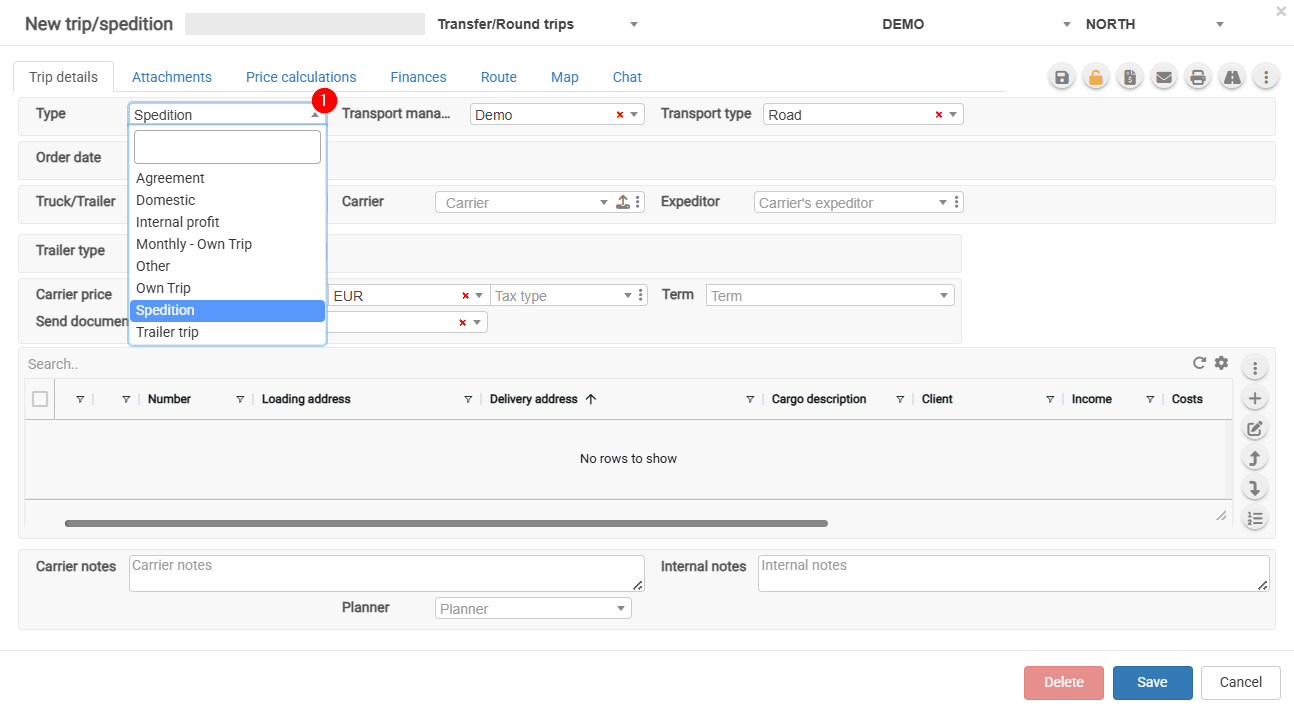
Which Trip/Expedition type should I choose?
- Agreement – Select this option when a subcontractor operates under your management and you are forwarding the vehicle for a full or partial route. Payment is usually calculated based on the kilometers driven.
- Domestic – Local transportation.
- Monthly – Monthly trip.
- Other – Other types of trips.
- Own Trip – Select this option when the trip is performed with your own vehicle. This enables the completion of the driver's report.
- Spedition – Freight forwarding and cargo transportation.
To ensure accurate trip reporting, it is important to select the correct trip type.
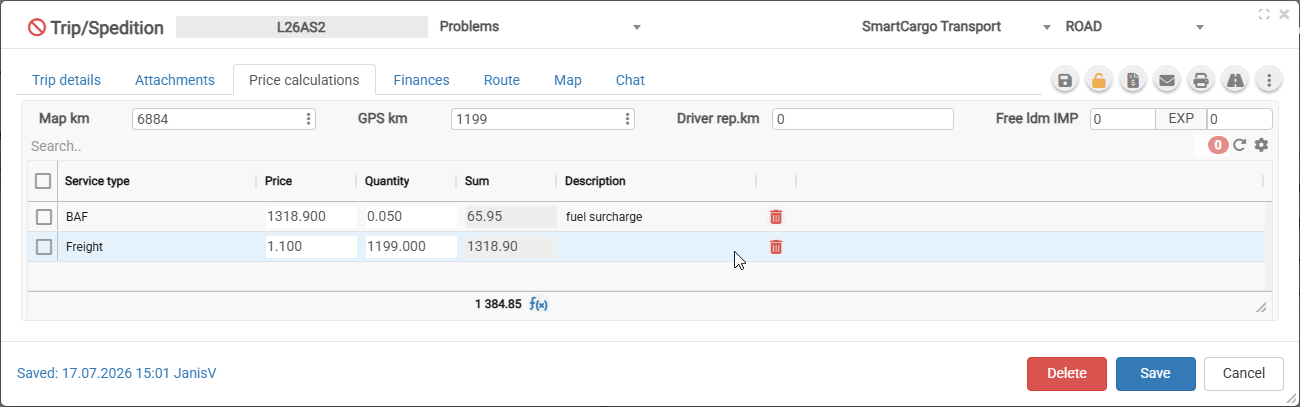
How to cauculate trip price
- Other expenses
- Idle time
- Extra LDM
- Loading locations
- Loading locations in Norway
- EU rate (EUR/km)
- Norway rate (EUR/km)
How to change the loading and delivery sequence in a trip?
- Open Operational work → Trips/Speditions → Active trips.
- Select the required trip from the list on the left.

- Open the Map tab on the right side of the trip planning view.
- Drag and drop the loading or delivery points to change their sequence.
- Check the updated route information in the detail panel.
The route can be shown on the map only if the loading and delivery addresses have correct GPS coordinates.
If the route is not shown correctly, check the GPS coordinates for each loading and delivery address.
You can ask Cloudex TMS team to set GPS coordinates as a mandatory fields
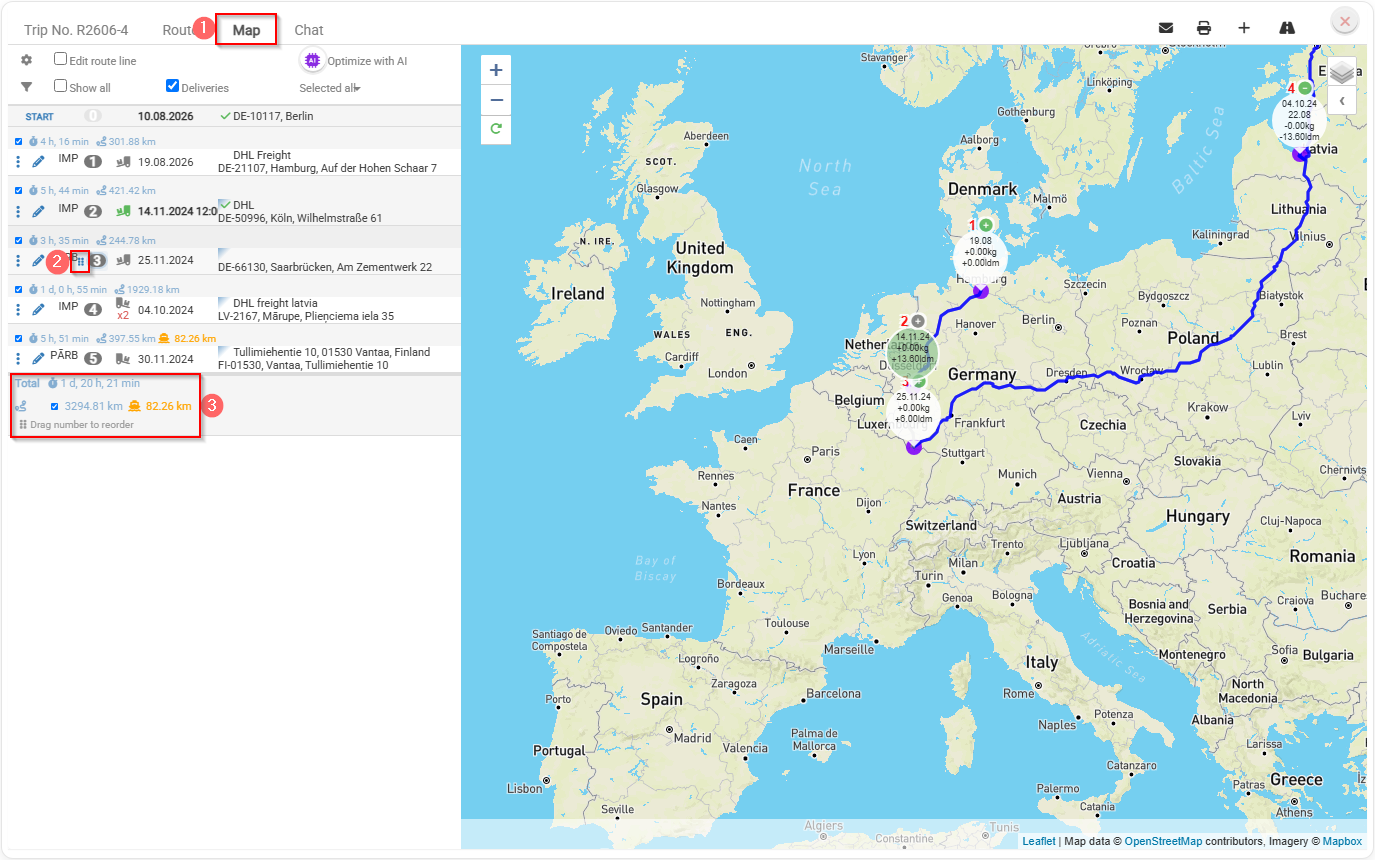
What can you check in the detail panel?
The detail panel shows:
- total travel time;
- total distance in kilometres;
- additional kilometres travelled by ferry.
Key benefits
Order Execution & Delivery
sending the carrier order, sending the trip to the driver, loading confirmation, shipment status updates, GPS/tracking, communication, delivery confirmation, POD upload, POD approval, and determining when the order is ready for invoicing.
This chapter explains how to send transport orders to carriers, give drivers access to trips through the Cloudex Drive mobile app or web link, and share loading and delivery information by email, SMS, or WhatsApp.
How to send an order to a carrier?
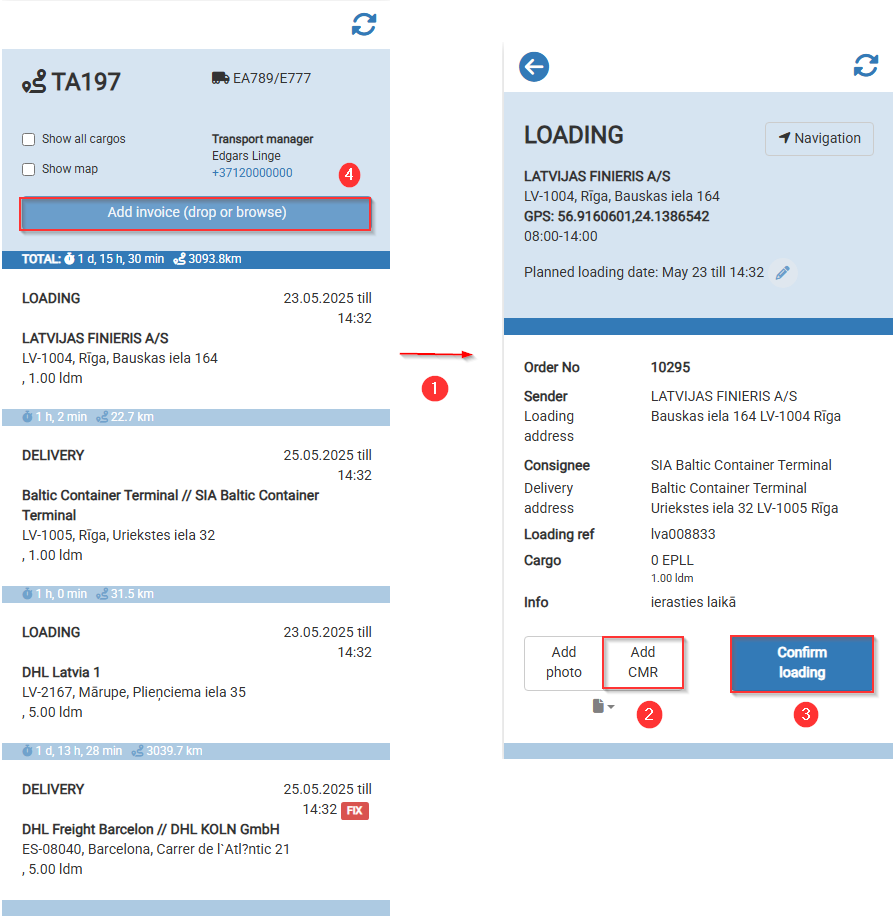
When you send order for carrier in e-mail is unique link on which Carrier manager need to click in order to mark loading/delivery dates and upload CMR and Invoice.
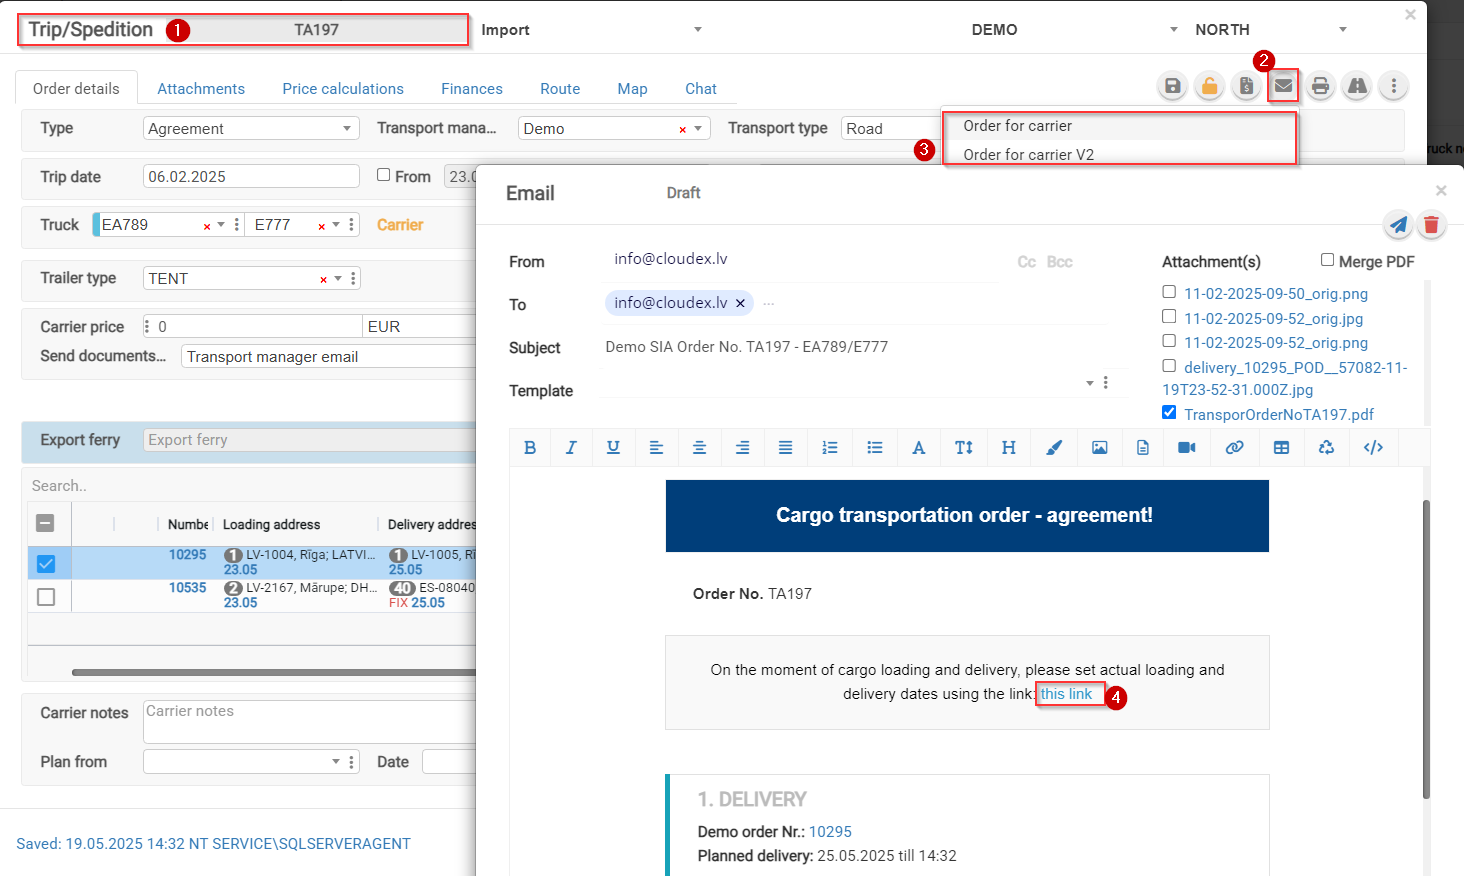
1. Click to open the page
2. Upload CMR
3. Confirm loading
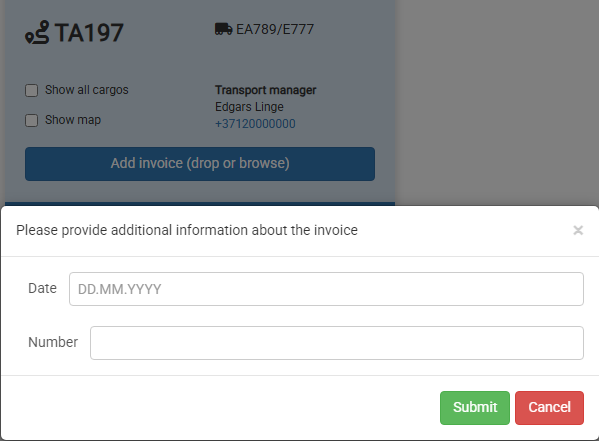
4. Upload invoice PDF file
Add invoice date
Add invoice number
How to send a trip to the driver?
How to give a driver access to a trip using a link?
How to display a trip in the Cloudex Drive app?
How to create a Cloudex Drive password?
How to give a driver access to a trip using a link?
1. Select the Required Trip
- Open the trip list menu.
- Select the desired trip from the list of available trips.
2. Open the Trip Window
- Click the road icon located in the toolbar.
- After clicking the road icon, the corresponding trip window will automatically open on a new page.

A window with the driver's web application for the trip will open.
- Copy the link from the browser's address bar and send it to the driver via WhatsApp so that the driver can complete the required information.

How to display a trip in the Cloudex Drive (Driver) app?
1. Select the Required Trip
- Click on the trip number to open the trip.
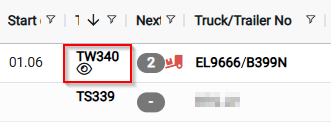
Important:
For the driver to be able to see the trip information:
- Activate the eye icon located next to the driver's name and surname.
- Once activated, the trip information will be sent to and become available in the Cloudex Drive mobile application.

The trip will remain visible in the list of active trips until its status is changed to Delivered.
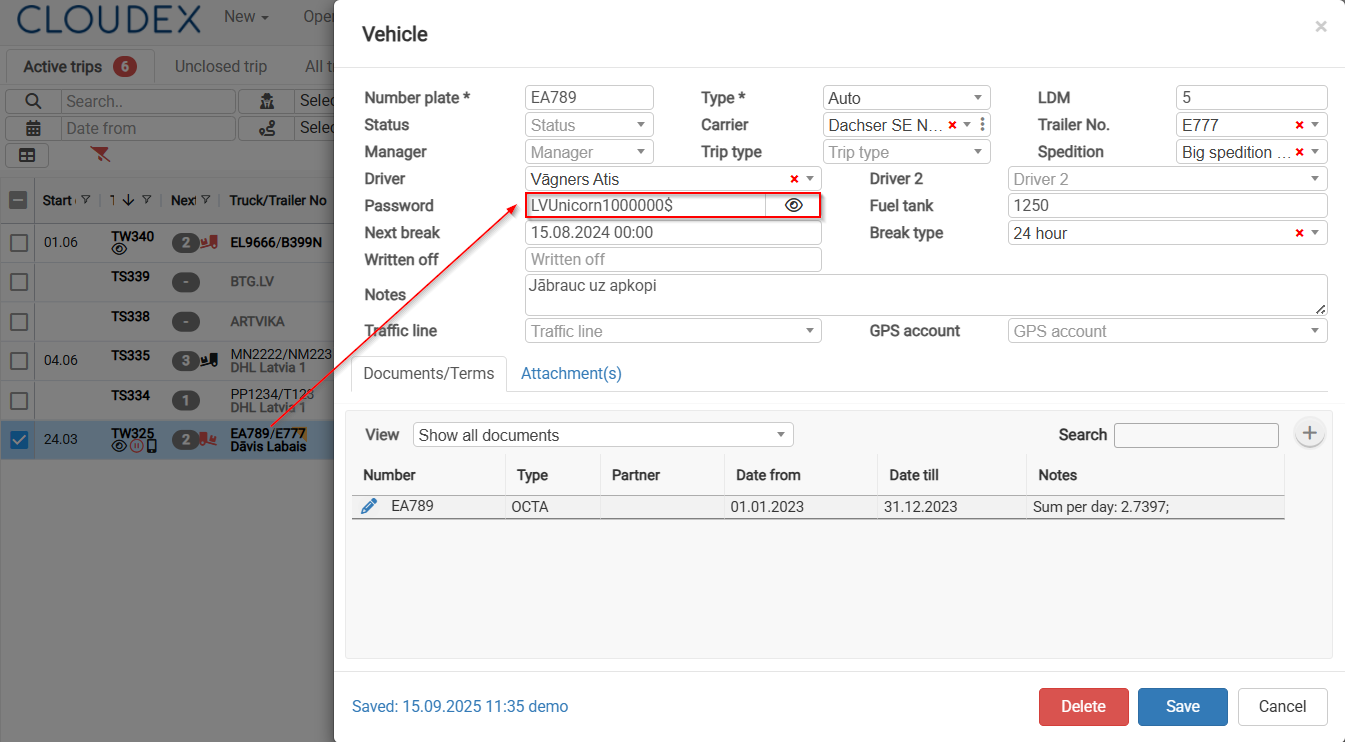
How to create a Cloudex Drive password?
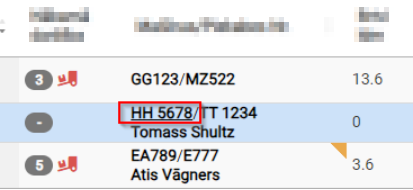
1. Open the Vehicle Window
- Click on the vehicle registration number specified in the trip.
- The Vehicle window will open.
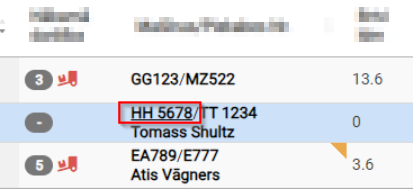
2. Create a Password
- Create a password of your choice.
- The driver will use this password to log in to the Cloudex Drive application.
How to Configure Customer Shipment Notifications?
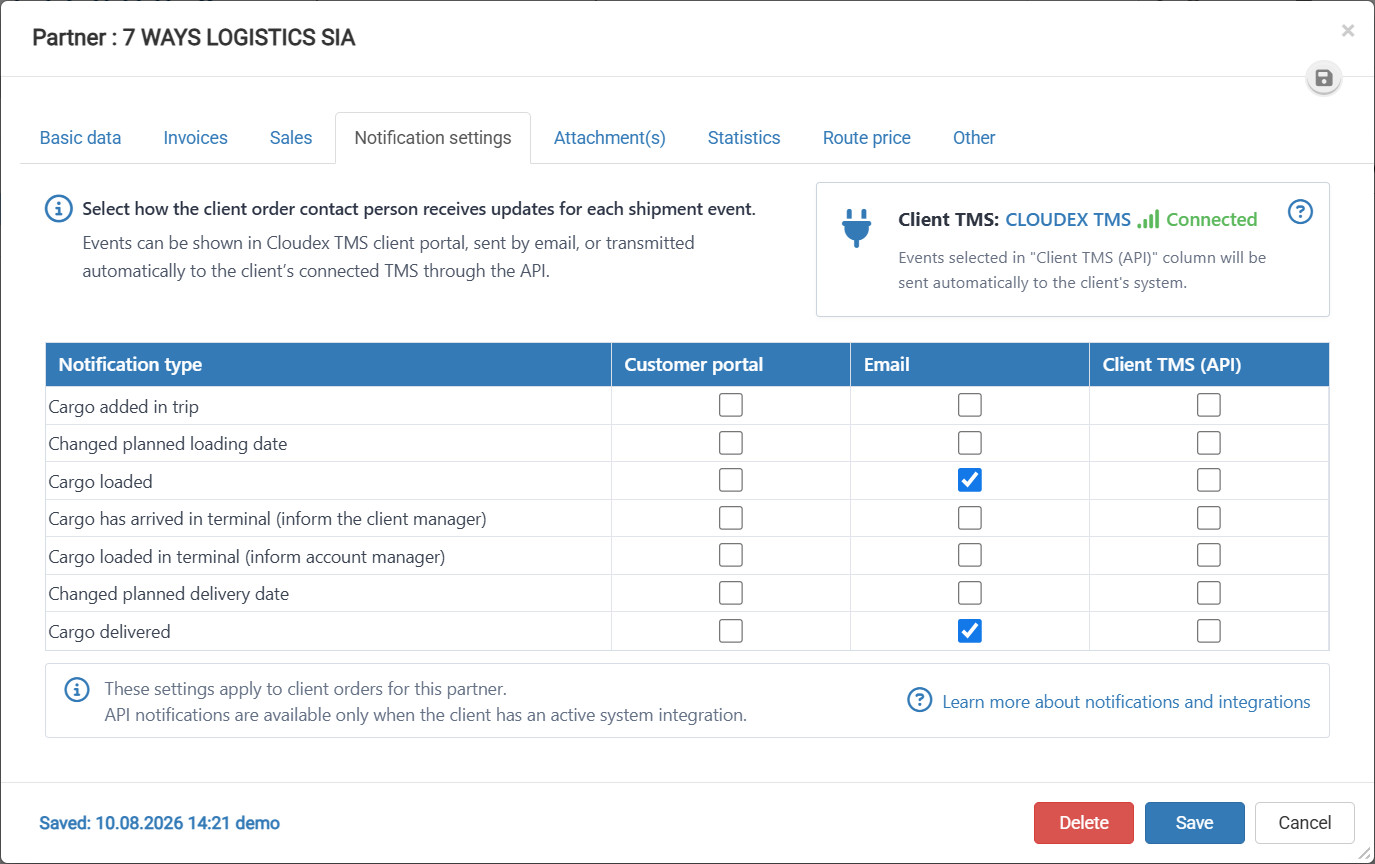
- Open the Partner page.
- Select the Notification settings tab.
- Review the available notification types.
- For each notification type, select the appropriate delivery method:
- Customer portal – sends the notification to the customer portal.
- Email – sends the notification by email.
- Client TMS (API) – sends the notification automatically to the client’s connected TMS through the API.
- Select the required checkboxes for each shipment event.
- Review the selected notification settings to make sure they are correct.
- Click Save to apply the changes.
- If you do not want to save the changes, click Cancel.
There are 3 available options for configuring notifications:
- By email
- Through the client portal
- Via API, sending notifications directly to the client’s TMS system
How to give access and rights to Client and Carrier portal and send Invitation for Access
The customer portal can be activated from the customer profile.
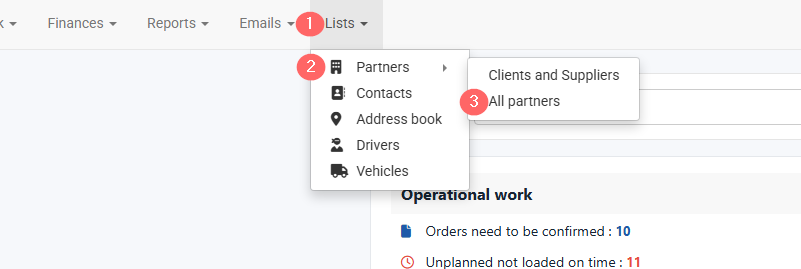
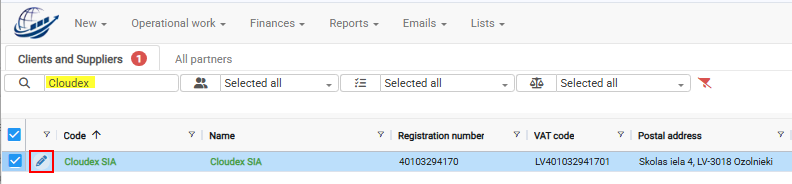
- Open Lists in the top navigation bar.
- Select Partners.
- Click All Partners.
4. Find the required partner.
5. Click the Edit icon .  to open the partner profile.
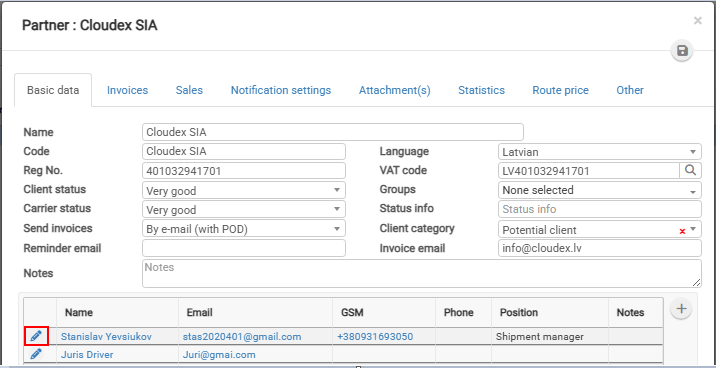
6. Select the manager you want to grant portal access to, then click the Edit icon to open contact.
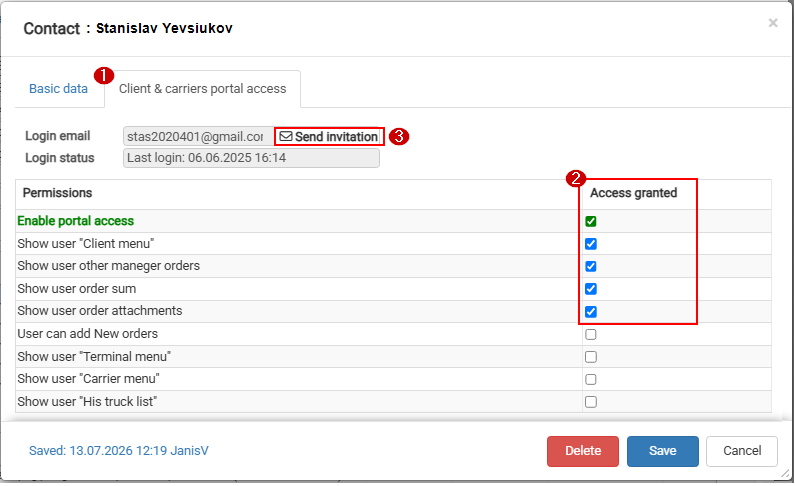
7. Switch from Basic data to the Clients & Carriers Portal access section to give Access granted.
8. Review and click  Send invitation to Client contact person.
How to send an order to a carrier via API?
You can send a transport order directly from Cloudex TMS to your carrier's TMS without sending the order manually by email or entering it again in another system.
This option is available when an API integration with the selected carrier's TMS has been configured.
How to send an order to the carrier
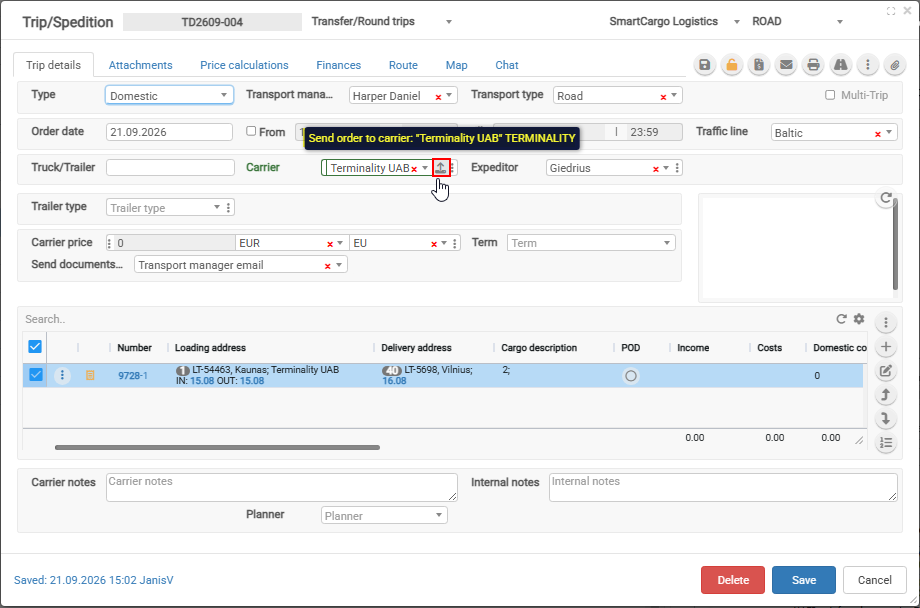
- Open the required Trip/Spedition.
- Select the Carrier.
- If an API integration with this carrier is available, the Send to carrier icon appears next to the Carrier field.
- Click the icon.
- The transport order is sent electronically to the carrier's TMS.
When does the API button appear?
Carrier uses Cloudex TMS
If the selected carrier also uses Cloudex TMS, the API connection is recognized automatically and the button appears without any additional API configuration.
Carrier uses another supported TMS
If the carrier uses another supported TMS, the carrier's API integration must first be configured in Cloudex TMS.
See: How to add carrier API key?
After the integration has been configured, the API button becomes available when that carrier is selected in Trip/Spedition.
Supported carrier TMS integrations
Currently, transport orders can be sent directly to carriers using:
- Cloudex/Ozols TMS
- XSPED
- Terminality
To which systems you can send Orders to carriers. If your carrier is using:
- Cloudex
- XSPED
- Terminality
- Danske Fragtmænd
Sending the order via API helps to:
- avoid manual order entry in the carrier's system;
- reduce data-entry mistakes;
- send transport information directly from Cloudex TMS;
- enable further API communication, such as receiving shipment statuses and documents back from the carrier.
What happens after the order is sent?
Depending on the carrier integration, Cloudex TMS can also receive information back from the carrier, such as:
- shipment status updates;
- delivery milestones;
- POD/CMR and other shipment documents.
This allows information to move between Cloudex TMS and the carrier's TMS without repeatedly entering the same data manually.
Related topics
- How to add carrier API key?
- How to receive statuses and documents from a carrier via API
- How to receive statuses from a carrier via Carrier Link
How to send automatic milestone and document request emails
Cloudex TMS can automatically request shipment updates and missing documents from the carrier during transport.
Instead of manually contacting the carrier to ask whether the cargo has been loaded or delivered, or to request a POD/CMR, Cloudex can send these requests automatically according to the planned loading and delivery dates.
The request emails are sent to the Carrier transport manager email.
The carrier receives a secure link to the shipment and does not need to log in to Cloudex TMS.
What can Cloudex request automatically?
Depending on your company settings, Cloudex can send the following requests:
Loading
Check loading details
Sent before the planned loading date.
The carrier can check or update:
- Planned loading date/time
- Truck/Trailer number
Confirm loaded
Sent on the planned loading date if loading has not yet been confirmed.
The carrier can:
- Confirm that the shipment has been loaded
- Update the Planned loading date/time if loading is delayed
- Update the Truck/Trailer number
When loading is confirmed, Cloudex records the Actual loading date/time.
Delivery
Check delivery plan
For longer transports, Cloudex can ask the carrier to check the delivery plan before the planned delivery date.
The carrier can update the Planned delivery date/time if the plan has changed.
For example, this request can be configured to be sent only when there are more than 2 days between the agreed loading and delivery dates.
Confirm delivered
Sent on the planned delivery date if delivery has not yet been confirmed.
The carrier can:
- Confirm that the shipment has been delivered
- Update the Planned delivery date/time if delivery is delayed
- Upload required delivery documents if they are already available
When delivery is confirmed, Cloudex records the Actual delivery date/time.
If documents are not yet available, they can be uploaded later.
Follow-up requests
If the carrier does not confirm delivery, Cloudex can automatically send follow-up requests.
For example:
- 1 day after the Planned delivery date
- 2 days after the Planned delivery date
Cloudex can also send reminders when delivery has already been confirmed but required documents are still missing.
Depending on the shipment, required documents can include:
- POD / CMR
- Pallet exchange document
- Other required shipment documents
Cloudex sends document reminders only while the required documents are still missing.
Enable automatic requests for a Trip/Spedition
Open the required Trip/Spedition.
In the carrier section, enable:
Automatic requests
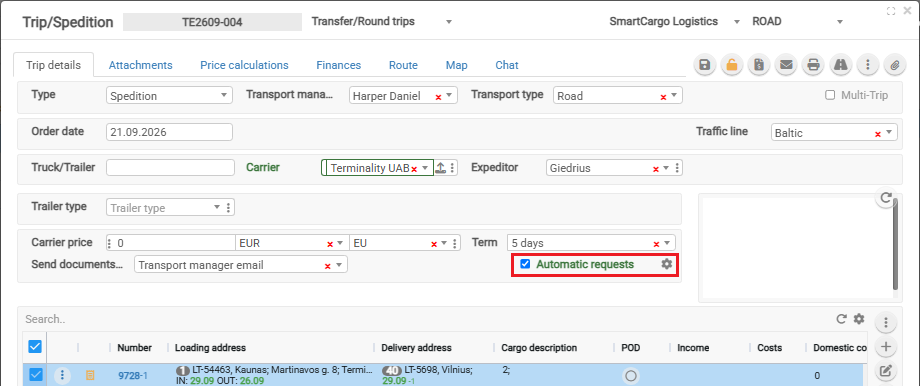
When this checkbox is selected, Cloudex can send automatic milestone and document requests for this Trip according to your company's Automatic email request settings.
Automatic milestone and document requests will be sent to the Carrier transport manager email.
The carrier must therefore have a valid Transport manager email.
The settings icon next to Automatic requests opens the company-level automatic request settings.
Automatic email request settings
The automatic request schedule is configured separately for each Cloudex company.
Open Automatic email request settings to define which requests should be sent and when.
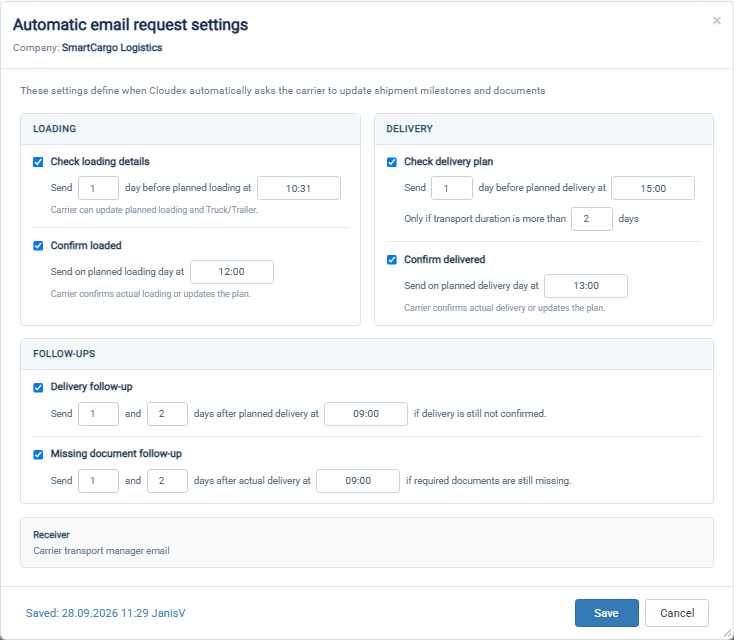
The settings include:
Loading
Check loading details
Example:
Send 1 day before planned loading at 15:00.
Confirm loaded
Example:
Send on planned loading day at 12:00.
Delivery
Check delivery plan
Example:
Send 1 day before planned delivery at 15:00.
Only if transport duration is more than 2 days.
Confirm delivered
Example:
Send on planned delivery day at 12:00.
Follow-ups
Delivery follow-up
Example:
Send 1 and 2 days after planned delivery at 09:00 if delivery is still not confirmed.
Missing document follow-up
Example:
Send 1 and 2 days after actual delivery at 09:00 if required documents are still missing.
The recipient is always:
Carrier transport manager email
These are company-level settings. You do not need to configure the schedule separately for every Trip.
What does the carrier receive?
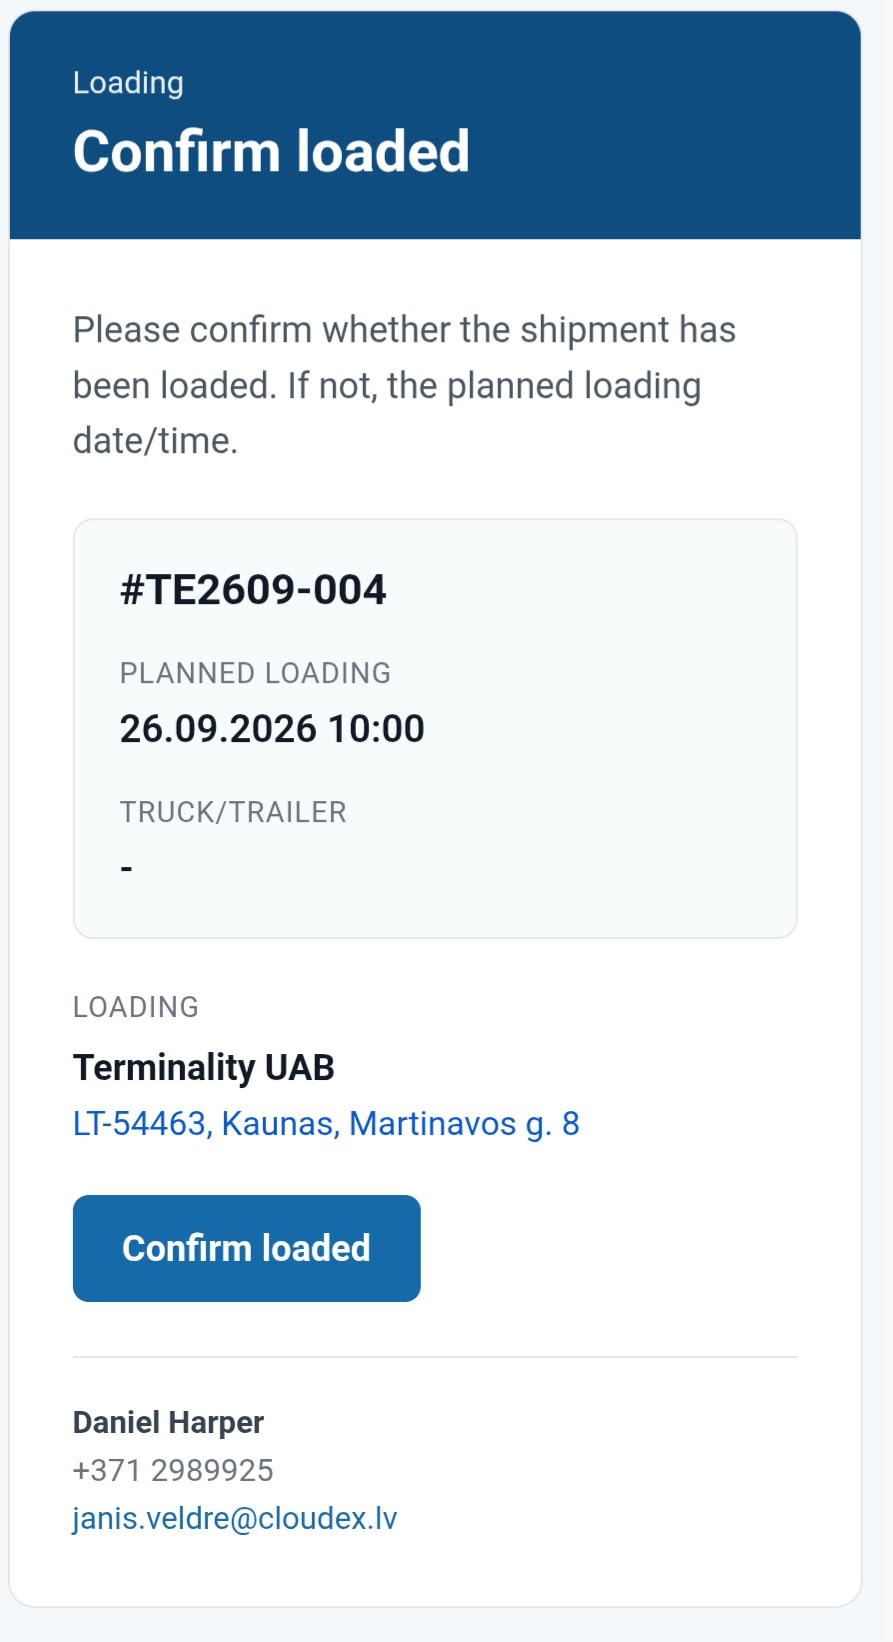
The carrier receives a simple email containing the shipment information and a button that opens the secure Cloudex shipment page.
Depending on the request, the carrier can:
- Update Planned loading or delivery
- Update Truck/Trailer
- Confirm loading
- Confirm delivery
- Upload POD/CMR and other required documents
No Cloudex TMS login is required.
Cloudex does not send a request if the requested action has already been completed. For example, if delivery has already been confirmed, Cloudex does not continue asking the carrier to confirm delivery.
Here is an example of an email that was viewed on a phone:
View sent automatic request emails
Open: Client order → Sent Emails
The list shows all sent emails connected to that order, including automatic carrier request emails.
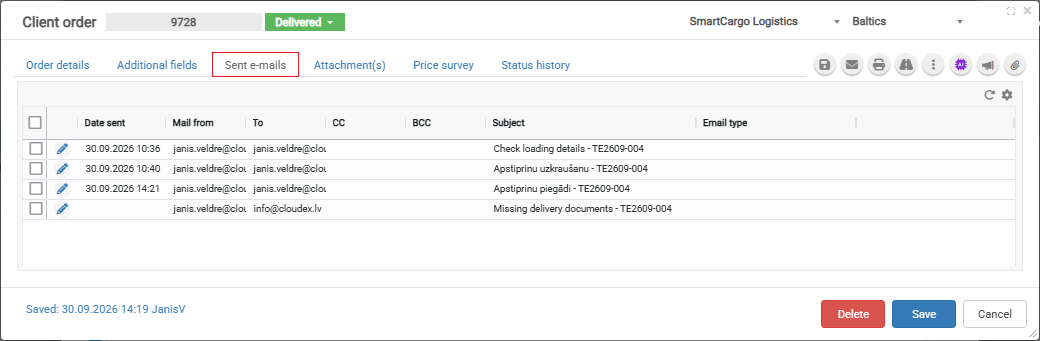
For example, you can see:
- Check loading details
- Confirm loaded
- Confirm delivered
- Missing delivery documents
- Other emails sent regarding the Client order
This makes it easy to verify what was sent, when it was sent, and to which email address.
Example workflow
A typical shipment could work like this:
-
1 day before loading
Cloudex asks the carrier to check Planned loading and Truck/Trailer. -
Loading day
Cloudex asks the carrier to confirm that the shipment has been loaded. -
Before delivery
For a longer transport, Cloudex asks the carrier to check the Planned delivery date/time. -
Delivery day
Cloudex asks the carrier to confirm delivery and upload available delivery documents. -
After delivery
If required documents are still missing, Cloudex sends document follow-up requests.
The forwarder therefore does not need to manually monitor every shipment date and repeatedly contact carriers for routine updates.
Outgoing invoices (debtors)
How to Import Bank Payments and Mark Invoices as Paid
1. Payment of Outgoing invoices - automated data Import from the Bank
2. Linking Incoming Bank payments with Outgoing invoices
3. Outgoing invoice payment - manual data entry
4. Tips and tricks
Important! CLOUDEX TMS provides two options - automated and manual outgoing invoice.
Only one of options can be used for the accounting period!
1. Payment of Outgoing invoices - automated data Import from the Bank
1.1. Export Account report from your Bank
Open your company's Internet Bank > prepare the Bank Account report for the desired period > Export it in ISO format. > Save this document to your computer.
1.2. Open CLOUDEX TMS
-
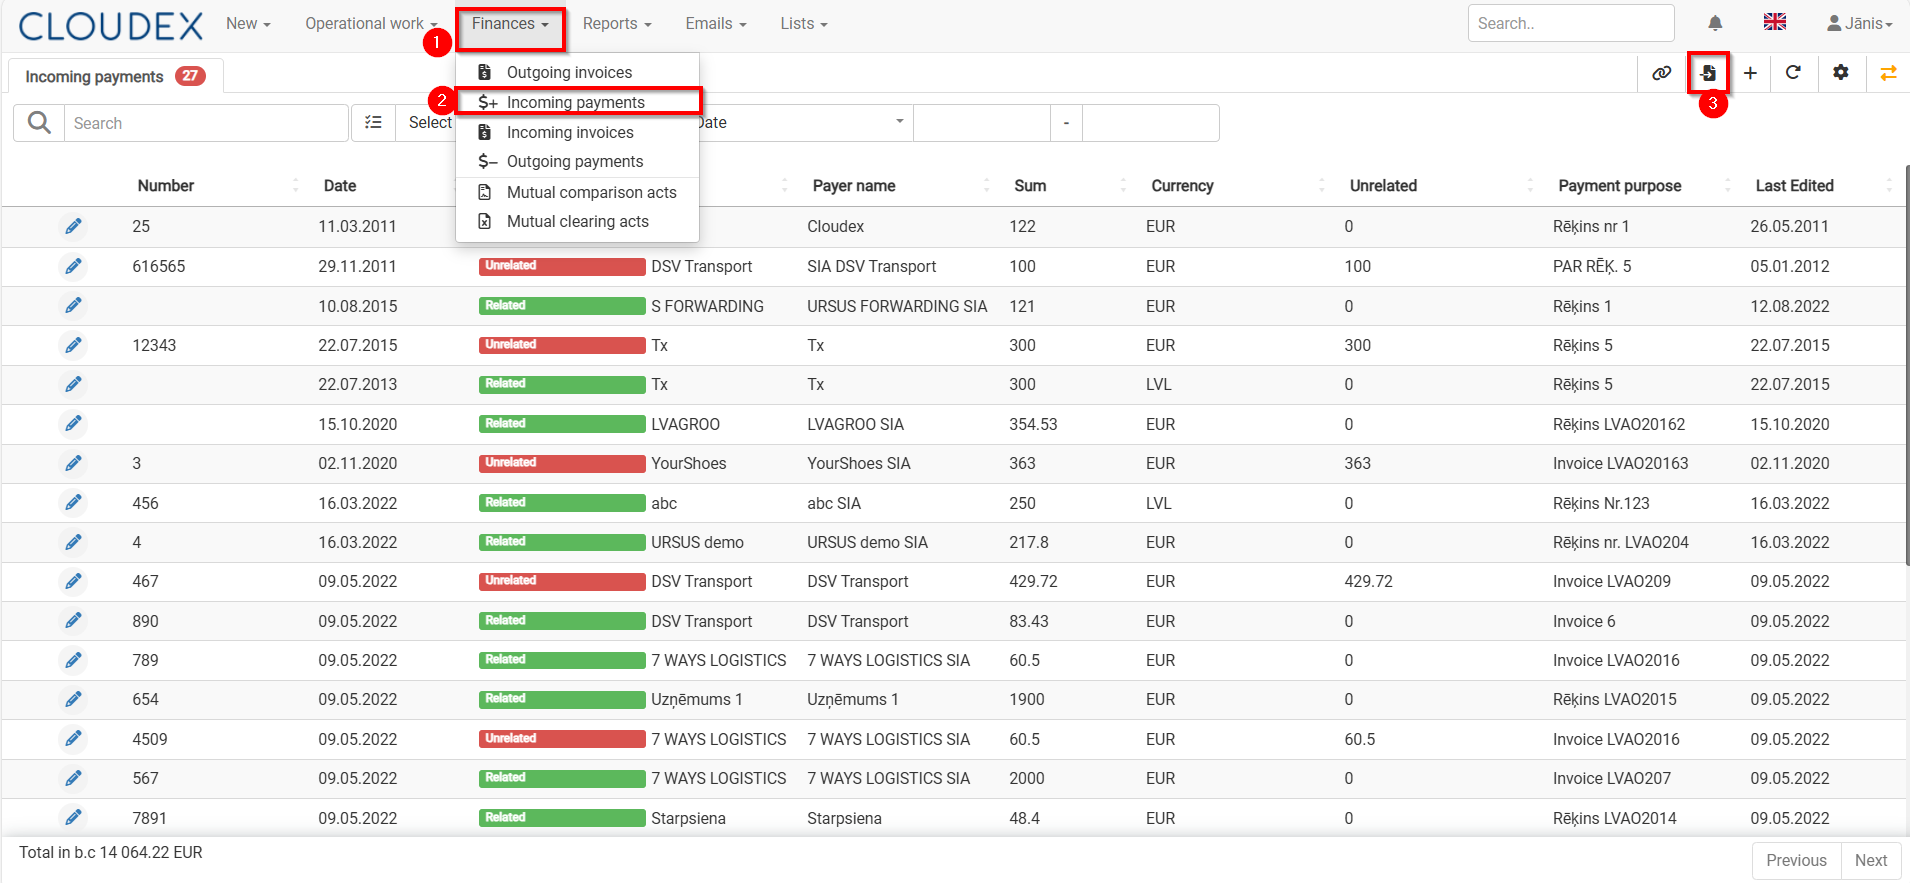
Finance > Incoming payments
-
Import payments from the Bank (using symbol "
 ")
")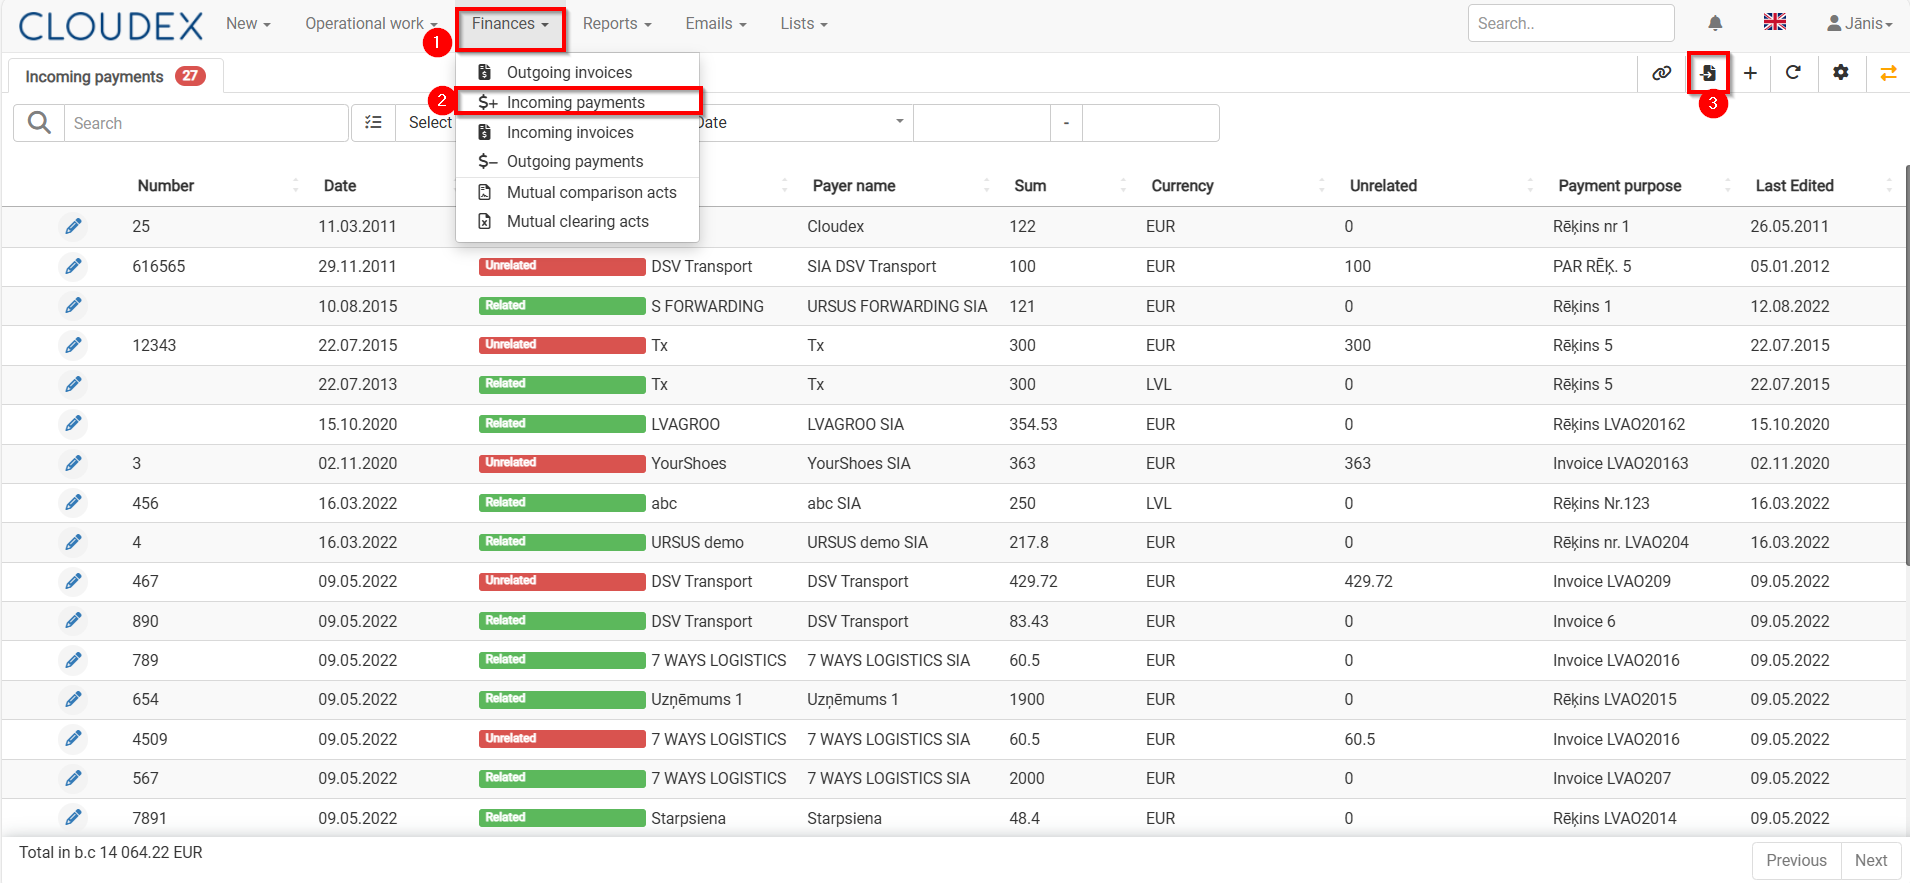 1.3. Import Bank payments
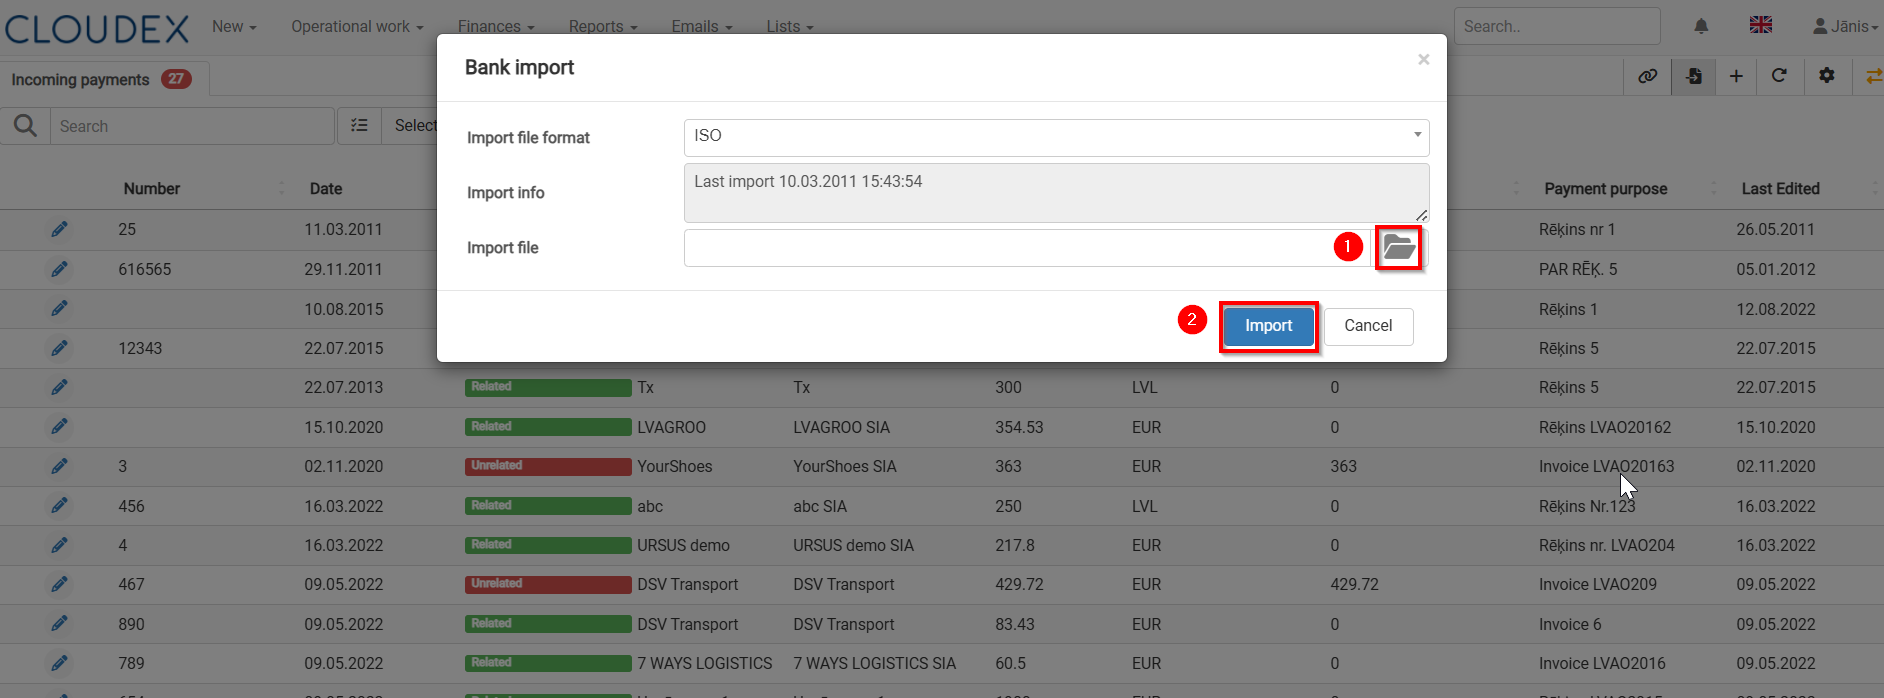
1) Choose the file which you imported from Internet Bank
2) Press Import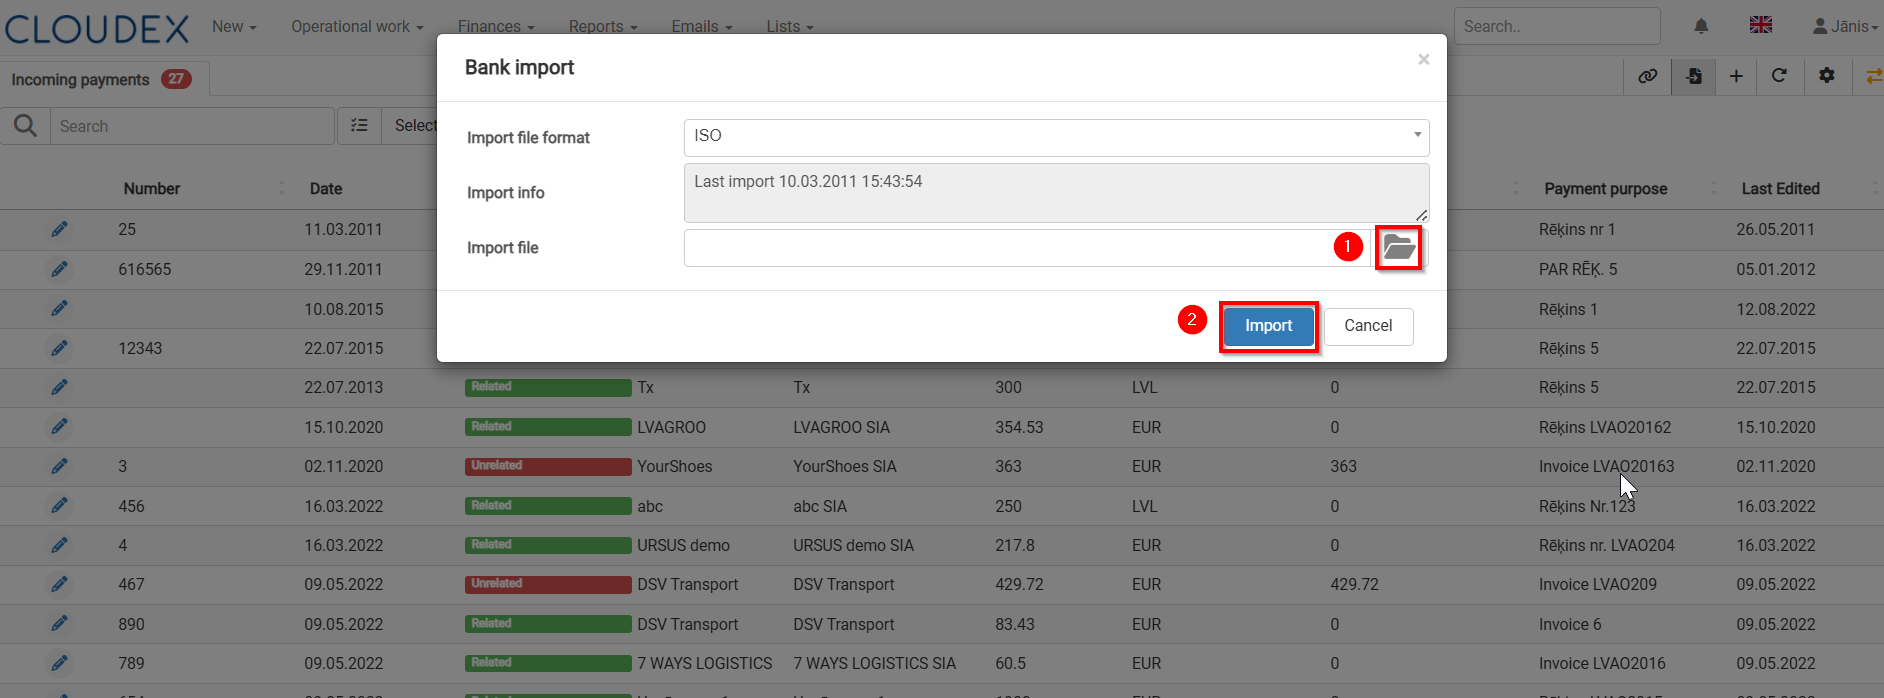

2. Linking "Incoming Bank payments" with "Outgoing invoices"
When importing payments from the Internet bank, CLOUDEX TMS creates attachment of invoices, but if the invoices are not attached to the payment amount, then do the attachment according to the instructions bellow.
1) CLOUDEX TMS > Finaces >Incoming payments
2) Filter >show only Unrelated payments "Unrelated" (payments which are not related to invoices)
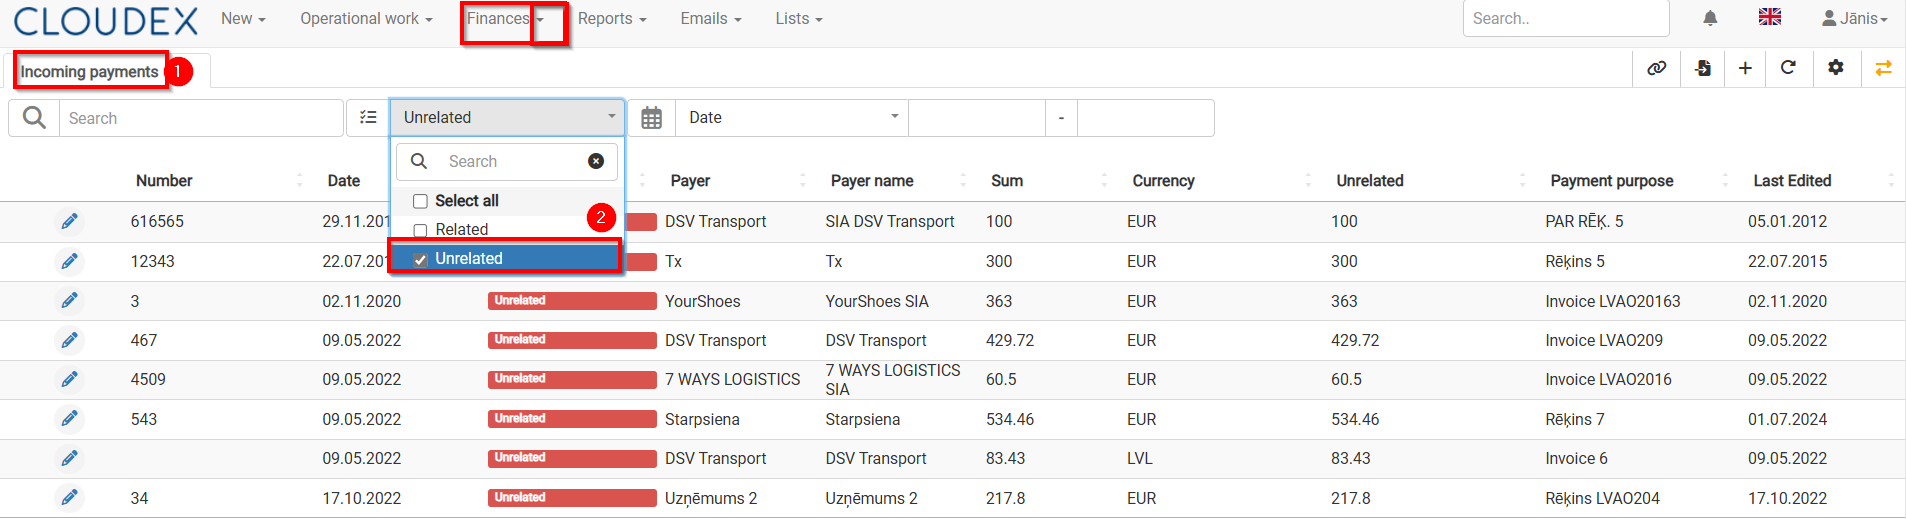
3) Select Incoming Payment which to "Relate" with Invoice
4) Press the button "Relate invoices" 
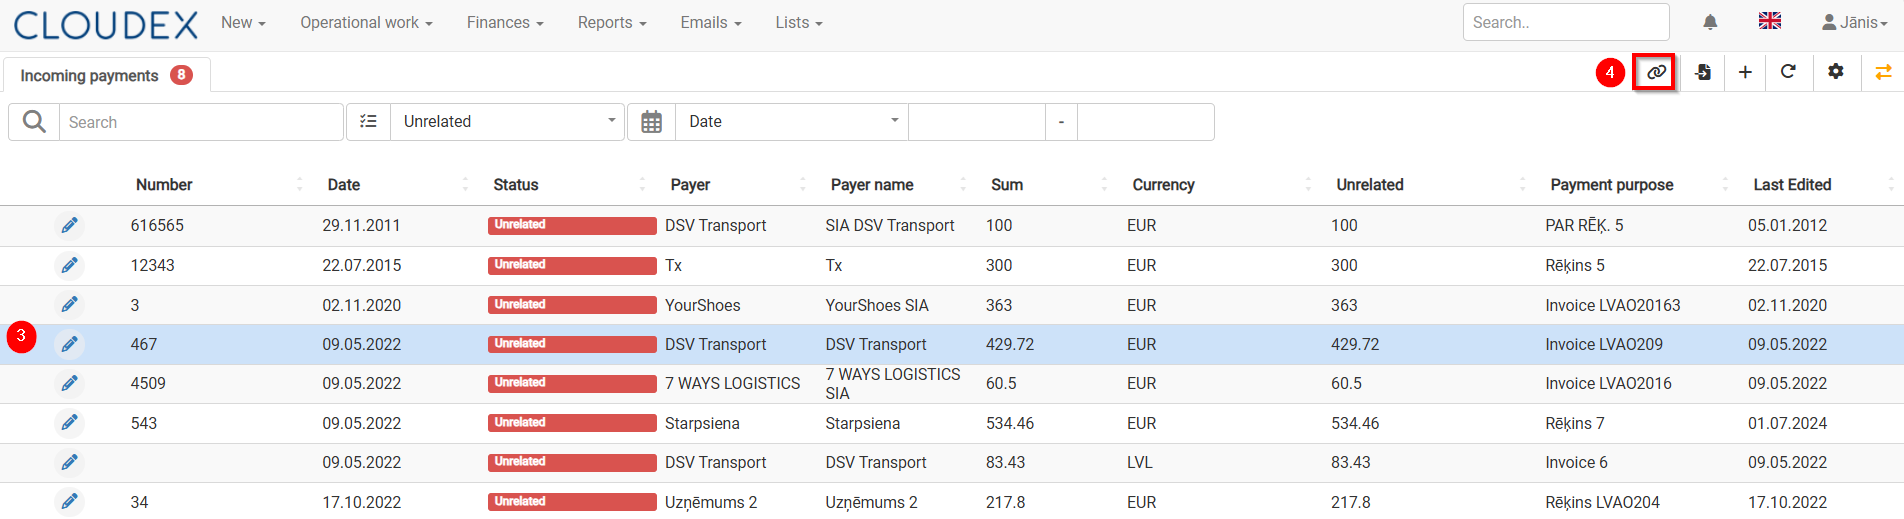
5) In the list of Invoices, select the appropriate invoice/invoices for which payment has been made, mark them.
6) Selecting "the up arrow" you will be able to relate the invoice to payment.
7) Confirm with the button "Close".
8) With "the green arrows" it is possible to switch to another "Unlinked" payment.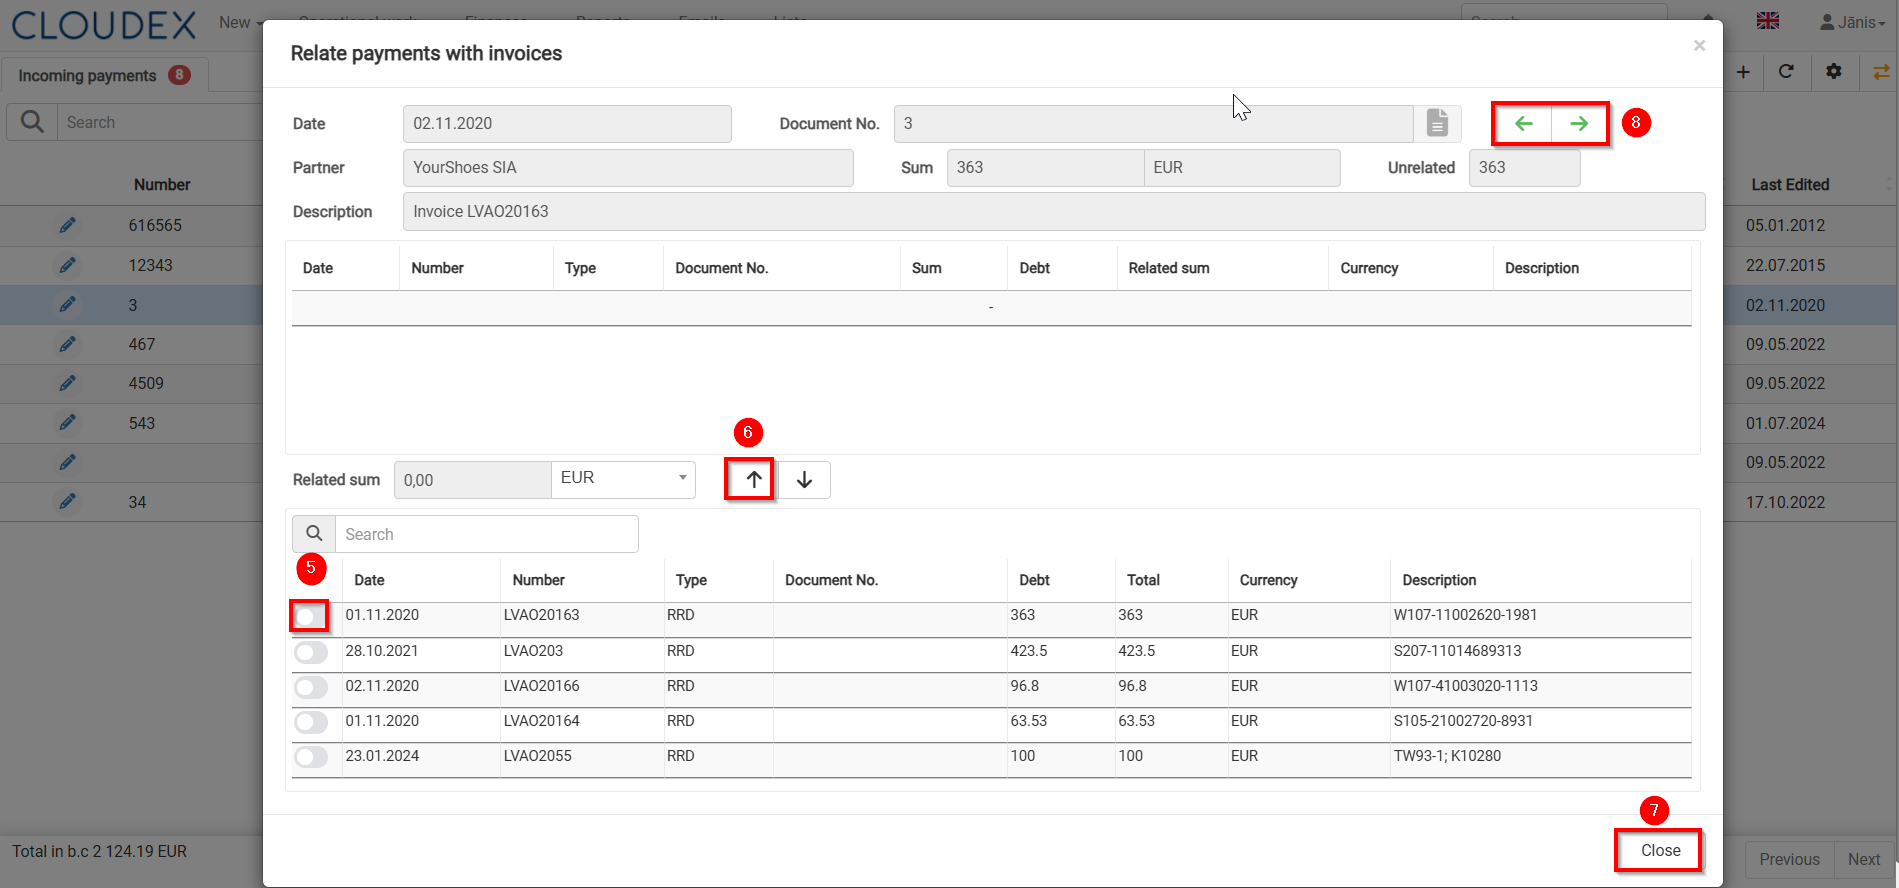
9) With the filter, you can quickly find the required invoice by number, amount, etc.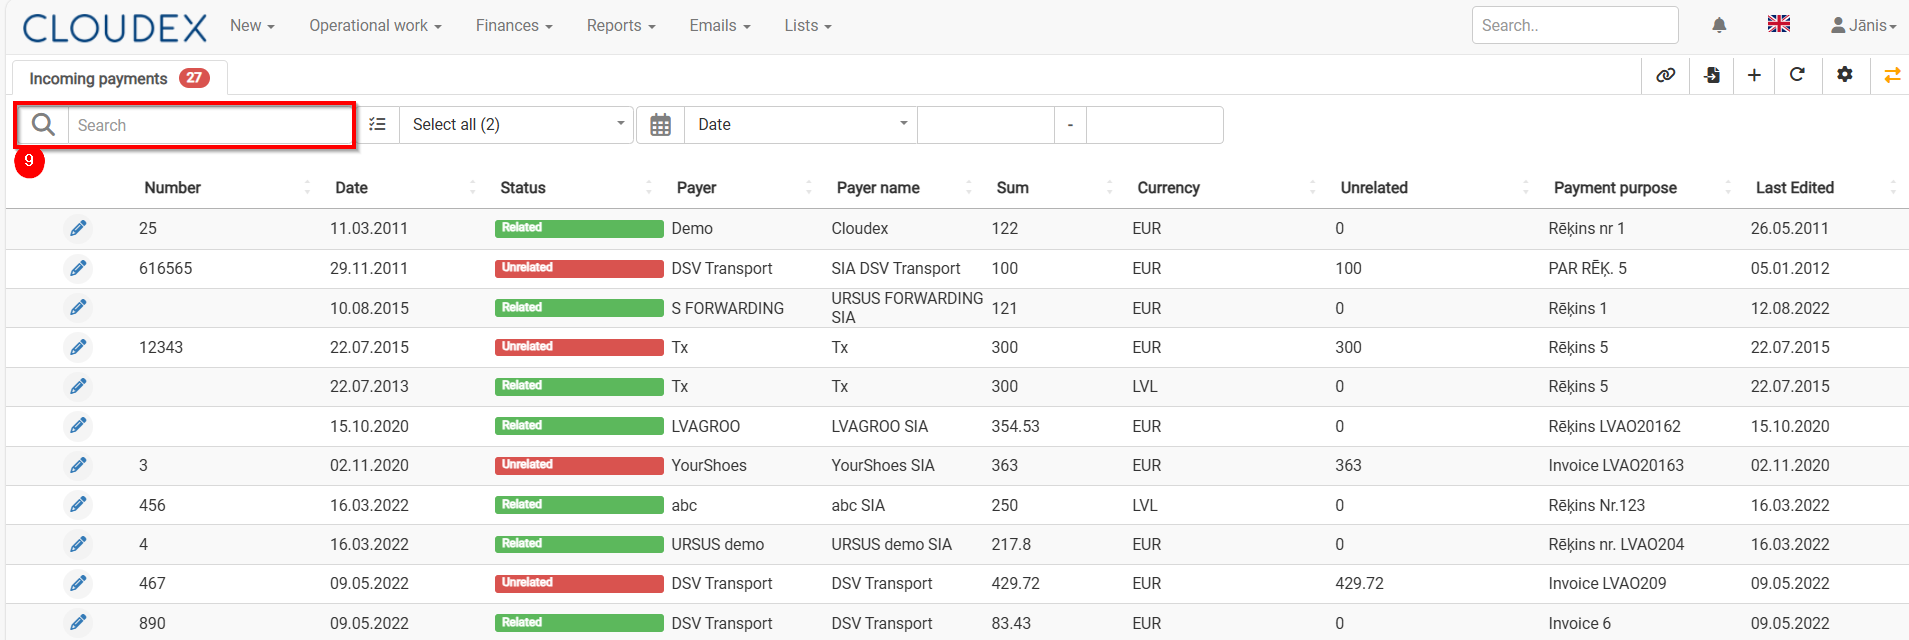
When the Incoming Payment is linked to the corresponding invoice, the amount in the "Unrelated" column in the Bank incomings list will be zero.
3. Outgoing invoice payment - manual data entry
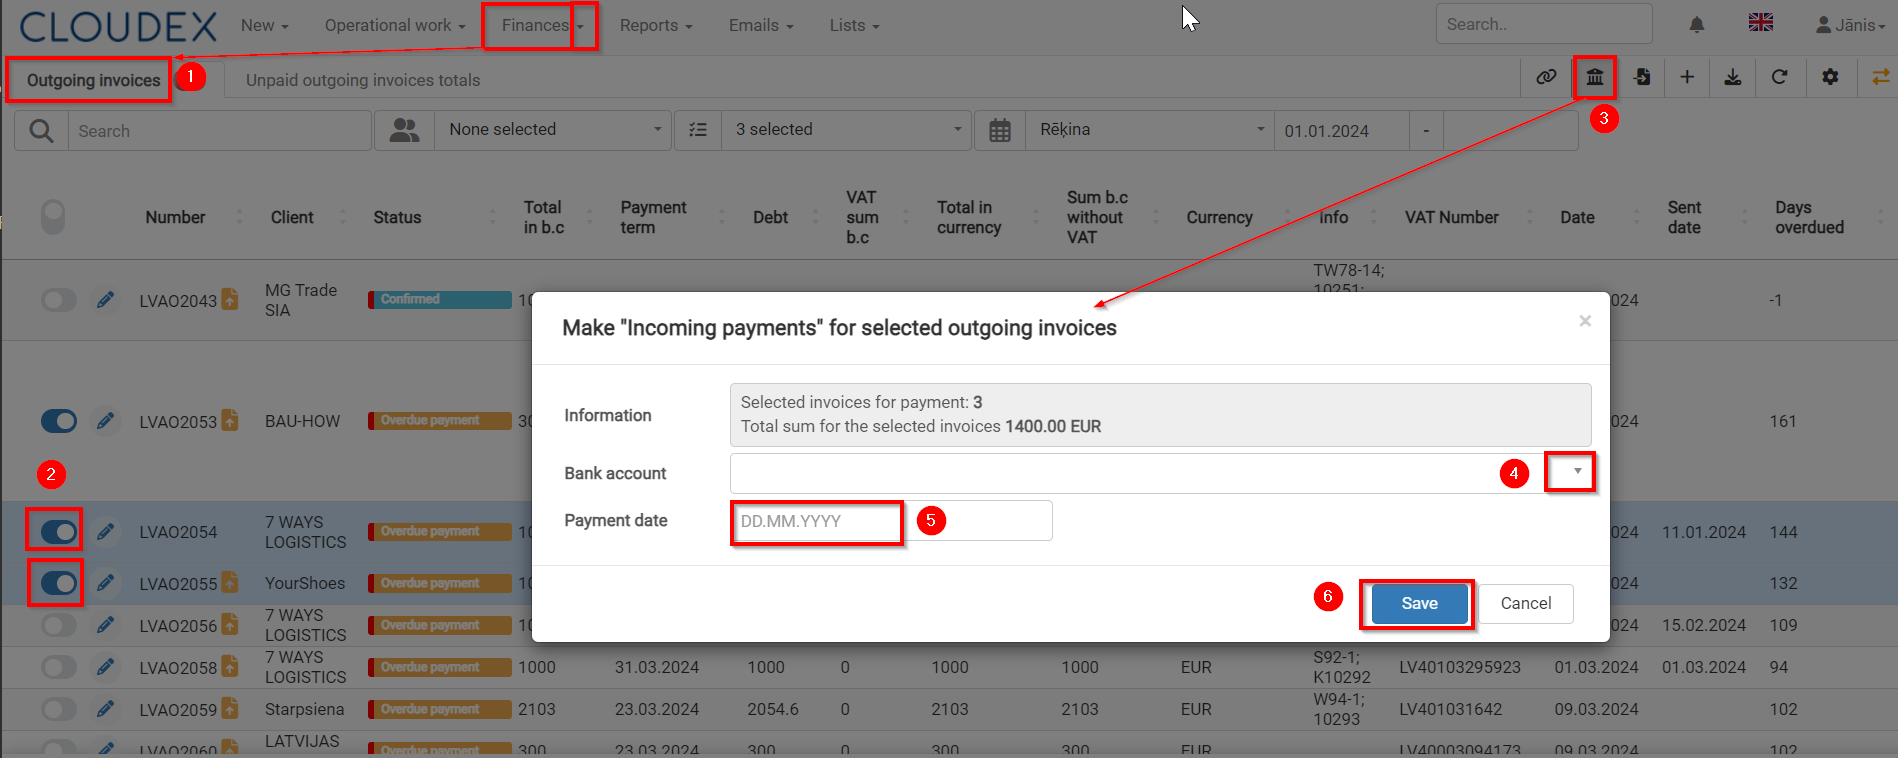
- Go to Finances >Outgoing Invoices
- Mark Outgoing Invoices which are paid
- Choose function "Make Incoming payments for selected outgoing invoice"
- Choose appropriate Bank account, if you have more than one account
- Enter the Payment date.
- Save
4. Tips and Tricks
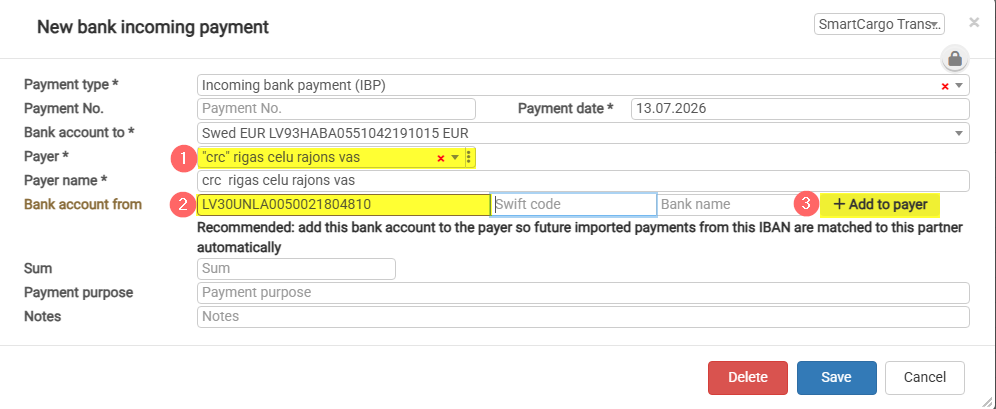
1 Trick. Add Bank account to payer in order to recognize Payer for next payments automaticaly
- Choose Payer
- Fill in the bank number.
- Press "Add Account to Payer Account."
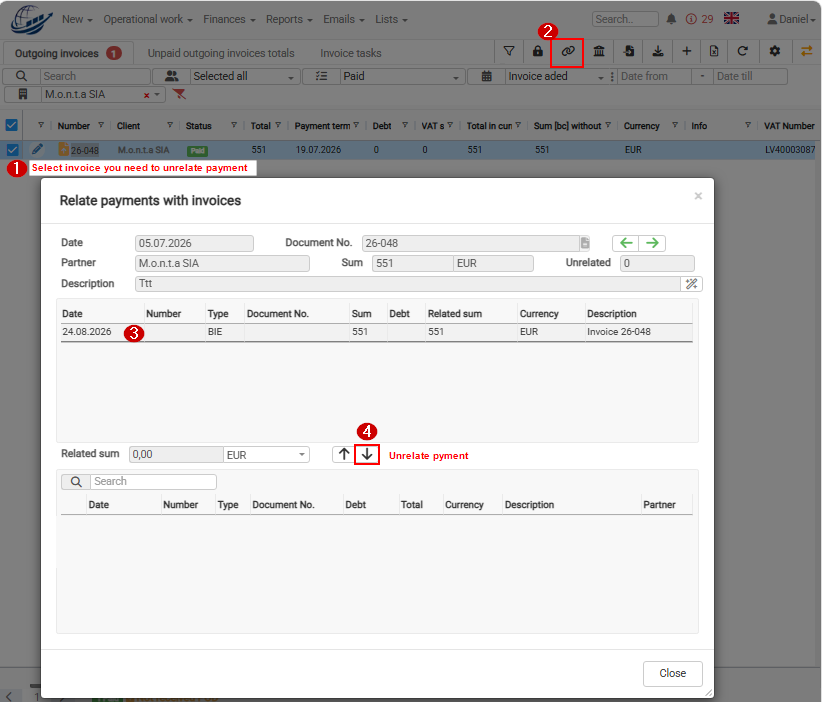
2 Trick. How to unrelate payment from invoice
When is the invoice “Date sent” field filled in automatically?
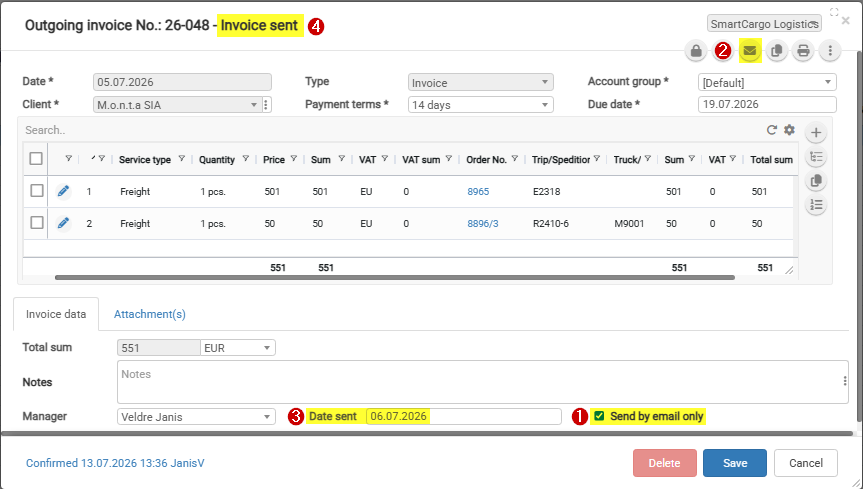
Cloudex TMS fills in the Date sent field automatically when both of the following conditions are met:
- Send by email only is selected.
- The invoice is sent by email from Cloudex TMS.
When the Date sent field contains a date, the invoice status changes automatically to Invoice sent.
The “Send by email only” checkbox value is set automatically when generating an invoice from an order.
The checkbox value depends on the “Send invoices” field value.
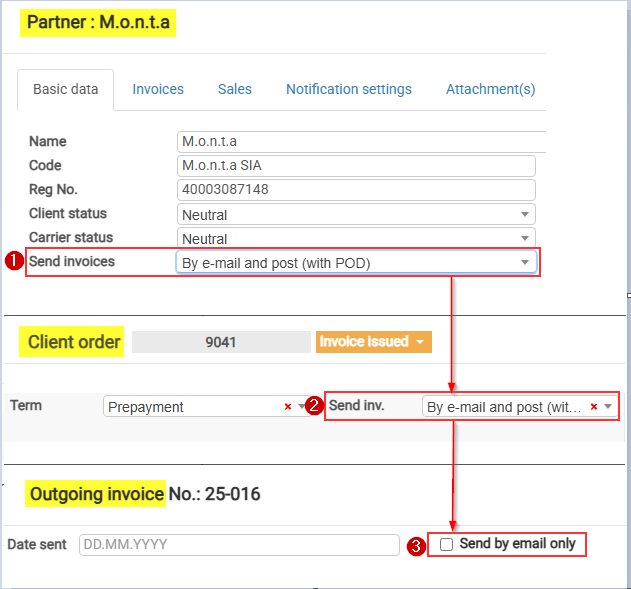
Send invoices values marked with “*” set the “Send by email only” checkbox value automatically:
| Send invoices setting | “Send by email only” selected automatically |
|---|---|
| By e-mail (with POD) | Yes |
| By post (with POD) | No |
| By e-mail and post (with POD) | No |
| Don’t send (Self-billing) | Yes |
| Download in Client Portal | Yes |
| By e-mail (invoice upon delivery, second time with POD) | No |
| By e-mail (without POD) | Yes |
| Upload to the Client Portal together with POD | No |
When should I enter the “Date sent” manually?
Enter the Date sent manually if the invoice was sent outside Cloudex TMS or if the date was not filled in automatically.
For example, manual entry may be required when the invoice was sent directly from Outlook or another email application.
How to connect your bank account for automatic payment import?
Cloudex TMS can automatically import payments from your bank account and match them with outgoing invoices.
The bank connection is provided through GoCardless.
Why should I connect my bank account?
Without an automatic bank connection, someone needs to regularly download bank statements and import them into Cloudex TMS manually.
With automatic payment import, Cloudex TMS can:
- automatically download new bank transactions up to 3 times per day;
- automatically match payments with outgoing invoices where possible;
- keep payment information in Cloudex TMS more up to date;
- reduce manual bank statement imports;
- show payments that could not be matched automatically so they can be reviewed.
This means your accounting and transport teams spend less time checking whether customers have paid and importing payment information manually.
How much does automatic bank payment import cost?
Automatic bank payment import is a paid Cloudex TMS add-on.
Price: €10 + VAT per month for up to 5 connected bank accounts.
If you need to connect more than 5 bank accounts, please contact Cloudex support.
How to connect your bank account?
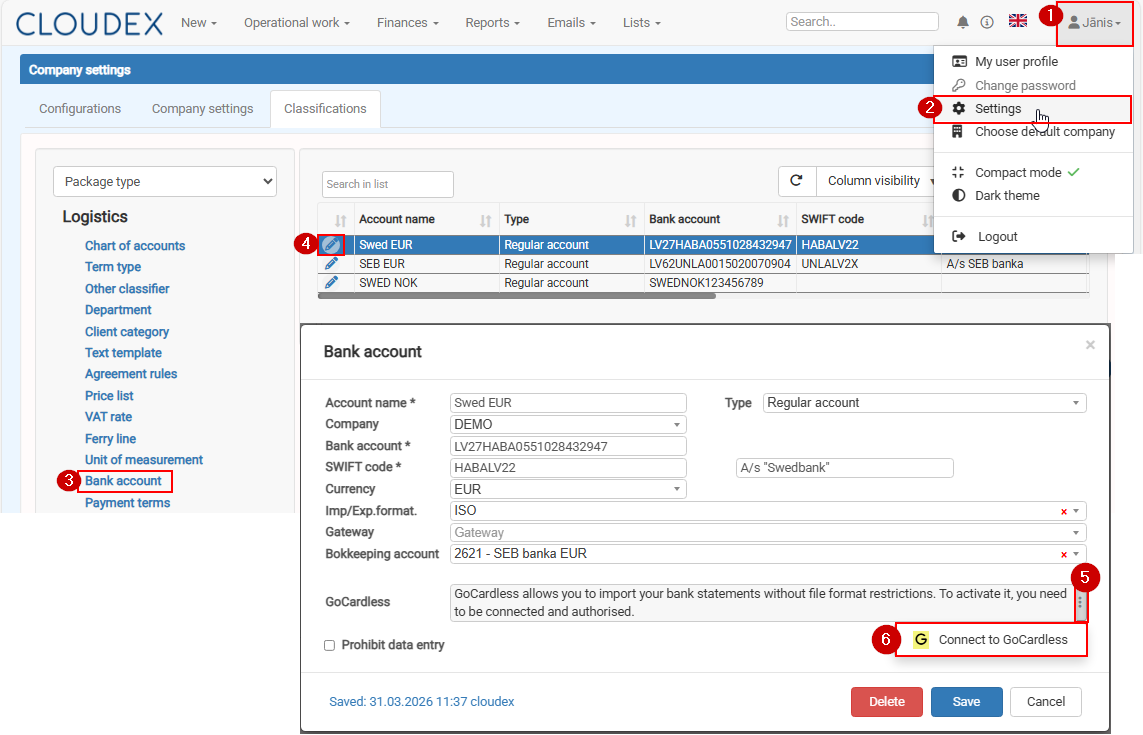
Go to: Your profile Settings → Settings → Classifications → Bank accounts
Select the bank account you want to connect and start the GoCardless bank connection process.
Follow the GoCardless authorization steps and select the bank account you want to connect with Cloudex TMS.
After the connection is completed, Cloudex TMS will start importing transactions automatically.
How can I check whether automatic import is working?
On the Cloudex TMS Dashboard, you can see information about each bank account.
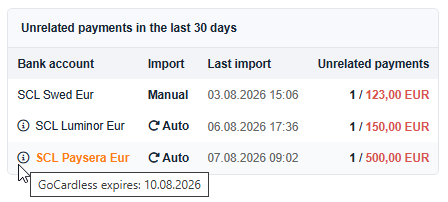
Import method: The bank account shows whether payments are:
- imported manually, or
- imported automatically through the GoCardless API.
Last import: The Last import column shows when payments were last imported into Cloudex TMS.
This can be either a manual or an automatic import.
After importing payments, Cloudex TMS tries to match them automatically with invoices.
If some payments cannot be matched, the Dashboard shows:
- the number of unrelated payments;
- the total amount of unrelated payments.
Click the bank account to open the list of unrelated payments from the last 30 days.
Review these payments and relate them manually when necessary.
What should I do if payments are no longer imported automatically?
Check the Last import date.
If automatic imports have stopped, the bank authorization may have expired or need to be renewed.
Reconnect the bank account through GoCardless or contact Cloudex support if the problem continues.
Related articles
How to send electronic Invoice to your client?
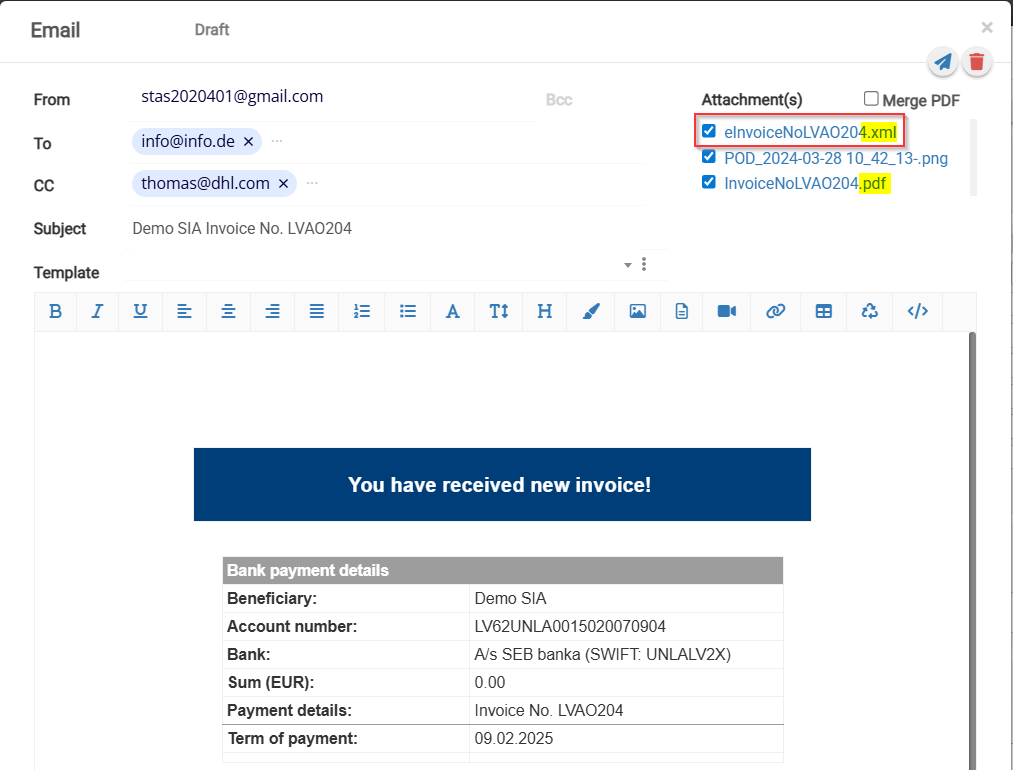
In order to send electronic Invoice to your client (PEPPOL, rekini.lv or other formats)
Go on Partner > Invoices > Electronic invoice format in email chose: Peppol or other > Save
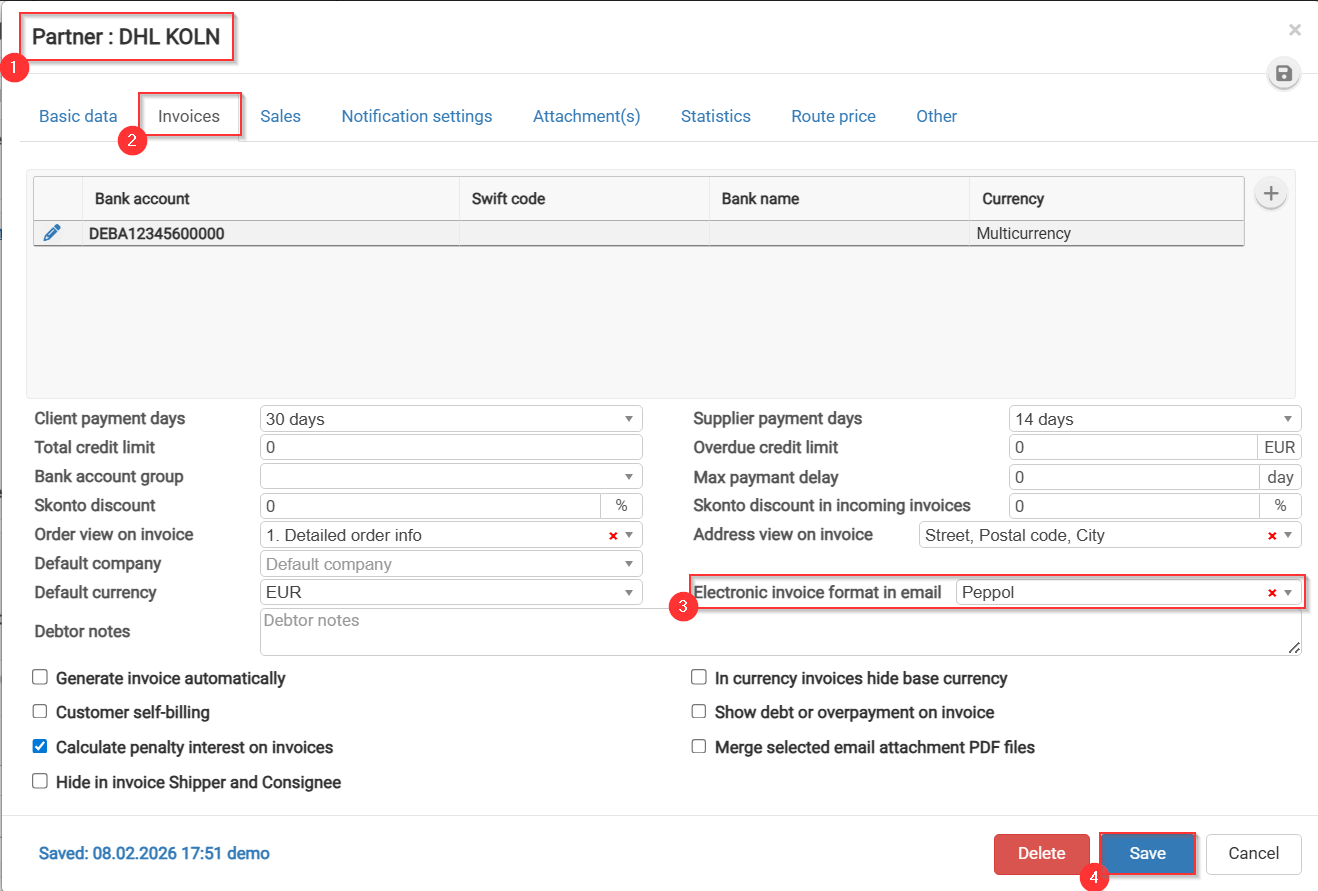
When you send an invoice to your client, electronic invoice (PEPPOL or other formats) will be included as an attachment.
How to create a mutual comparison?
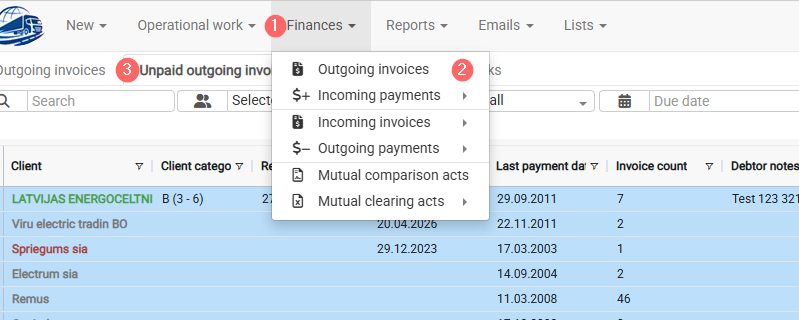
Mutual Comparison Acts – Documents used to compare and reconcile financial transactions, balances, or invoices between two parties.
Create and manage reconciliation documents to compare balances and transactions with customers or suppliers.
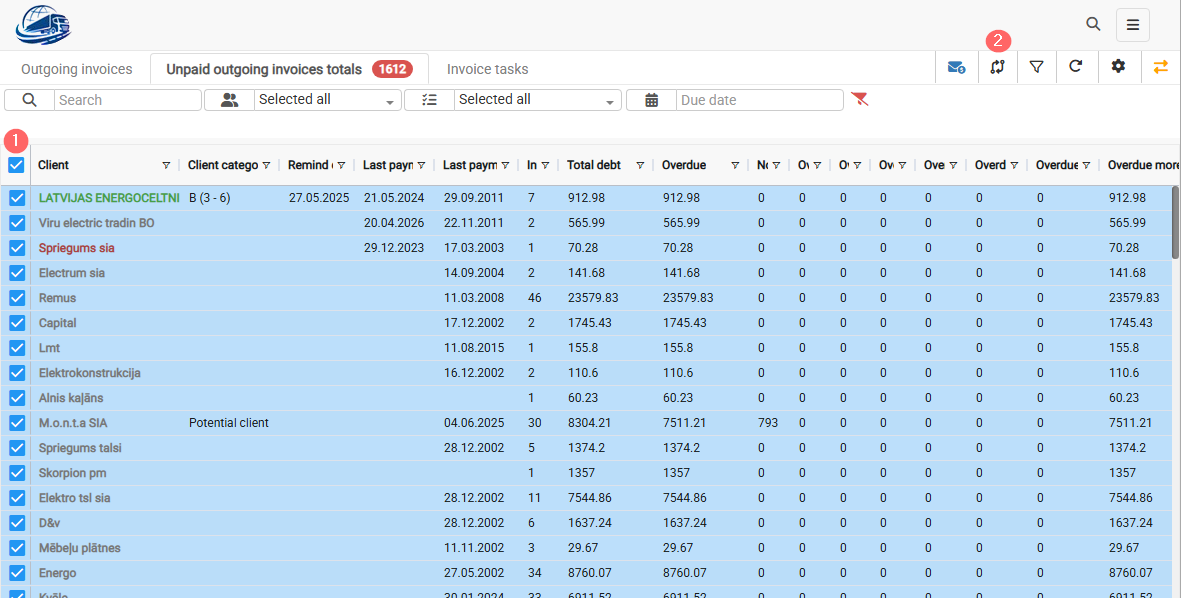
Finances -> Outgoing invoices -> Unpaid outgoing invcoices tools

How to send payment reminders for unpaid outgoing invoices?
Use this instruction when you need to send payment reminders to customers for unpaid outgoing invoices.
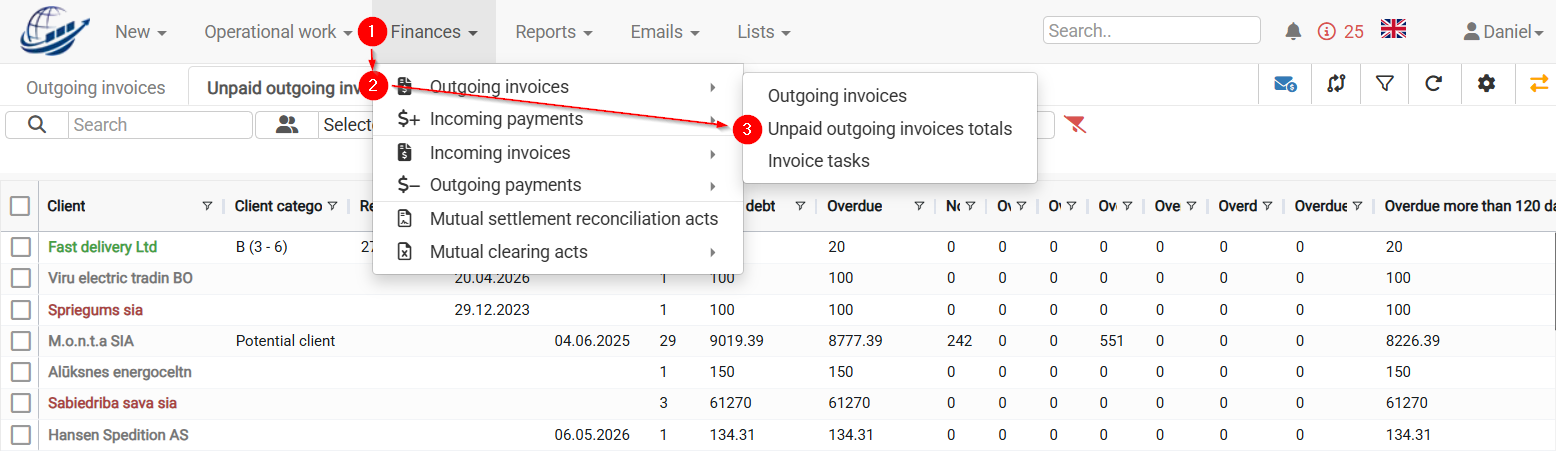
- Open Finances → Outgoing invoices → Unpaid outgoing invoices totals.
2. In the Due date field, select the date you want to check (usually today).
3. CLOUDEX TMS will show the invoices that were still unpaid for the selected due date.
If no Due date is selected, the system will display all unpaid invoices.
Usually, payment reminders should be sent only for overdue invoices.
4. Select the customers for whom you want to send payment reminders.
5. Click Send payment reminders. 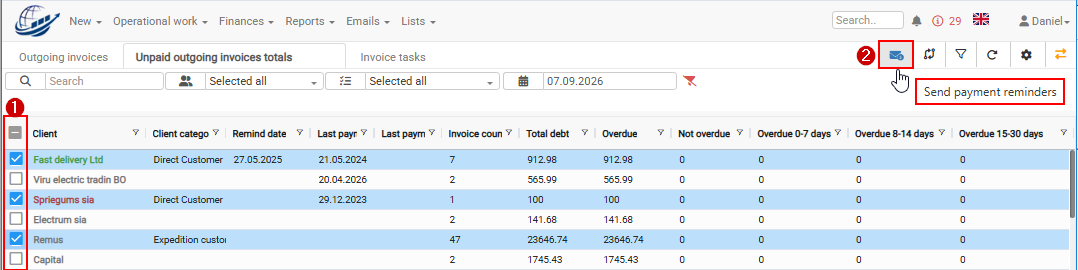
6. In the reminder window, select the required payment reminder text.
7. If needed, select Attach unpaid invoices as PDFs.
8. Send the payment reminders.
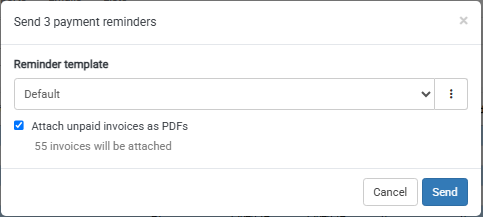
If Attach unpaid invoices as PDFs is selected, the unpaid invoices will be added to the reminder email as separate PDF attachments.
Where will the payment reminder be sent?
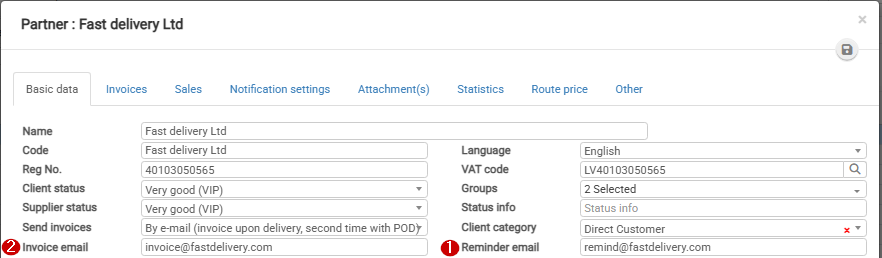
CLOUDEX TMS sends the payment reminder using this order:
- To the customer’s Reminder email.
- If the Reminder email is empty, to the customer’s Invoice email.
- If both fields are empty, the reminder is sent to the manager responsible for the order included in the
Common mistakes
- No Due date is selected, so all unpaid invoices are shown.
- The wrong customer is selected.
- The customer’s Reminder email is empty.
- The invoice is unpaid in CLOUDEX TMS, but it has already been paid outside the system.
- Unpaid invoice PDFs are not attached when the customer needs invoice copies.
How to send outgoing invoices automatically
To generate an invoice automatically, the following criteria must be met:
- In the client card Invoices tab has to be mark

- Order must be in status "Delivered"

-
Depending on the selected “Send inv.” option, a POD/CMR may need to be uploaded and approved before the invoice can be generated.



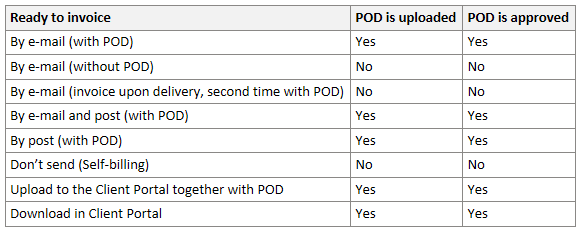
Active orders

 Second orange empty circle means POD/CMR approval is expected,
 icon indicates that the invoice is ready to be generated manually,
 icon indicates that the invoice will be generated automatically.
Whre to find checkbox "Generate invoice automatically"
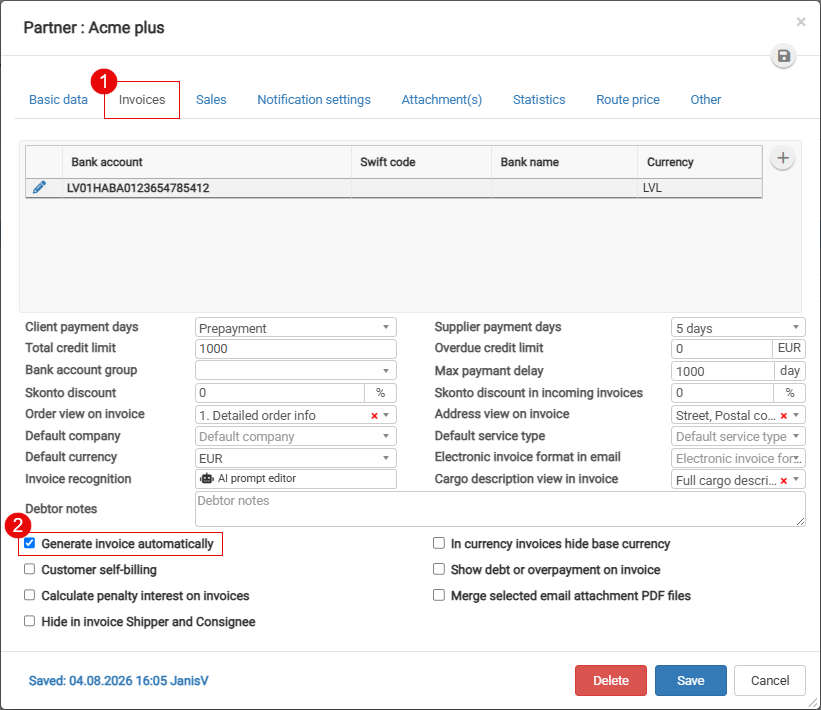
How to credit an outgoing invoice and create a new corrected invoice?
Use this instruction when an outgoing invoice has already been created, but it must be corrected by creating a credit invoice and then creating a new corrected invoice.
This process includes four main steps:
- Create a credit invoice for the existing invoice.
- Create a new corrected invoice.
- Update the income amount in the client order.
- Clear the debts for the original invoice and the credit invoice.
1. How to create a credit invoice?
- Open the outgoing invoice that needs to be credited.
- Click the three-dot menu.
- Select Create credit invoice.
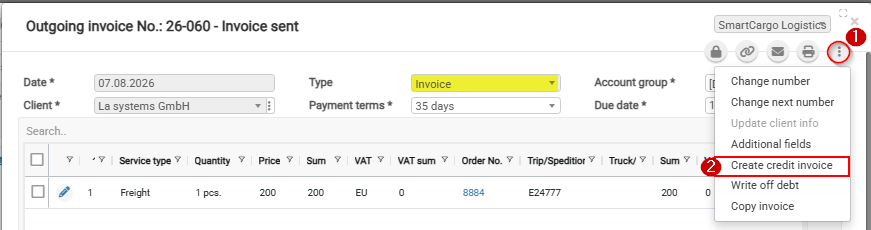
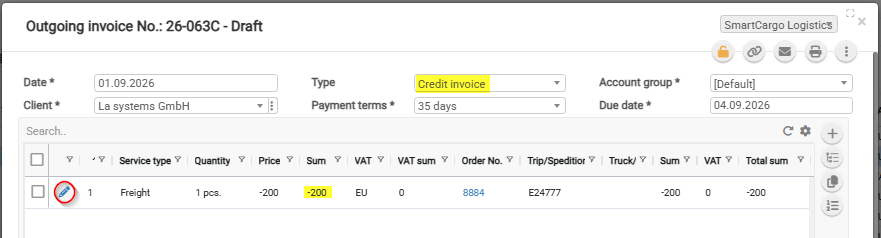
CLOUDEX TMS will create a new invoice with the type Credit invoice. The credit invoice will have the same amount as the original invoice, but with a minus value.
If you only need to credit part of the invoice amount, click the Edit icon in the invoice content list and change the amount.
2. How to create a new corrected invoice?
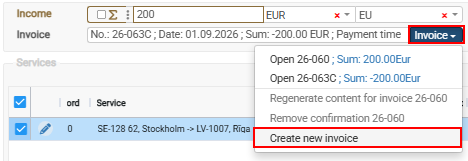
Before creating the new invoice, correct the information in the related Client order that caused the original invoice to be incorrect.
Then create a new outgoing invoice from the same client order.
3. How to update the income amount in the client order?
This is important when the corrected invoice amount is different from the original invoice amount.
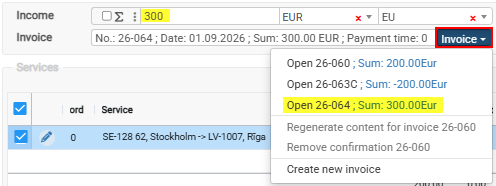
4. How to clear the debts for the original invoice and credit invoice?
After the credit invoice is created, clear the debts for both:
- the original outgoing invoice;
- the credit invoice.
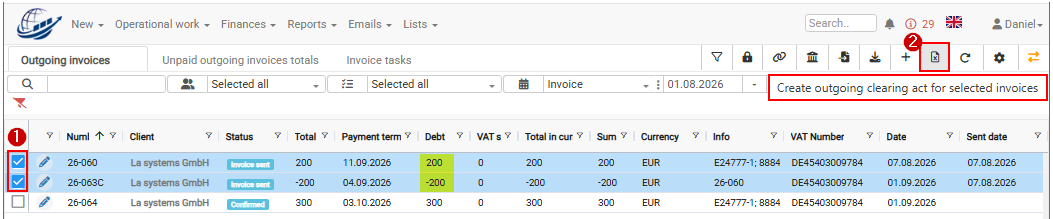
Create an Outgoing invoice clearing act. After the clearing act is created, the debts for both invoices will be cleared and both invoice statuses will be changed to Paid.
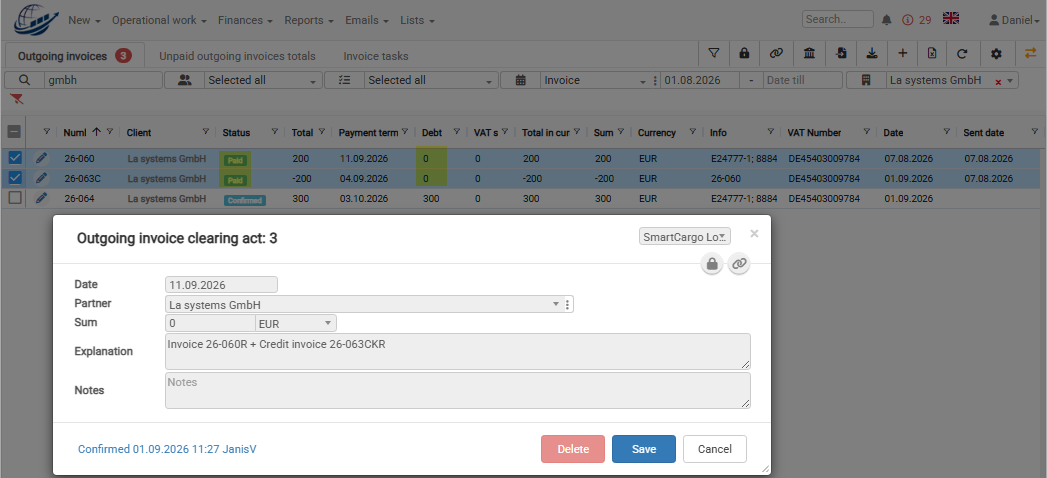
Common mistakes
- The client order is not corrected before creating the new invoice.
- The credit invoice amount is not adjusted when only part of the invoice should be credited.
- The income amount in the client order is not updated after creating the corrected invoice.
- The original invoice and credit invoice debts are not cleared.
How to record a customer self-billing invoice?
Use this function when your customer uses self-billing — meaning that the customer creates the invoice for your services on your behalf.
In Cloudex TMS, you should still create the Outgoing invoice as usual so that the revenue, customer debt and related Client orders are correctly recorded in the system.
Additionally, Cloudex TMS allows you to save the invoice number assigned by the customer in the Self-billing No field.
This is especially useful when the customer later makes a payment using their self-billing invoice number as the payment reference.
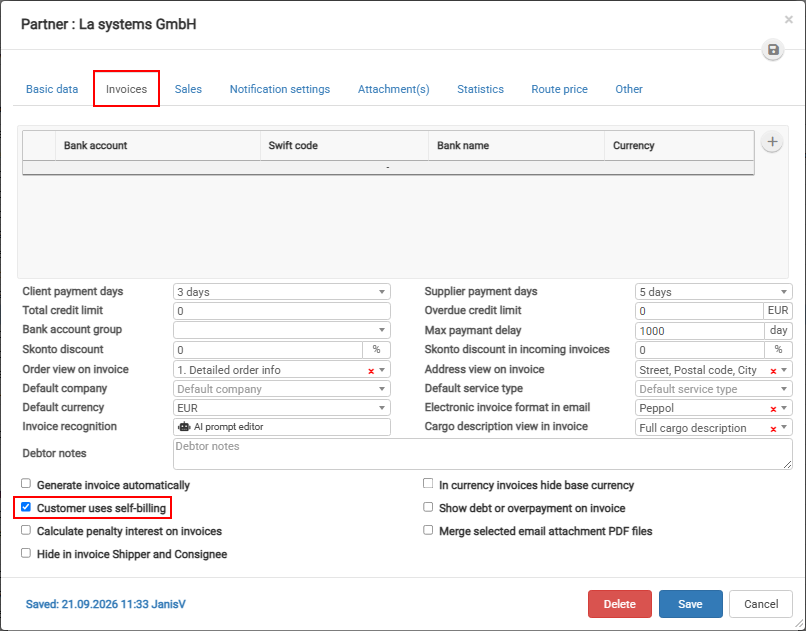
1. How to enable self-billing for a customer?
You only need to configure this once for each customer that uses self-billing.
Go to: Partners → Open the customer → Invoices
- Open the Invoice tab.
- Select Customer uses self-billing.
- Click the Save button.
After this setting is enabled, the Self-billing No field will become available on outgoing invoices created for this customer.
2. How to enter the customer's self-billing invoice number?
Create the customer's Outgoing invoice in Cloudex TMS as usual.
On the outgoing invoice:
- Find the Self-billing No field.
- Enter the invoice number shown on the self-billing invoice received from the customer.
- Click the Save button.
Example
Cloudex TMS outgoing invoice number: INV-2026-01584
Customer's self-billing invoice number: SB-45879
Enter SB-45879 in the Self-billing No field.
The Cloudex TMS invoice number remains unchanged.

Why is the Self-billing No important?
Customers that use self-billing may use their own invoice number when making a payment.
Saving this number in Cloudex TMS makes it easier to identify which outgoing invoice the received payment belongs to and helps with automatic or manual payment matching.
Incoming Invoices (Creditors)
How to register an Incoming Invoice?
To register a single invoice for multiple trips at once, you can do so in one of the following ways:
- How to register an Invoice from the Trip Form?
- How to Register an Invoice from the Open Trips window?
How to register an Invoice from the Trip Form?
- Open the Trip.
- Click the "Register Invoice" button.
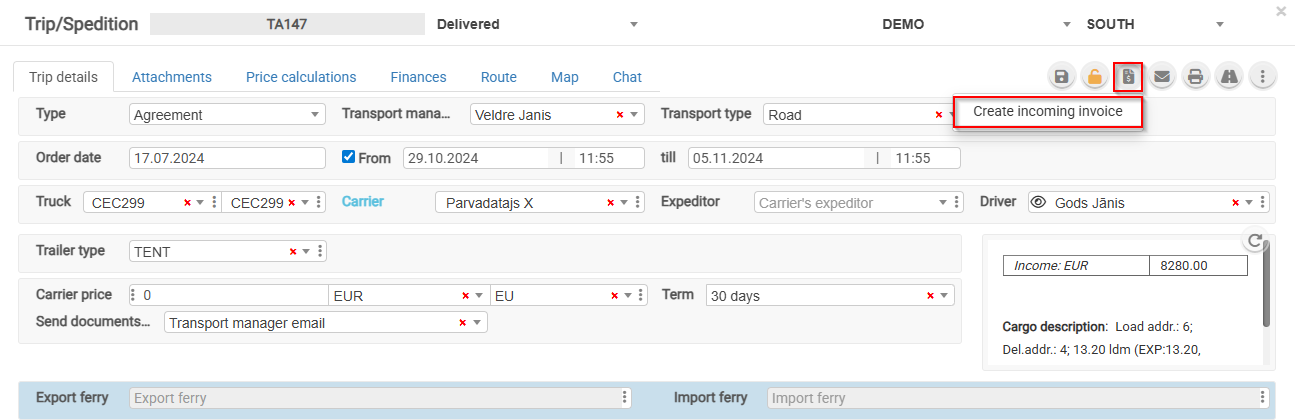
For an unconfirmed invoice, it is possible to add other customer orders.
How to Register an Invoice from the Open Trips window?
- Select the trips for which you want to register an incoming invoice.
- Click the invoice registration icon

- Complete the required fields and click Save.

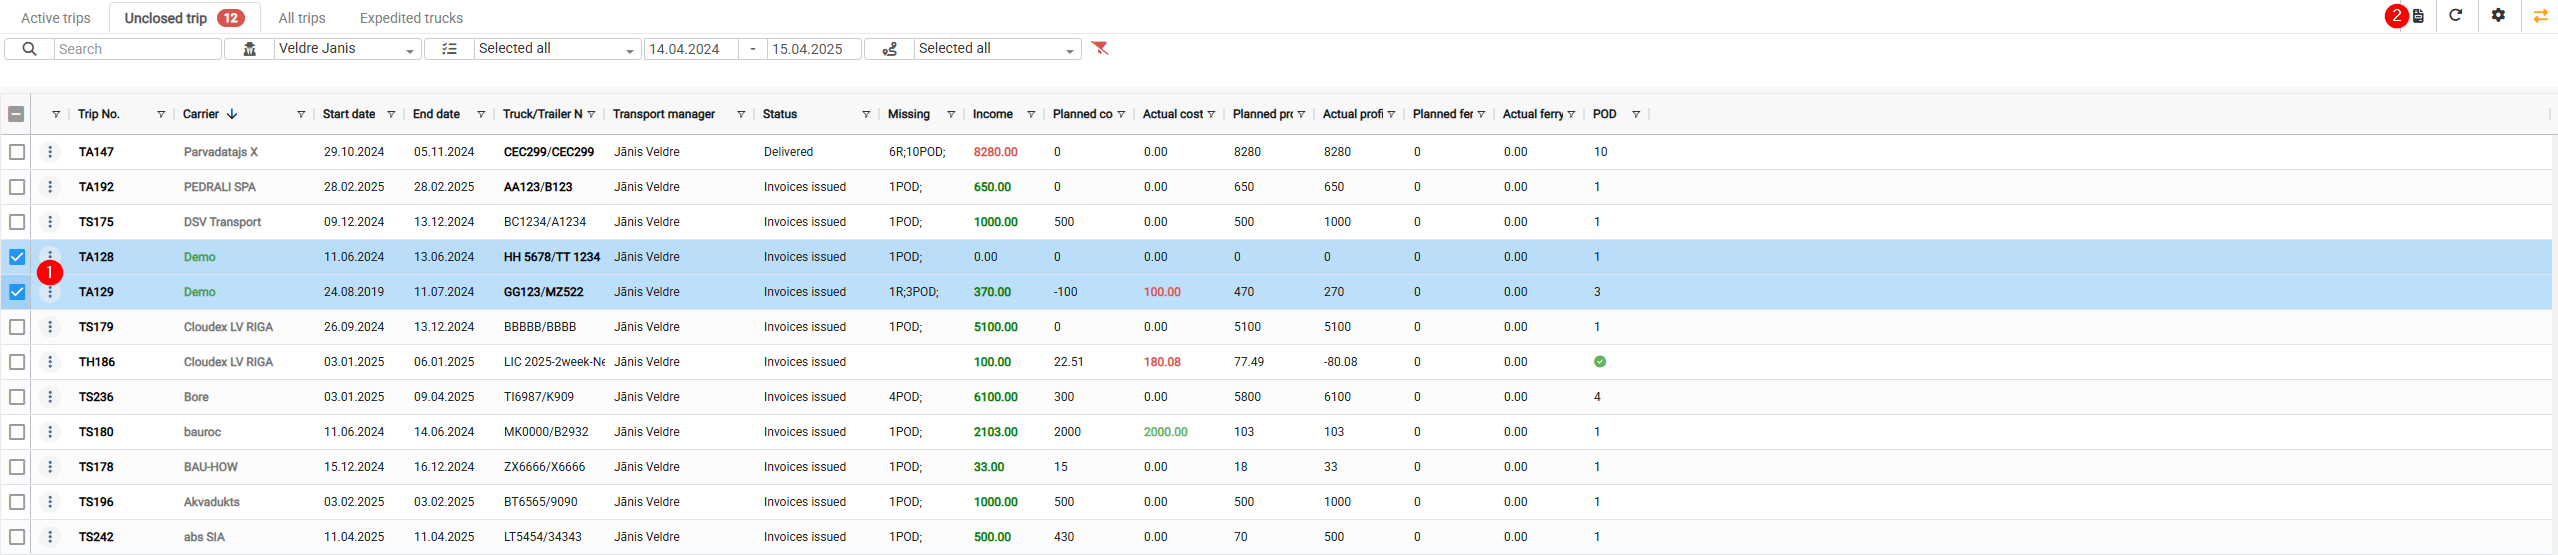
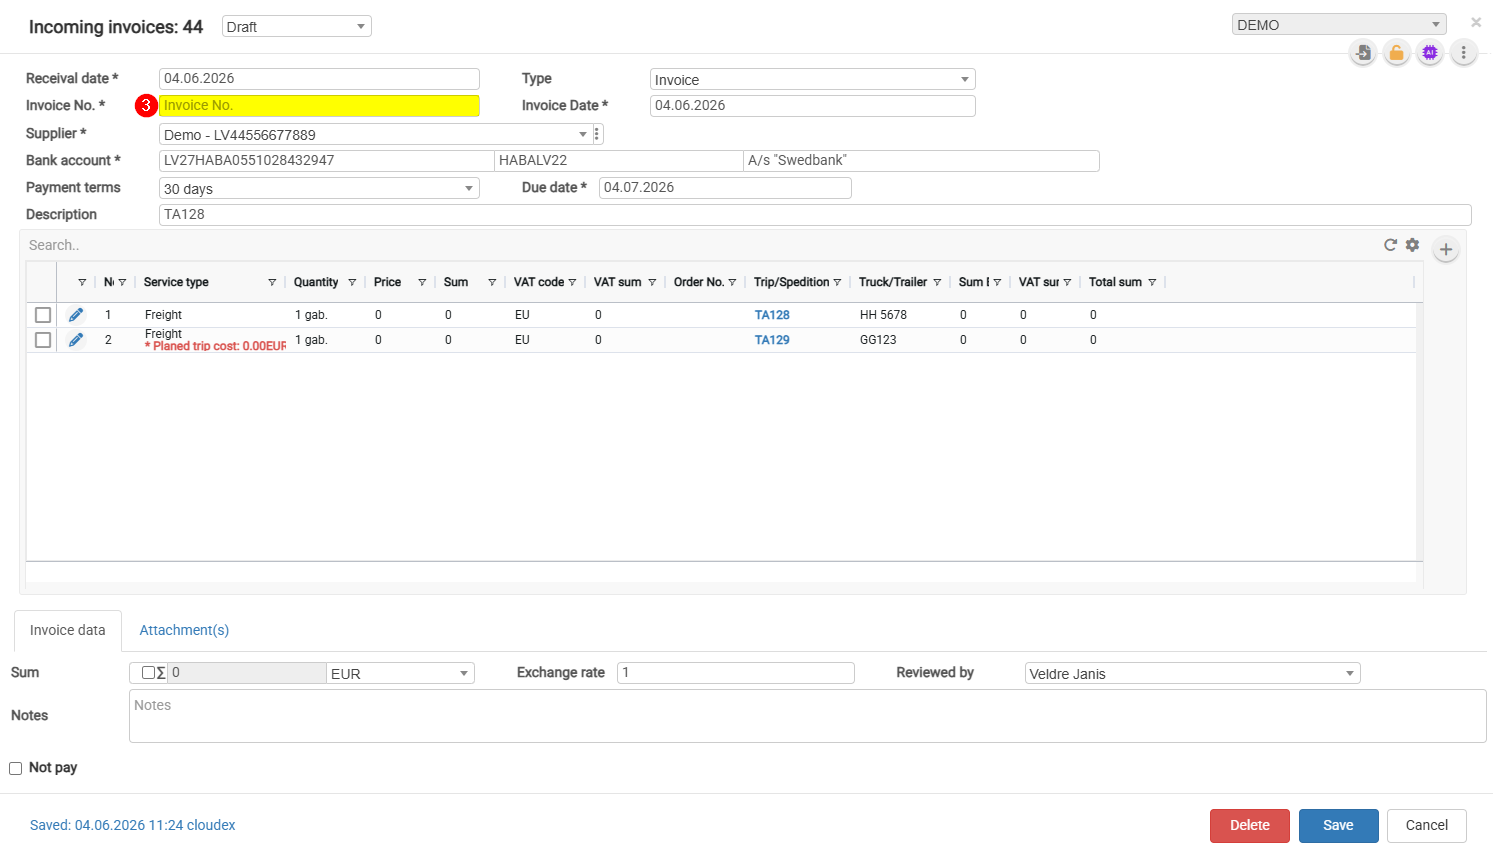
How to apply a discount (Skonto) to an incoming invoice?
1. In the Partner List, find the relevant partner.
2. Open the "Settlements" section and enter the discount.
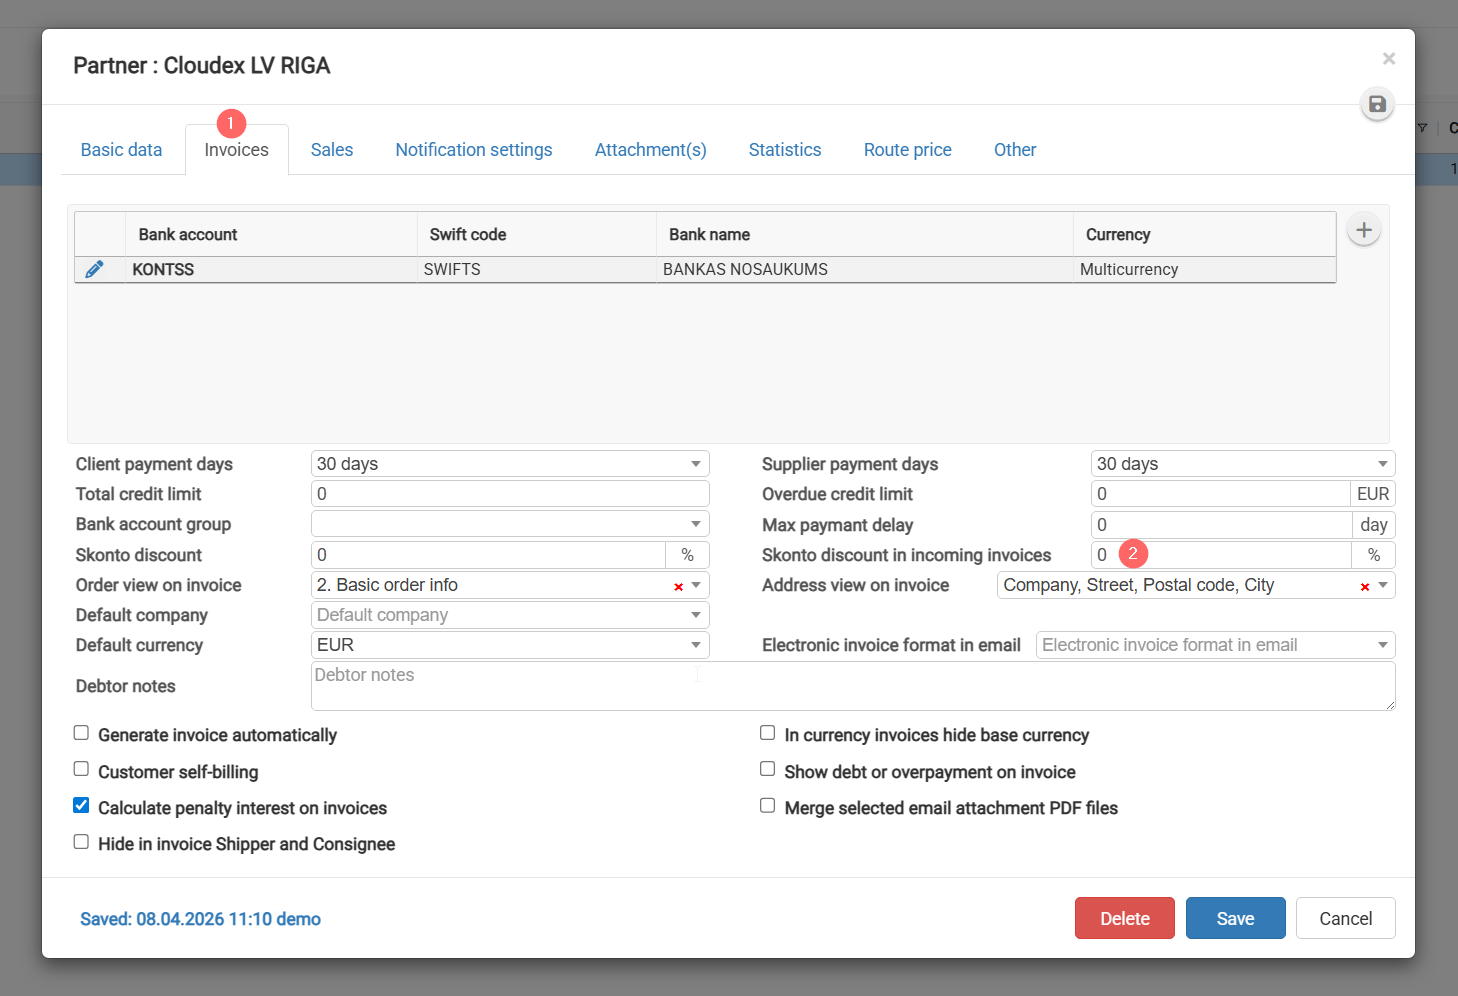
How to find carrier orders or trips for which an incoming invoice has not been received?
How to pay Incoming invoices?
- 1. How to prepare payments for incoming invoices?
- 2. How to export payments to the Internet bank?
- Tips ans tricks
How to pay incoming invoices?
Use this function when you want to prepare payments for supplier or carrier invoices registered in Cloudex TMS.
The payment process consists of two steps:
- Create Outgoing payments from the incoming invoices.
- Export the prepared payments to your Internet bank.
Important: Creating an outgoing payment in Cloudex TMS does not transfer money from your bank account. The payment must still be exported to the Internet bank and processed there.
1. How to prepare payments for incoming invoices?
-
Open Finances → Incoming invoices.
-
In the Payment term filter, select the date up to which invoices should be paid.
Cloudex TMS will show incoming invoices with a payment due date up to the selected date.
-
Select the invoices you want to pay using the checkboxes.
-
Click Make outgoing payments in the toolbar.
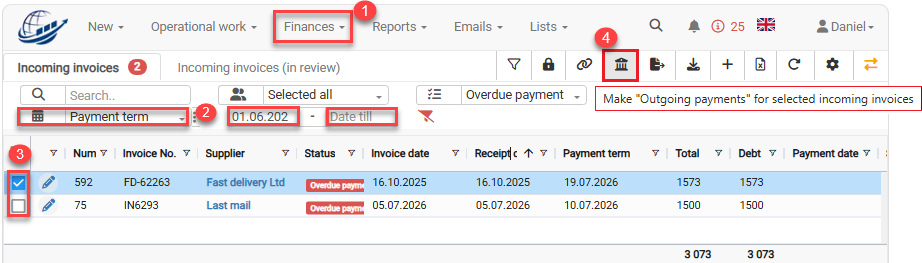
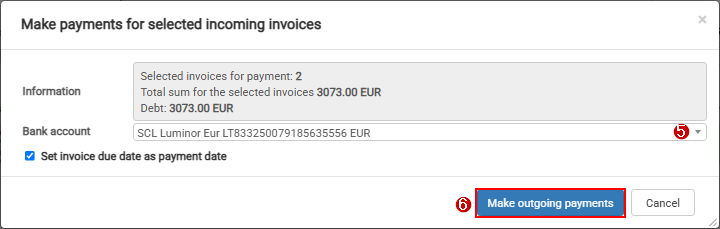
5. In the Make outgoing payments for selected incoming invoices window, select the bank account from which the payments will be made.
6, Click Make outgoing payments.
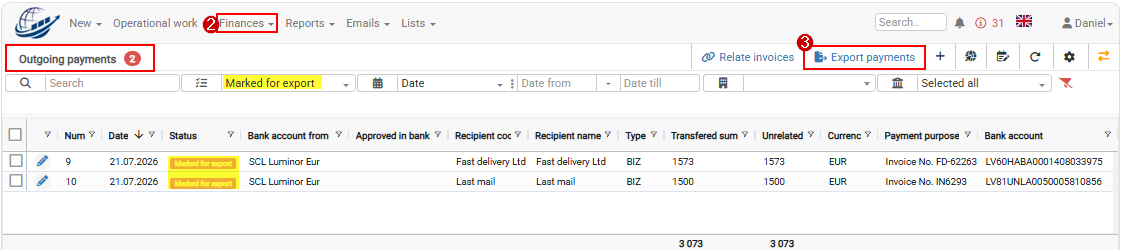
The created payments can be found under: Finances → Outgoing payments
By default, newly created payments are prepared for bank export and have the status Marked for export.
2. How to export payments to the Internet bank?
-
Open Finances → Outgoing payments.
-
Review the payments that have the status Marked for export.
-
Click Export payments
 in the toolbar.

Cloudex TMS will create the bank payment export file for the payments marked for export.
Upload the generated payment file to your Internet bank and complete the payment according to your bank's workflow.
Tips and tricks
How to exclude a payment from bank export?
When an outgoing payment is created from an incoming invoice, the Export to Internetbank checkbox is selected by default.
You may want to clear this checkbox if, for example:
- the invoice has already been paid manually;
- you do not want to include this payment in the next bank export;
- the payment will be processed in another way.
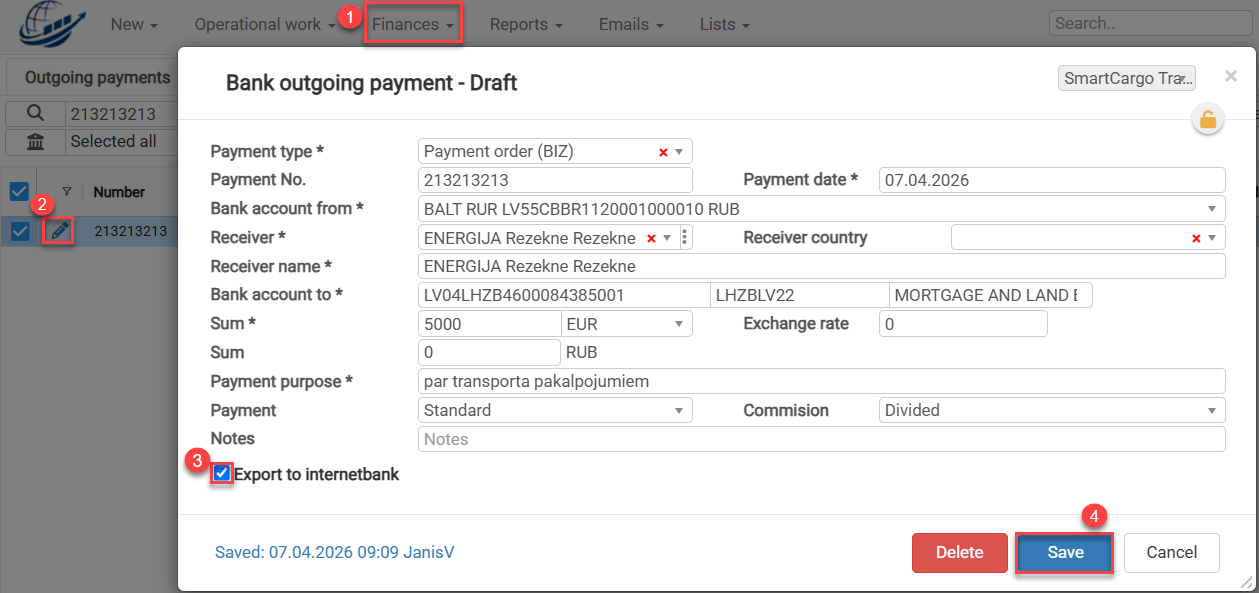
To remove a payment from bank export, go to: Finances → Outgoing payments
- Find the required outgoing payment.
- Click Edit.
- Clear the Export to Internetbank checkbox.
- Click Save.
The outgoing payment will remain in Cloudex TMS, but it will no longer be included in the bank payment export.
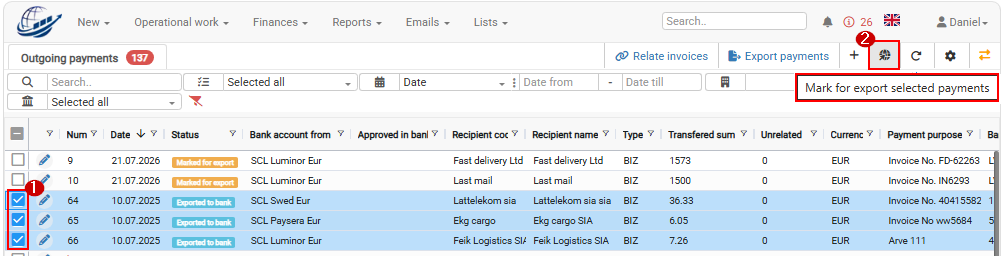
How to mark a payment for export again?
If an outgoing payment should be included in the next bank export:
- Open the outgoing payment.
- Select Export to Internetbank.
- Click Save.
Or see picture below if you want to mark more than one payment for export again
The payment will again be marked for export.
How to review AI-generated Incoming invoices and POD/CMR documents?
Incoming invoices created automatically from emails processed by the Cloudex TMS AI mailbox must be reviewed before they are confirmed.
During the review, check:
- the information read from the supplier invoice;
- whether the invoice is related to the correct Trip/Spedition;
- whether the invoice amounts are correct;
- whether POD/CMR documents are attached to the correct Client order.
When to use
Use this procedure when an Incoming invoice has been automatically created from an email received in your AI incoming-invoice-reading email.
All invoices created by AI that still require user validation can be found under:
Finances → Incoming invoices → Incoming invoices (in review)
How to review an AI-generated Incoming invoice
1. Open the invoice
Go to: Finances → Incoming invoices → Incoming invoices (in review)
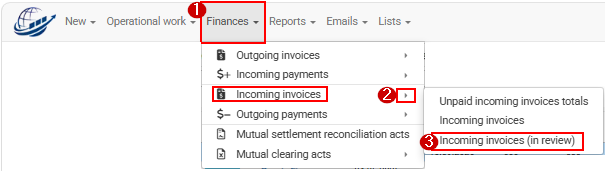
You will see Incoming invoices created by AI that still need to be reviewed.
Open the invoice you want to review.
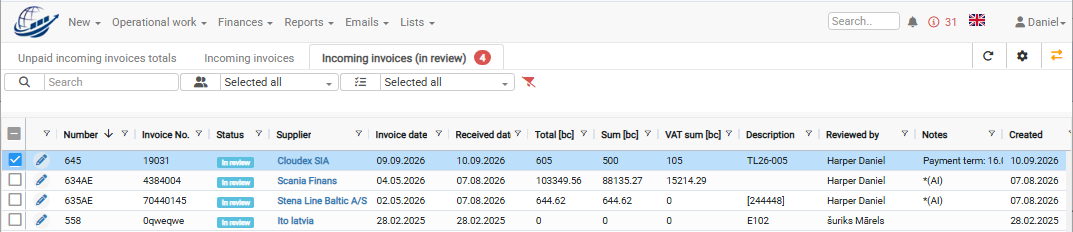
2. Open the invoice attachments
In the upper-right corner of the Incoming invoice, click the Attachments icon.

The attachments received with the original email will be displayed.
Usually, the email contains:
- the supplier's invoice PDF;
- one or more POD/CMR documents related to the shipments included in the invoice.
3. Compare the AI-generated invoice with the original invoice
Select the original invoice attachment.
Cloudex TMS allows you to review the information side by side:
- the Incoming invoice created by AI;
- the original invoice received from the supplier.
Check that the information read by AI is correct.
Pay particular attention to:
- supplier;
- invoice number and date;
- currency;
- invoice amounts and VAT;
- payment information;
- related Trip/Spedition.
Correct any information if necessary.
Important: AI helps automate invoice data entry, but the user is responsible for reviewing the information before confirming the invoice.
Review POD/CMR attachments
After checking the invoice, review the POD/CMR documents received with the email.
The invoice PDF should remain attached to the Incoming invoice.
POD/CMR documents should normally be attached to the corresponding Client order.
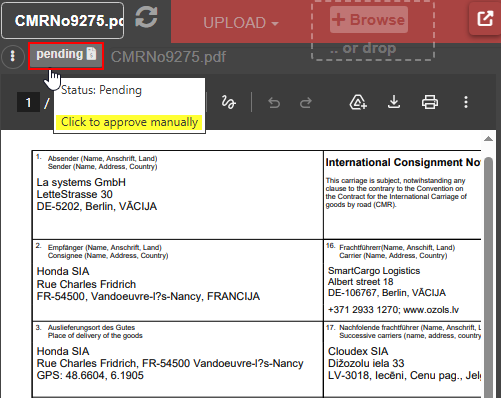
4. Check where the POD/CMR is attached
In the attachment list, check whether the POD/CMR file is shown under:
Incoming invoice or Client order
If the POD/CMR is already attached to the correct Client order, no action is required.
If the POD/CMR is shown under Incoming invoice, Cloudex TMS or AI was not able to determine the correct Client order automatically and the document must be moved manually.
This can happen, for example, when one carrier invoice contains costs for several shipments.
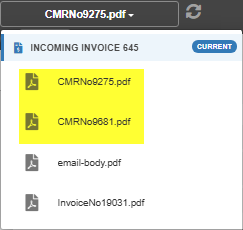
5. Move the POD/CMR to the correct Client order
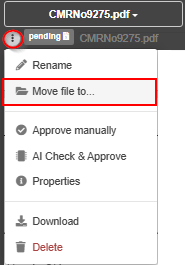
Find the POD/CMR attachment.
Click the three-dot (...) menu next to the file and select: Move file to
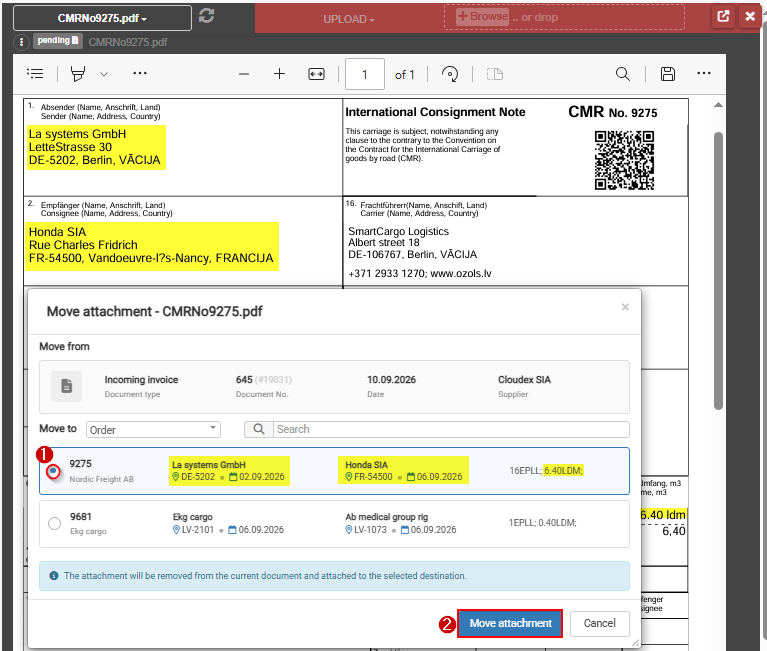
Select the appropriate Client order.
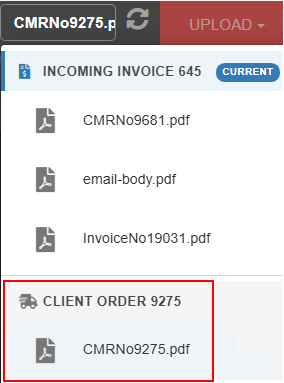
After moving the file, it will be displayed in the attachments list as a Client order attachment.
Important: Make sure you select the correct Client order before moving the document, especially when the Trip/Spedition contains several shipments.
After you move POD/CMR to appropriate Client order in Invoice attachment list it will show as Client order attachment
6. Review and approve the POD/CMR
Open the POD/CMR document and check that it belongs to the selected Client order.
Approve the POD/CMR if the document is correct.
An approved POD/CMR can then be used in the Client order invoicing process and, when automatic invoice sending is configured, can be included with the outgoing invoice.
Confirm the Incoming invoice
After you have:
- checked the invoice information;
- verified the related Trip/Spedition;
- checked the invoice amounts;
- moved POD/CMR documents to the correct Client orders where necessary;
- reviewed and approved the POD/CMR documents;
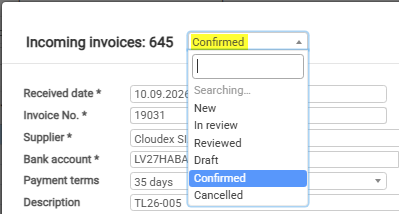
change the Incoming invoice status from:
In review → Confirmed
Click Save.
The AI-generated Incoming invoice has now been reviewed and confirmed.
Related topics
- How to set up an AI mailbox for incoming invoice reading
- How to pay Incoming invoices?
- How to send outgoing invoices automatically
Tips and Tricks
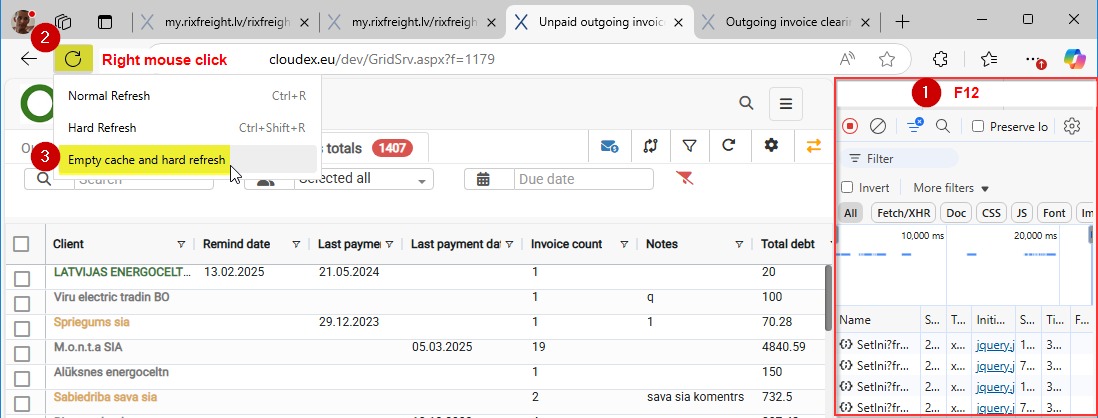
How to clear browser cache and cookies?
Quick cache clearing in Google Chrome:
- Press F12 to open Developer Tools.
- Right-click the Refresh icon (usually located in the upper-left area next to the address bar).
- Select "Empty Cache and Hard Reload".
This method clears the cache only for the current page, which is useful for developers and testing purposes.
Clearing Cache and Cookies for the Entire Browser
- Open the browser menu (the three dots in the upper-right corner).
- Go to Settings > Privacy and Security > Clear Browsing Data.
- Select "Cookies and other site data" and "Cached images and files".,
- Click "Clear Data".
 3
3
How to delete duplicate or unused partners?
Purpose
Use this guide when you need to delete an unused partner or remove a duplicate partner in CLOUDEX TMS.
This article explains:
- when a partner can be deleted immediately;
- when partner data must be moved to another duplicate partner before deletion;
- why the replacement partner must have the same VAT code or registration number;
- what to do if no replacement partner is available in the selection list.
If partner is only used as Sender, Consignee or Loading/Delivery company then open partner and press button Delete
If Partner is used as client/customer, carrier/suppliers then it is possible to delete duplicate partners only if they have the same VAT or Registration numbers.
Open: Lists → Partners → All partners
Use the search field to search by: partner name; VAT code; registration number; ...
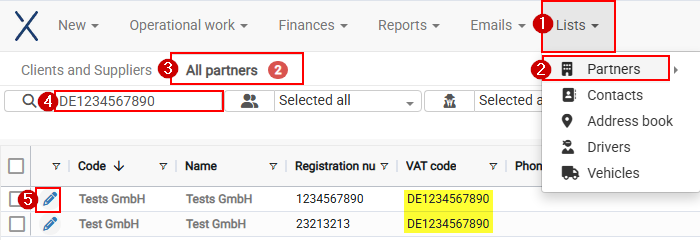
Open one of 2 duplicate partners (5)
Press Delete button
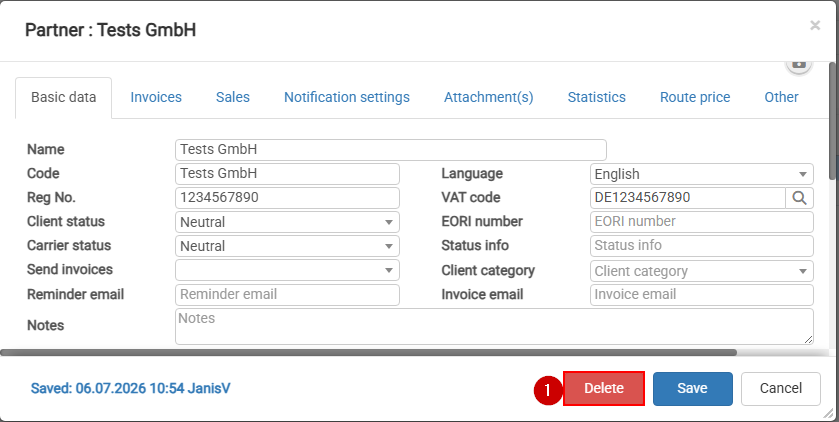
If partner is used in some tables then will appear window where you will be able to choose duplicate Partner with the same VAT or registration number
Select the duplicate partner that will receive the data, then click Replace and delete.
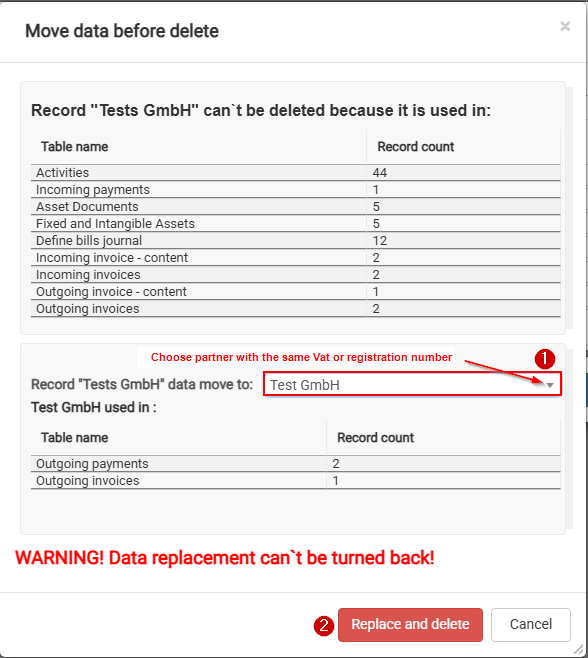
If you can't choose partner to which move data, then first to duplicate Partner enter the same VAT or registration number
After clicking "Replace and delete":
- data from the deleted partner is moved to the selected replacement partner;
- the duplicate partner is deleted;
- historical records remain connected to the correct partner.
How to reset a form table
- Press
 it will open additional settings.
 -
Press
 it will reset table columns to default state.
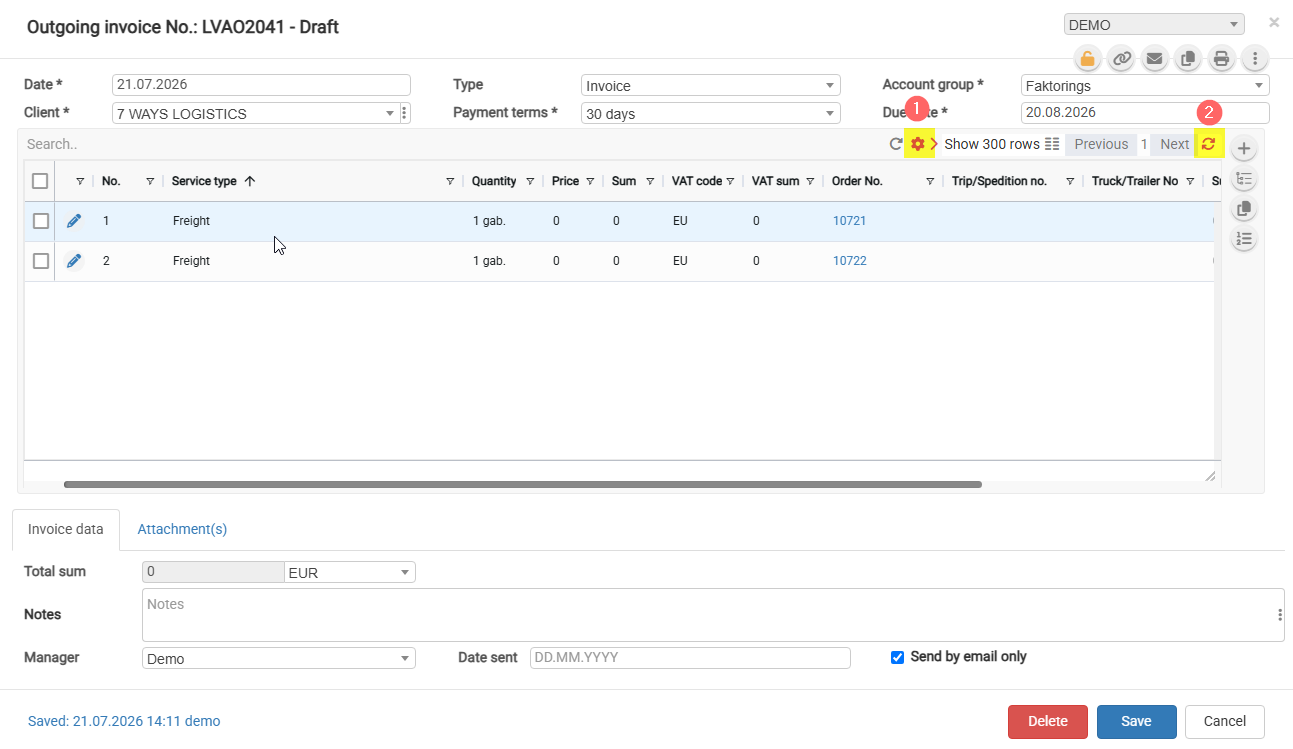
How do I unlock a locked order?
When it is necessary to unlock an order, the following conditions must be met: the user must have the appropriate permissions to do so, and the following steps must be performed: trip must be unlocked, then the order must be saved and reopened. After that, the information in the order can be edited.
-
Click on the trip number to open the Trip/Spedition form.
-
Click the Lock icon to unlock and open the trip.
-
Close and reopen the Order. You can then change the order information.
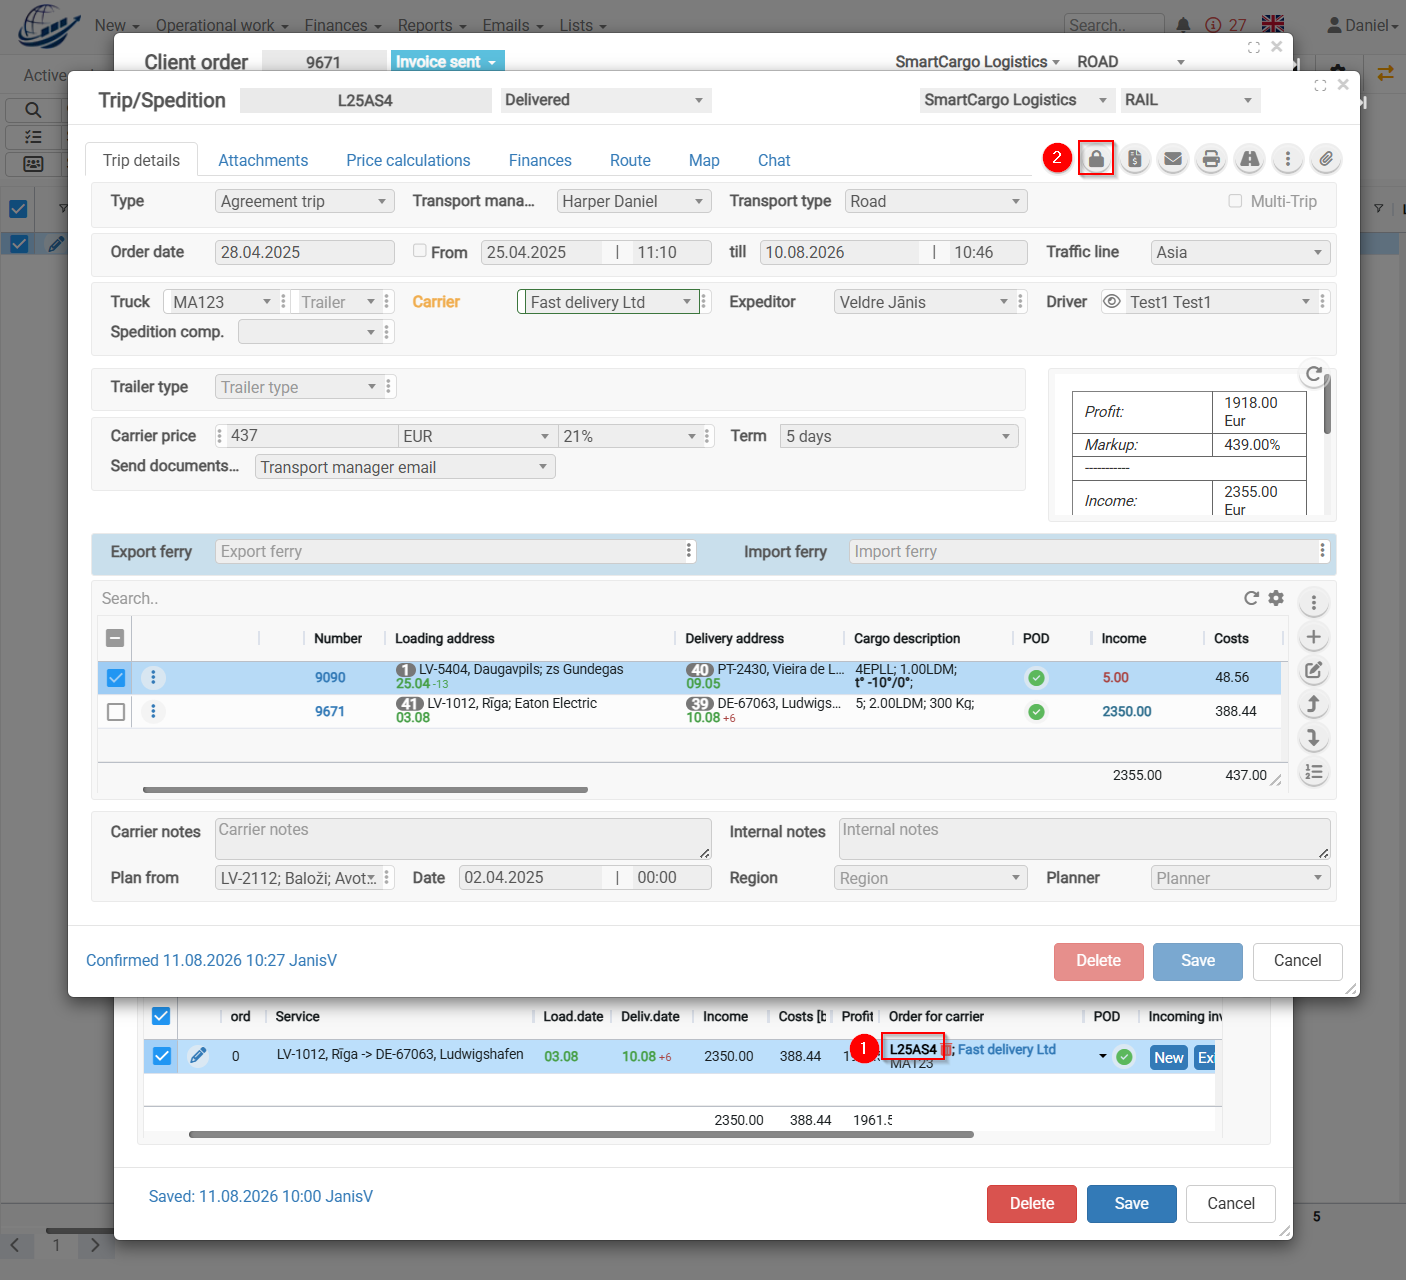
Additional:
There is a configuration option that provides additional security. Once the invoice has been generated, all three locking steps are activated.
To make changes, you need to unlock the invoice, unlock the trip, close and reopen the Order.
How to change the next document number?
Use this function when you need to change the number that Cloudex TMS will assign to the next document you create.
The next number can be changed for different document types, including:
- Outgoing invoices
- Incoming invoices
- Client orders
- Trips / spedition
- Mutual clearing acts
- Other documents
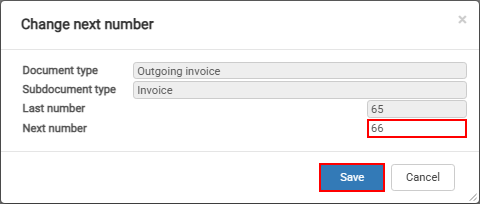
When using Change next number, you change only the sequence number. The configured prefix, suffix, year and month remain unchanged.
Example
Your outgoing invoice format may be: INV-2026-09-0125
where:
- INV- = prefix
- 2026 = year
- 09 = month
- 0125 = sequence number
If you change the next number to 130, the next generated document could be: INV-2026-09-0130
Cloudex TMS applies the configured prefix, year, month and other formatting automatically.
How to change the next number
1. Open a document from the required period
Open an existing document of the same type for which you want to change the numbering.
Important: Open a document with a date from the year and month for which you want to change the next number.
For example, if you want to change the next outgoing invoice number for September 2026, open an outgoing invoice dated September 2026.
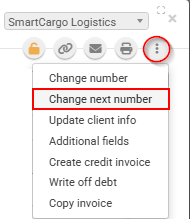
2. Click the three-dot (...) menu in the document toolbar.
3. Select Change next number
4. Enter the required sequence number only.
Important
Be careful when changing document numbering, especially for invoices and other accounting documents.
Before changing the number, make sure that:
- you have selected the correct document type;
- you have opened a document from the correct year and month;