Incoming Invoices (Creditors)
- How to register an Incoming Invoice?
- How to apply a discount (Skonto) to an incoming invoice?
- How to find carrier orders or trips for which an incoming invoice has not been received?
- How to pay Incoming invoices?
- How to review AI-generated Incoming invoices and POD/CMR documents?
How to register an Incoming Invoice?
To register a single invoice for multiple trips at once, you can do so in one of the following ways:
- How to register an Invoice from the Trip Form?
- How to Register an Invoice from the Open Trips window?
How to register an Invoice from the Trip Form?
- Open the Trip.
- Click the "Register Invoice" button.
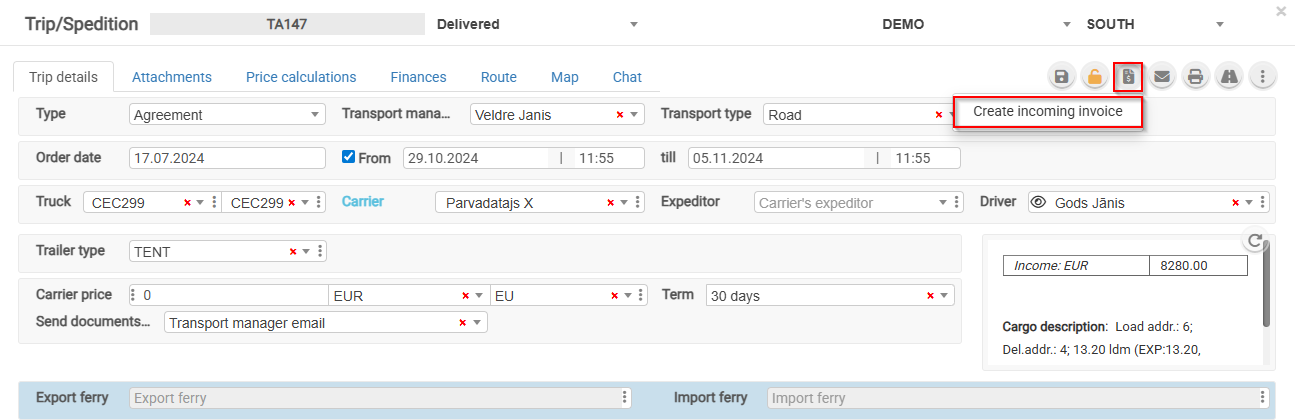
For an unconfirmed invoice, it is possible to add other customer orders.
How to Register an Invoice from the Open Trips window?
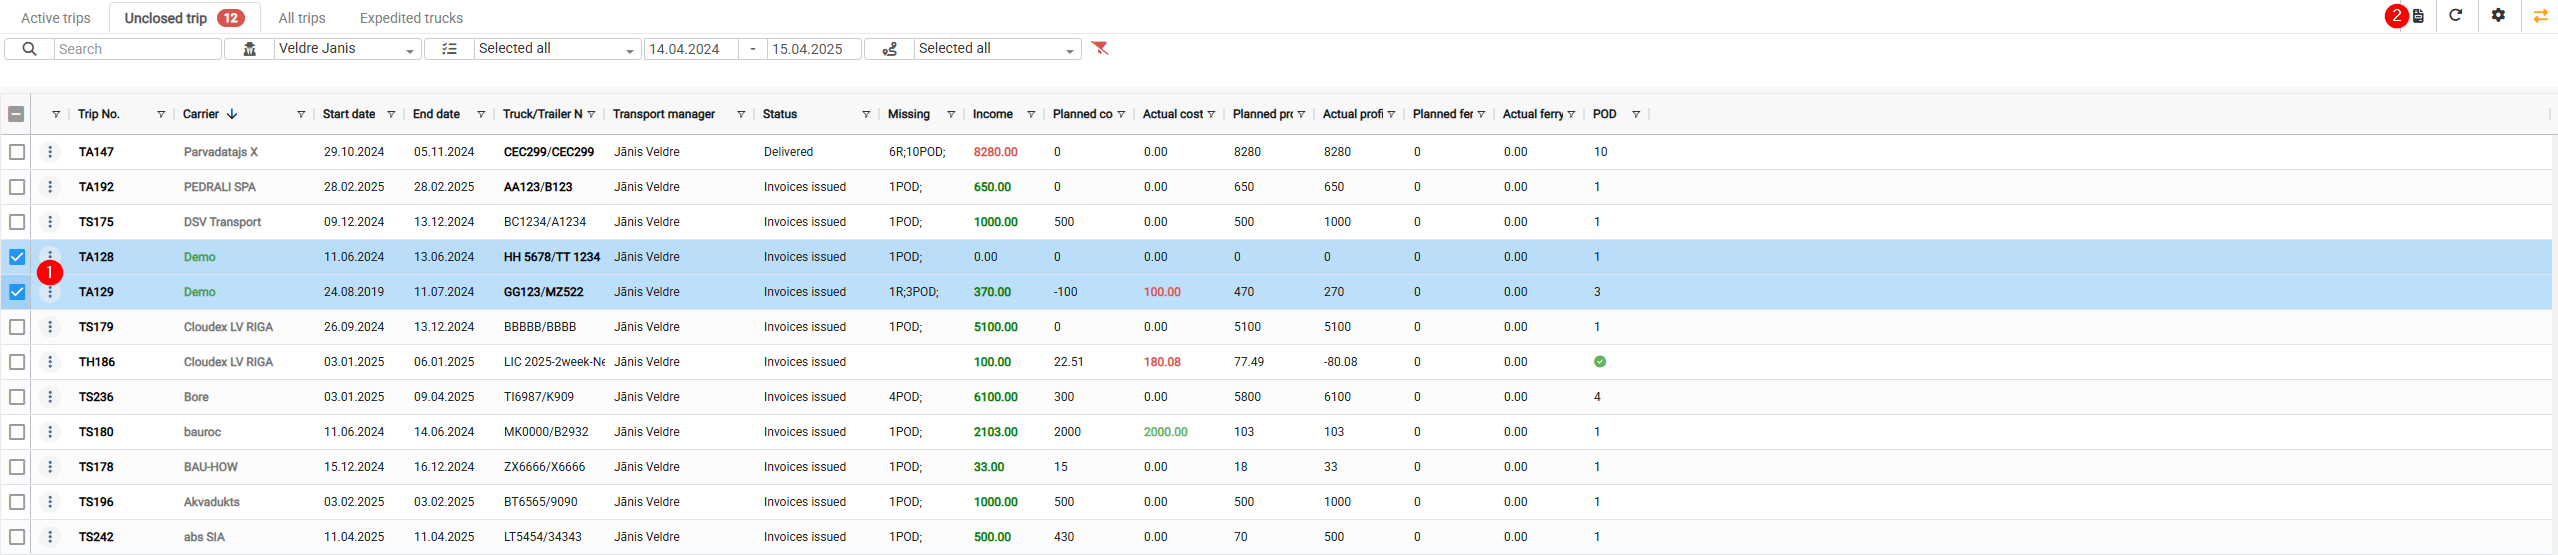
- Select the trips for which you want to register an incoming invoice.
- Click the invoice registration icon

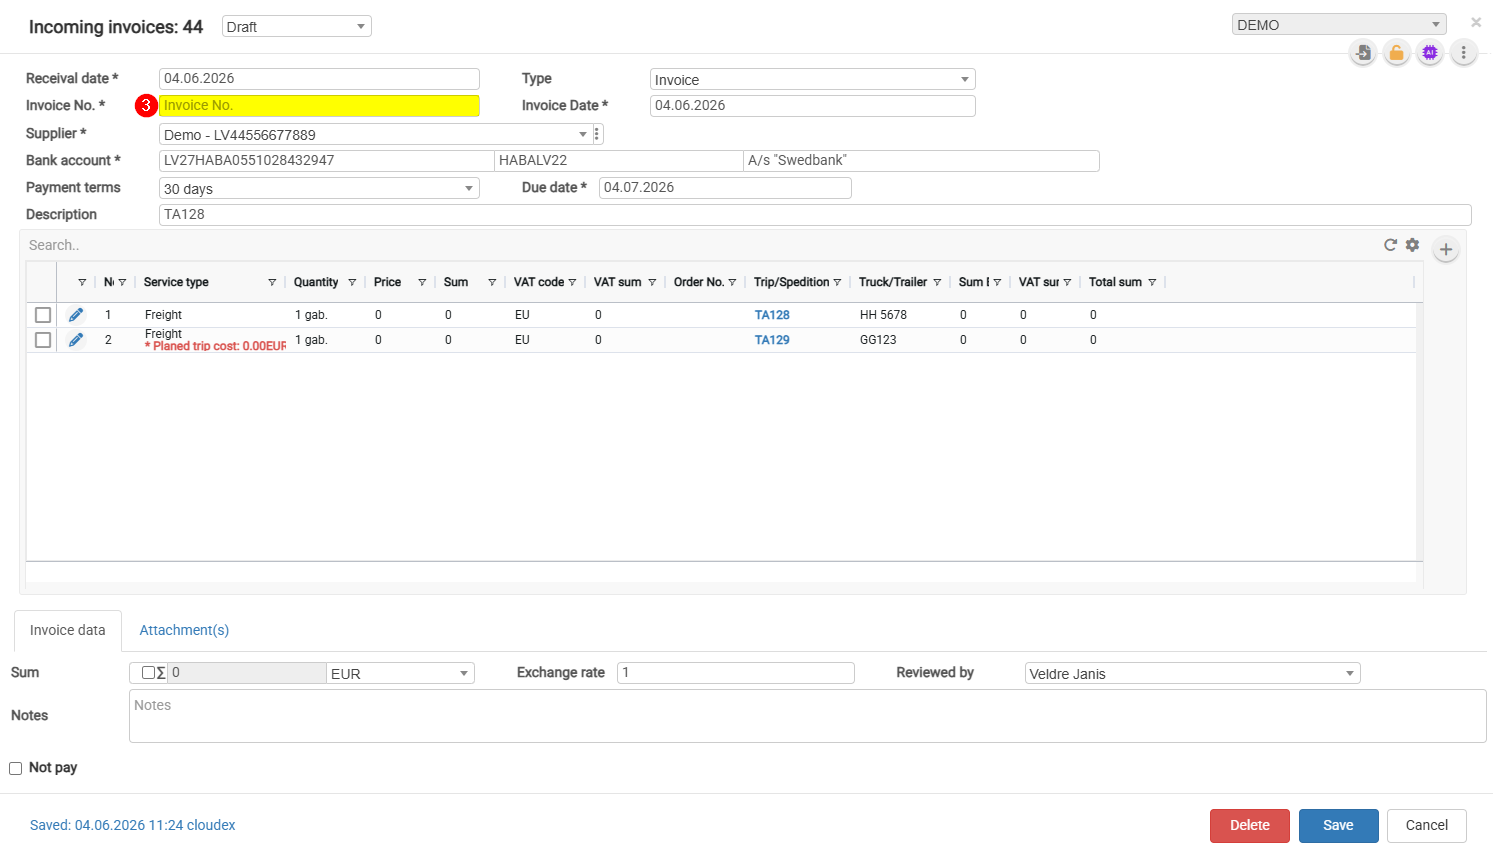
- Complete the required fields and click Save.

How to apply a discount (Skonto) to an incoming invoice?
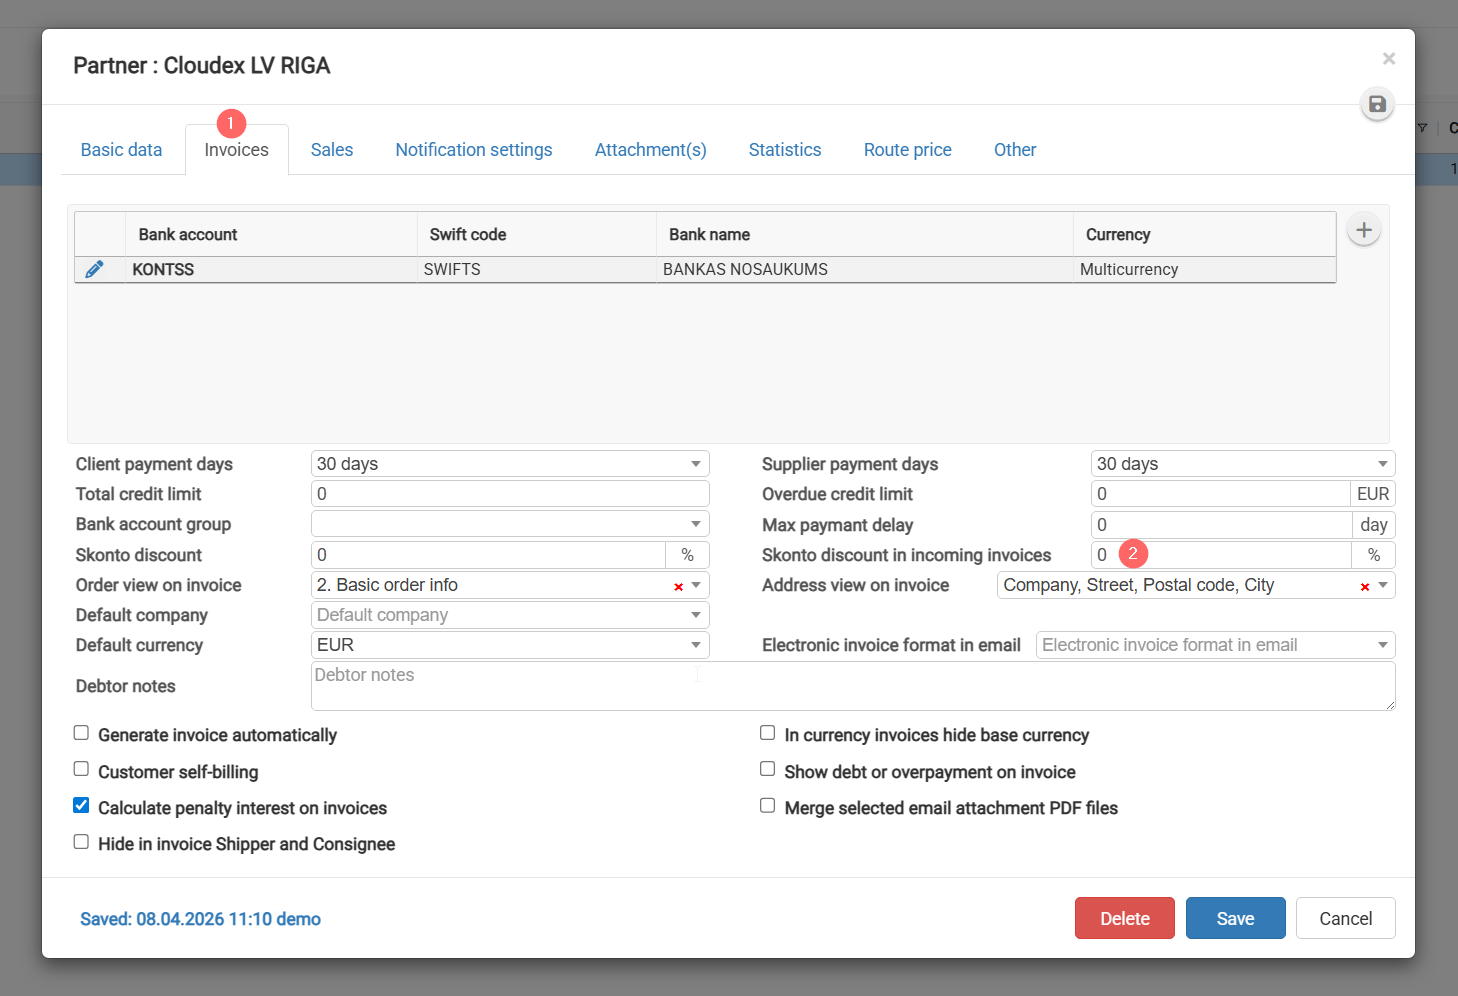
1. In the Partner List, find the relevant partner.
2. Open the "Settlements" section and enter the discount.
How to find carrier orders or trips for which an incoming invoice has not been received?
How to pay Incoming invoices?
- 1. How to prepare payments for incoming invoices?
- 2. How to export payments to the Internet bank?
- Tips ans tricks
How to pay incoming invoices?
Use this function when you want to prepare payments for supplier or carrier invoices registered in Cloudex TMS.
The payment process consists of two steps:
- Create Outgoing payments from the incoming invoices.
- Export the prepared payments to your Internet bank.
Important: Creating an outgoing payment in Cloudex TMS does not transfer money from your bank account. The payment must still be exported to the Internet bank and processed there.
1. How to prepare payments for incoming invoices?
-
Open Finances → Incoming invoices.
-
In the Payment term filter, select the date up to which invoices should be paid.
Cloudex TMS will show incoming invoices with a payment due date up to the selected date.
-
Select the invoices you want to pay using the checkboxes.
-
Click Make outgoing payments in the toolbar.
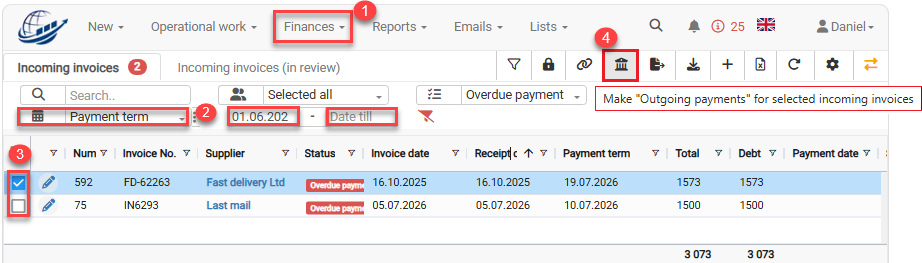
5. In the Make outgoing payments for selected incoming invoices window, select the bank account from which the payments will be made.
6, Click Make outgoing payments.
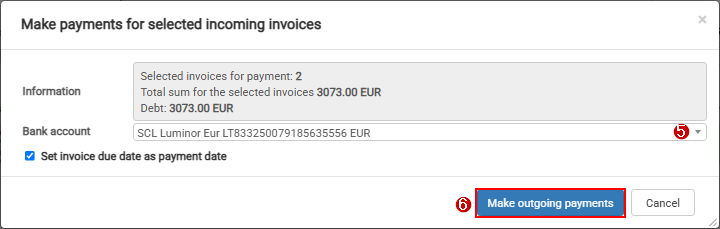
The created payments can be found under: Finances → Outgoing payments
By default, newly created payments are prepared for bank export and have the status Marked for export.
2. How to export payments to the Internet bank?
-
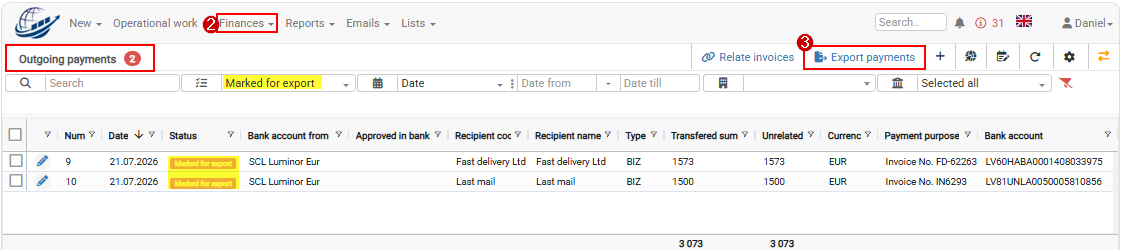
Open Finances → Outgoing payments.
-
Review the payments that have the status Marked for export.
-
Click Export payments
 in the toolbar.

Cloudex TMS will create the bank payment export file for the payments marked for export.
Upload the generated payment file to your Internet bank and complete the payment according to your bank's workflow.
Tips and tricks
How to exclude a payment from bank export?
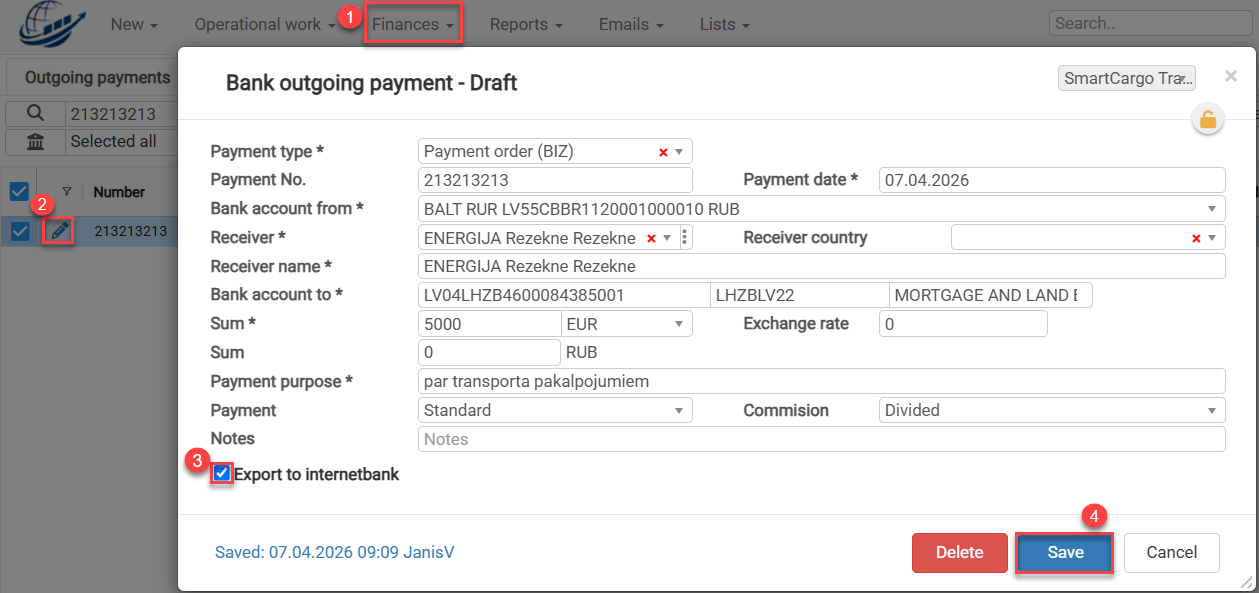
When an outgoing payment is created from an incoming invoice, the Export to Internetbank checkbox is selected by default.
You may want to clear this checkbox if, for example:
- the invoice has already been paid manually;
- you do not want to include this payment in the next bank export;
- the payment will be processed in another way.
To remove a payment from bank export, go to: Finances → Outgoing payments
- Find the required outgoing payment.
- Click Edit.
- Clear the Export to Internetbank checkbox.
- Click Save.
The outgoing payment will remain in Cloudex TMS, but it will no longer be included in the bank payment export.
How to mark a payment for export again?
If an outgoing payment should be included in the next bank export:
- Open the outgoing payment.
- Select Export to Internetbank.
- Click Save.
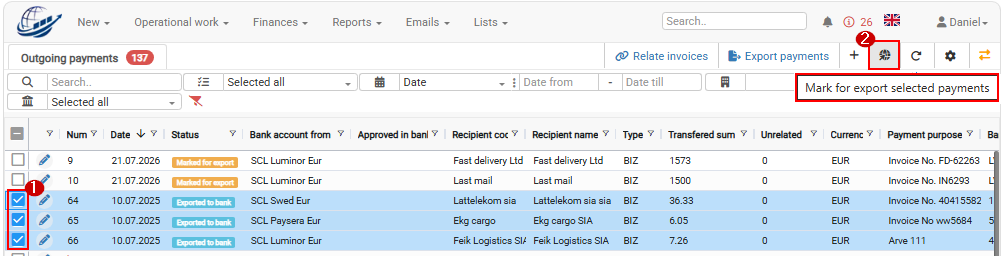
Or see picture below if you want to mark more than one payment for export again
The payment will again be marked for export.
How to review AI-generated Incoming invoices and POD/CMR documents?
Incoming invoices created automatically from emails processed by the Cloudex TMS AI mailbox must be reviewed before they are confirmed.
During the review, check:
- the information read from the supplier invoice;
- whether the invoice is related to the correct Trip/Spedition;
- whether the invoice amounts are correct;
- whether POD/CMR documents are attached to the correct Client order.
When to use
Use this procedure when an Incoming invoice has been automatically created from an email received in your AI incoming-invoice-reading email.
All invoices created by AI that still require user validation can be found under:
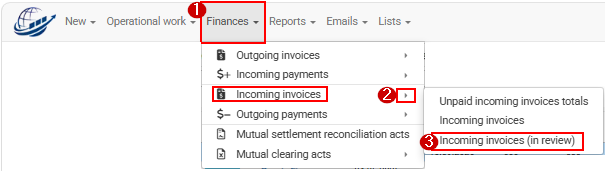
Finances → Incoming invoices → Incoming invoices (in review)
How to review an AI-generated Incoming invoice
1. Open the invoice
Go to: Finances → Incoming invoices → Incoming invoices (in review)
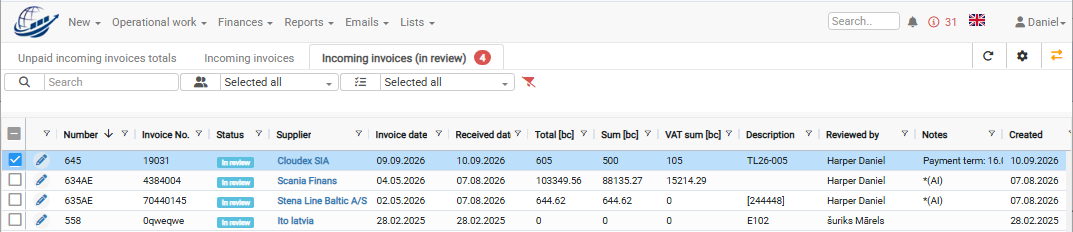
You will see Incoming invoices created by AI that still need to be reviewed.
Open the invoice you want to review.
2. Open the invoice attachments
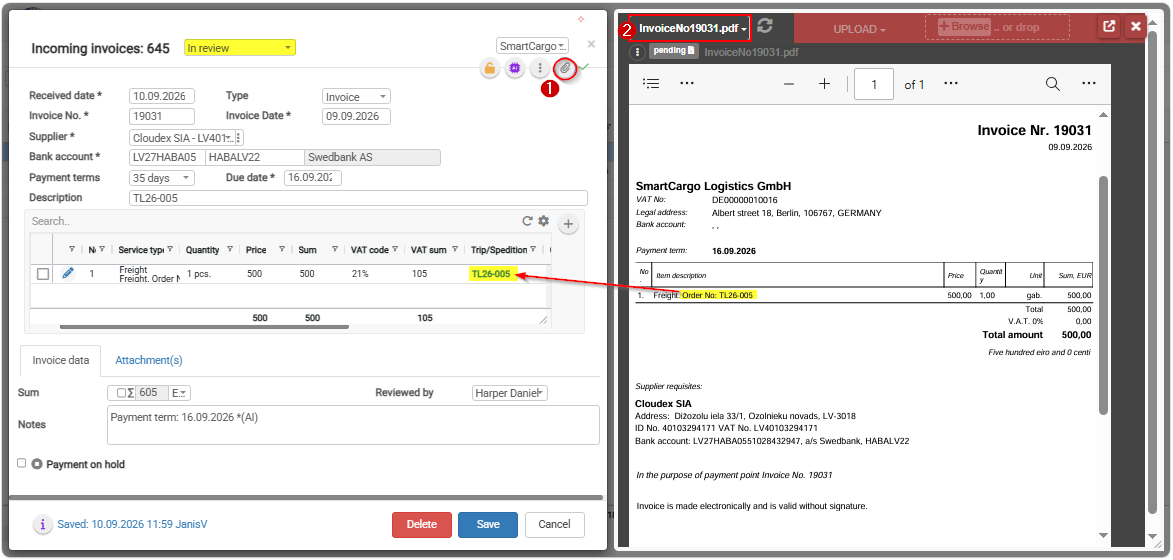
In the upper-right corner of the Incoming invoice, click the Attachments icon.

The attachments received with the original email will be displayed.
Usually, the email contains:
- the supplier's invoice PDF;
- one or more POD/CMR documents related to the shipments included in the invoice.
3. Compare the AI-generated invoice with the original invoice
Select the original invoice attachment.
Cloudex TMS allows you to review the information side by side:
- the Incoming invoice created by AI;
- the original invoice received from the supplier.
Check that the information read by AI is correct.
Pay particular attention to:
- supplier;
- invoice number and date;
- currency;
- invoice amounts and VAT;
- payment information;
- related Trip/Spedition.
Correct any information if necessary.
Important: AI helps automate invoice data entry, but the user is responsible for reviewing the information before confirming the invoice.
Review POD/CMR attachments
After checking the invoice, review the POD/CMR documents received with the email.
The invoice PDF should remain attached to the Incoming invoice.
POD/CMR documents should normally be attached to the corresponding Client order.
4. Check where the POD/CMR is attached
In the attachment list, check whether the POD/CMR file is shown under:
Incoming invoice or Client order
If the POD/CMR is already attached to the correct Client order, no action is required.
If the POD/CMR is shown under Incoming invoice, Cloudex TMS or AI was not able to determine the correct Client order automatically and the document must be moved manually.
This can happen, for example, when one carrier invoice contains costs for several shipments.
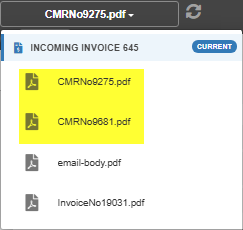
5. Move the POD/CMR to the correct Client order
Find the POD/CMR attachment.
Click the three-dot (...) menu next to the file and select: Move file to
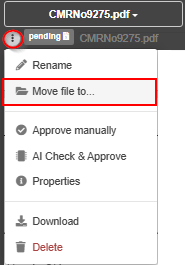
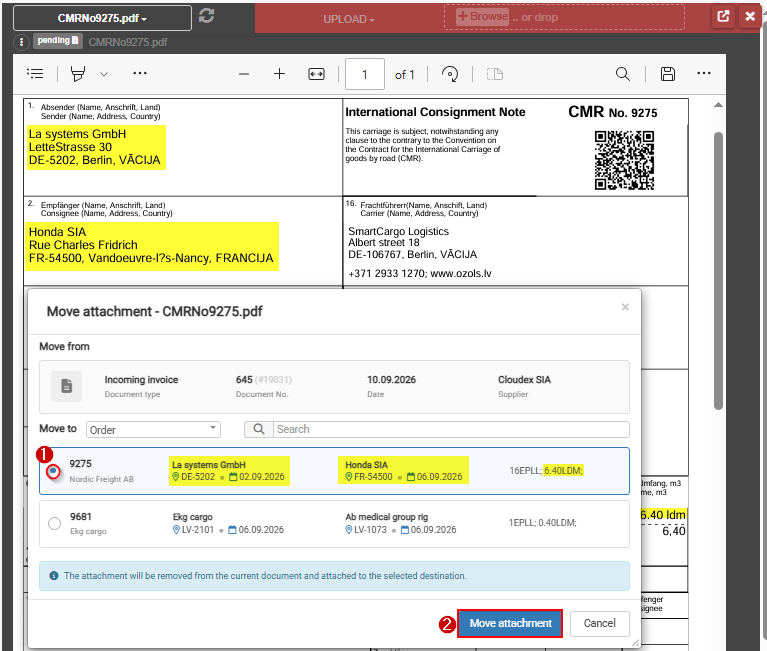
Select the appropriate Client order.
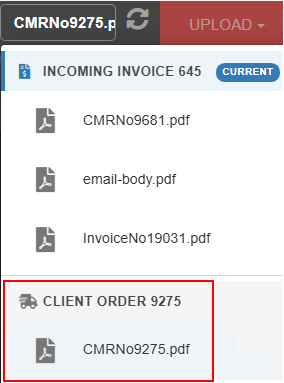
After moving the file, it will be displayed in the attachments list as a Client order attachment.
Important: Make sure you select the correct Client order before moving the document, especially when the Trip/Spedition contains several shipments.
After you move POD/CMR to appropriate Client order in Invoice attachment list it will show as Client order attachment
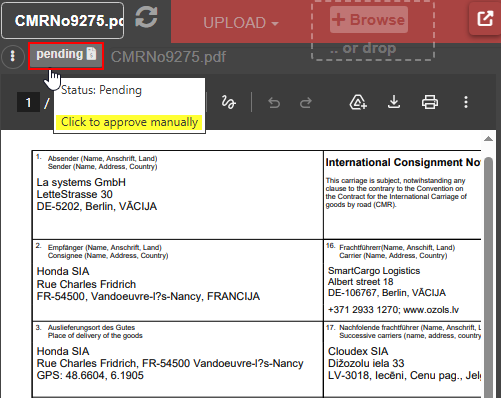
6. Review and approve the POD/CMR
Open the POD/CMR document and check that it belongs to the selected Client order.
Approve the POD/CMR if the document is correct.
An approved POD/CMR can then be used in the Client order invoicing process and, when automatic invoice sending is configured, can be included with the outgoing invoice.
Confirm the Incoming invoice
After you have:
- checked the invoice information;
- verified the related Trip/Spedition;
- checked the invoice amounts;
- moved POD/CMR documents to the correct Client orders where necessary;
- reviewed and approved the POD/CMR documents;
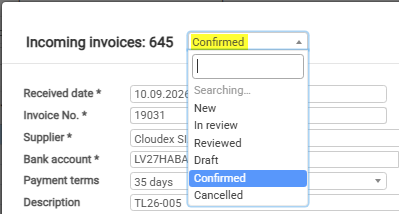
change the Incoming invoice status from:
In review → Confirmed
Click Save.
The AI-generated Incoming invoice has now been reviewed and confirmed.
Related topics
- How to set up an AI mailbox for incoming invoice reading
- How to pay Incoming invoices?
- How to send outgoing invoices automatically