
How to change the next document number?
Use this function when you need to change the number that Cloudex TMS will assign to the next document you create.
The next number can be changed for different document types, including:
- Outgoing invoices
- Incoming invoices
- Client orders
- Trips / spedition
- Mutual clearing acts
- Other documents
How to change the next number
1. Open a document from the required period
Open an existing document of the same type for which you want to change the numbering.
Important: Open a document with a date from the year and month for which you want to change the next number.
For example, if you want to change the next outgoing invoice number for September 2026, open an outgoing invoice dated September 2026.
2. Open the additional actions menu
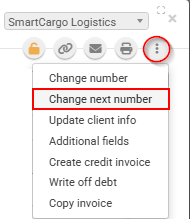
In the document toolbar, click the three-dot (...) menu.
3. Select Change next number
Click: Change next number
4. Enter the required next number
Enter the number that should be used for the next document and confirm the change.
The next document created for the corresponding document type and period will use the new numbering sequence.
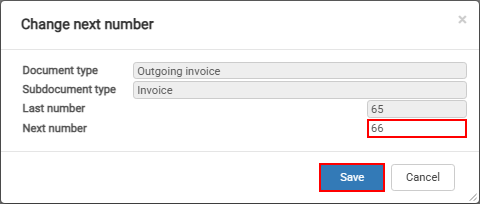
Example
If the next outgoing invoice should be: INV-2026-0095
open an outgoing invoice from the required year/month, select Change next number, and enter the required next number: 95
The next outgoing invoice will then continue from the updated numbering sequence.
Important
Be careful when changing document numbering, especially for invoices and other accounting documents.
Before changing the number, make sure that:
- you have selected the correct document type;
- you have opened a document from the correct year and month;